

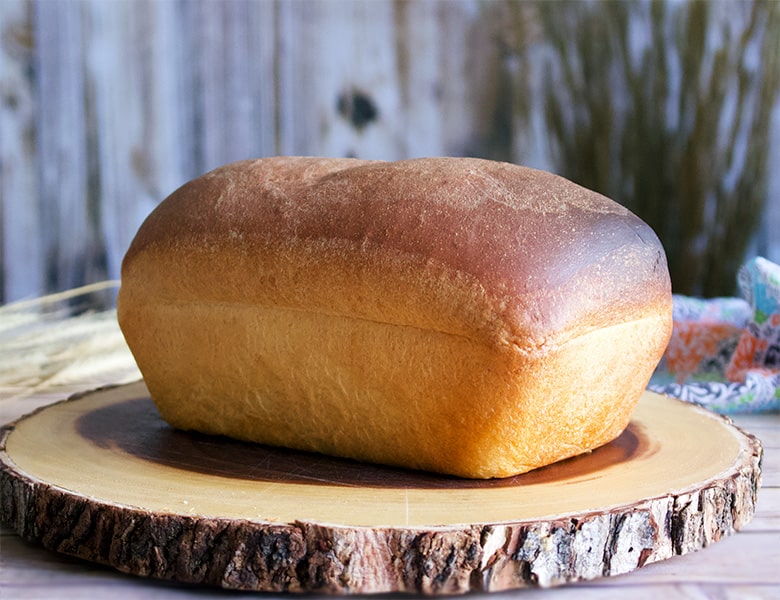
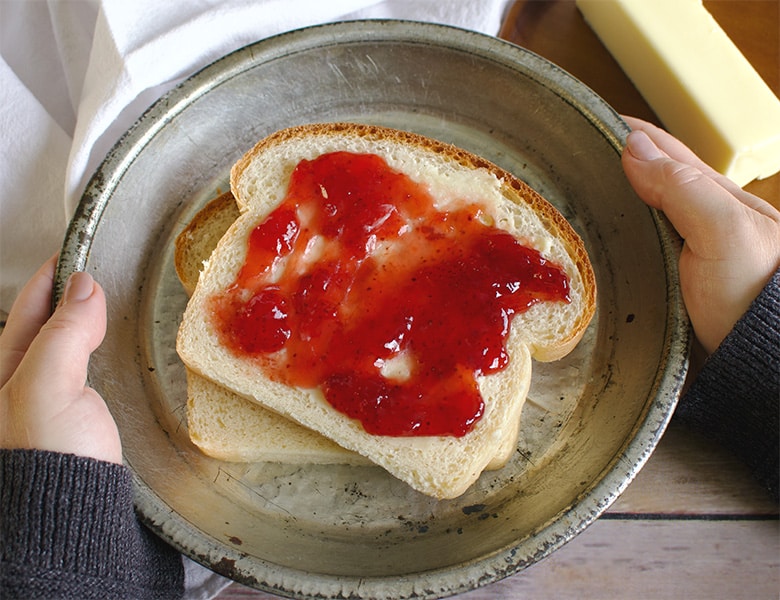
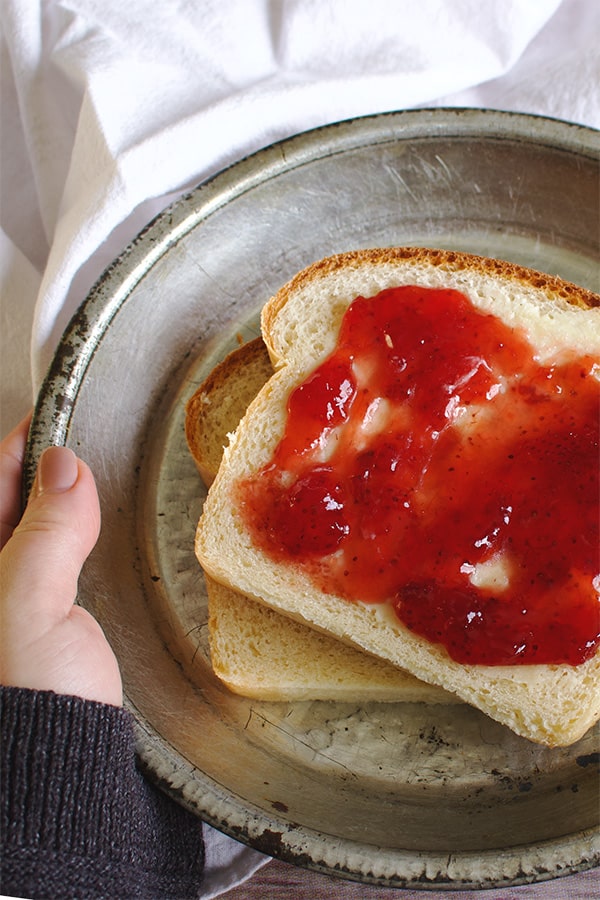
Guess what? You could be eating a thick slice of buttery homemade bread in about 3 hours. Even better, only about 20 minutes of that time is hands-on. This homemade white bread recipe has been a staple in my house for over 20 years because it's quick, simple, fail-proof, and deliciously satisfying like only homemade bread can be.
Years ago, when our kids were little and the budget was tight, I decided to plant a vegetable garden. My initial interest in doing so was economic. I figured that a few packets of seeds and seedlings could provide a healthy, savvy solution to our super-restricted grocery budget.
This proved to be true. That vegetable garden fed our little family well for the few years we had it. What I didn't anticipate was the enormous satisfaction I felt from walking out into the garden on a warm summer evening and picking things for my family's dinner that I had grown myself.
This is how I feel about homemade bread.
Baking your own bread is economical and delicious. But, it's also enormously satisfying. It is one of the most effortless ways I know to feel like a domestic goddess.
The simple extravagance of homemade bread
I make at least one batch of homemade bread every single week, which means that homemade bread is completely commonplace around my house. And yet, like magic, it never looses its novelty. We comment on how good it smells while it's baking. We hover around warm loaves, wondering if they are cool enough to slice.
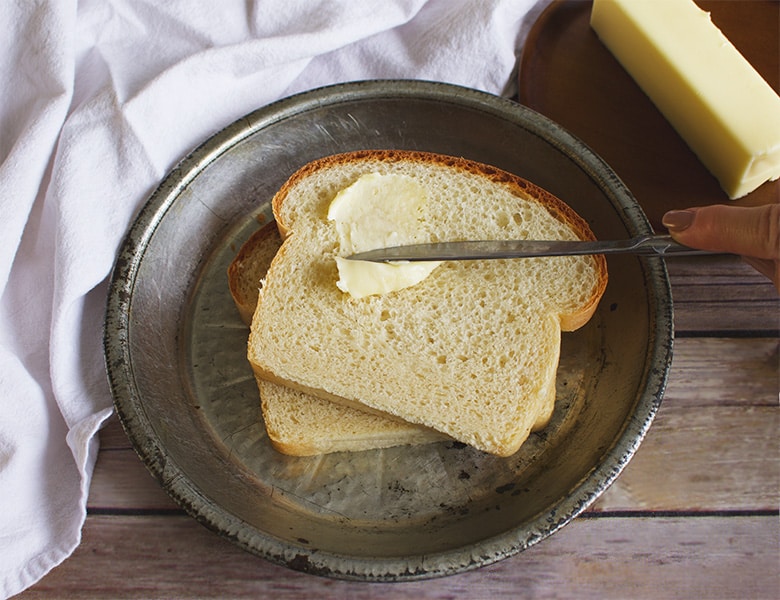
Homemade bread is always welcome, always delicious, and always a treat. Comfort food at it's finest.
I can cook dinner guests a gourmet feast of complicated, expensive dishes and you know what they can't get enough of? The homemade bread.
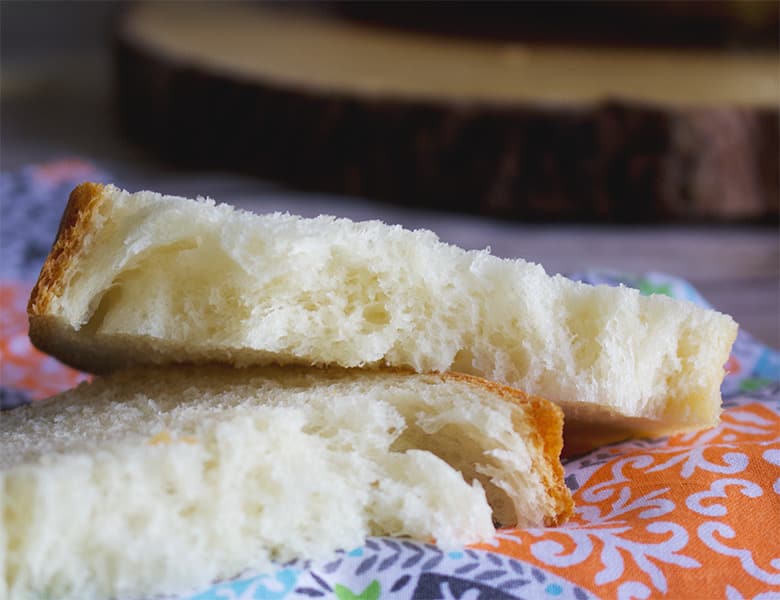
All of us love and appreciate homemade bread. But, few of us actually bake it. Perhaps this is partly because many don't realize how easy it is. The majority of the bread making process is hands-off. Mix the dough and let it sit. Shape the loaves and let them rise. Put the loaves in the oven and let them bake.
If you're making bread by hand, the most involved part of the process is the kneading, which will only take you 10 minutes or so. (Kneading dough is also a great way to get out any pent up frustrations. I recently received a sweatshirt that says, "I bake because punching people is frowned upon." There are days when a truer statement has not been uttered.)
How to knead bread cough
I made homemade bread before I owned a standing mixer. But, I started making it weekly after receiving one. It just makes the process so incredibly easy. Dump the ingredients in the bowl and let the mixer do all the work of kneading them into bread dough.
You can even force the dough to rise in accordance with your schedule. For this homemade white bread recipe, there are two blocks of time during which the dough is left alone to rise. If you allow the dough to rise at room temperature, each rise will take between45 minutes and an hour and a half.
However, if you place the dough in the refrigerator to rise, you can slow the whole process down. Use this as needed to make bread baking fit your schedule. Mix up a batch of dough and let it rise in the refrigerator all day if you wish.
Another way to make bread baking suit your schedule is to punch it down after the first rise and let it rise again before shaping it into loaves and baking it. This will, in fact, make your homemade white bread loaves even more delicious because it's during the rise time (also called "proofing") that the bread's flavor is developed.
One reason why you might not want to bake homemade bread...
I recently read an article about a woman in Rhode Island who is literally the town baker. It's the kind of town where such a thing can still exist. Every week she bakes wholesome, hand crafted gorgeous loaves of bread, which she then delivers around town, stocking local shelves with the kind of happiness that only comes from a fresh loaf of homemade bread.
If you live in that Rhode Island town, buy that woman's bread. Otherwise, it's time to start baking.
More favorite homemade bread recipes:
- Simple Homemade Whole Wheat Bread
- Homemade Cinnamon Bread
- Buttery Homemade Dinner Rolls
- Homemade Flour Tortillas
- Simple Homemade Pizza Dough
- Soft, Buttery Potato Rolls
- Homemade Cinnamon Rolls {Overnight Recipe}
- Homemade Overnight Caramel Rolls
- Homemade Hamburger and Hot Dog Buns
- Simple Cream Biscuits
- Chocolate Almond Babka
The other kind of bread I make on the regular is sourdough bread. I mostly follow this recipe and method from Tartine Bakery and it’s absolutely delicious. I also highly recommend the Tartine Bread Book.
This sourdough bread for beginners tutorial is also a good resource for beginner bakers.
And, if you're looking for a delicious way to use up leftover bread, try this french bread casserole, a super easy breakfast casserole that you can prepare the night before and then just pop it in the oven in the morning.
This White Bread is a Building Block Recipe
Building block recipes are tried-and-true recipes that I consider foundational to great home baking. They are the kind of recipes I come back to over and over again, sometimes baking them as is, but often using them as a jumping off point to create something new. > Scroll through all Building Block recipes.
If you give this recipe a try, let me know! Leave a comment, rate it, or take a picture and tag it #ofbatteranddough on Instagram.
Happy baking!
📖 Recipe

Simple Homemade White Bread Recipe
This simple, fail-proof homemade white bread recipe turns sandwich suppers, a humble bowl of soup, or a simple piece of toast into a whole new treat.
Ingredients
- 2 ½ cups whole or 2% milk (warmed slightly, to between 80-100 degrees Fahrenheit)
- 1 tablespoon active dry yeast
- 2 tablespoon granulated sugar
- 4 tablespoon (½ stick or 2 oz.) butter, melted and cooled to at room temperature
- 6 cups (approximately) all-purpose flour (Can also use bread flour)
- 1 tablespoon salt
Instructions
- Add the milk, yeast and sugar to the bowl of a standing mixer and whisk with a fork to blend. Let the mixture rest for about 5 minutes, until the yeast is activated and looks creamy. Whisk in the melted butter.
- Fit the mixer with the dough hook and add 4 cups of flour to the milk and yeast mixture. Turn the mixer to low (speed level 2 on a KitchenAid mixer) and beat to start to bring the dough together. As the dough beats, slowly add enough remaining flour to bring the dough together into a soft, smooth dough. The dough should clean the sides of the bowl, but still stick slightly to the bottom. (*See note.)
- With the mixer continuing to knead the dough, slowly sprinkle in the salt. Once the salt is incorporated, let the mixer continue to knead the dough for another 5 minutes, until the dough is elastic, smooth and soft.
- Spray a bowl large enough to hold double the amount of dough with non-stick spray, or coat it with a bit of melted butter. Remove the dough from the mixing bowl, shape it into a ball, and plop it down into the greased bowl. Spray a sheet of plastic wrap with non-stick spray, or brush it with a bit of melted butter, and use it to cover the bowl.
- Let the dough rest at room temperature until it has doubled in size. Depending on the temperature of the room, this will take between 45 min, and 1 ½ hours. (*See note below about controling the temperature of the dough.)
- Spray two 8 ½ by 4 ½ inch loaf pans with non-stick spray, or coat with a bit of melted butter. Dump the dough out onto a clean work surface and divide into two pieces. Lift one piece of dough and form it into a ball by using your thumbs to gently stretching the outside of the dough into a ball, pinching the dough together at the bottom. Bring the opposite sides together and pinch together at the bottom. Lay the ball of dough on your work surface, and roll it back and forth a few times to create an oblong ball. Lay the dough, seam side down, into one of the loaf pans. Repeat with the other half of dough.
- Spray two sheets of plastic wrap with non-stick spray, or brush them with a bit of melted butter and loosely cover each loaf.
- Allow the loaves to rise at room temperature until they double in size again, rising over the tops of the pans, 45 minutes - 1 ½ hours.
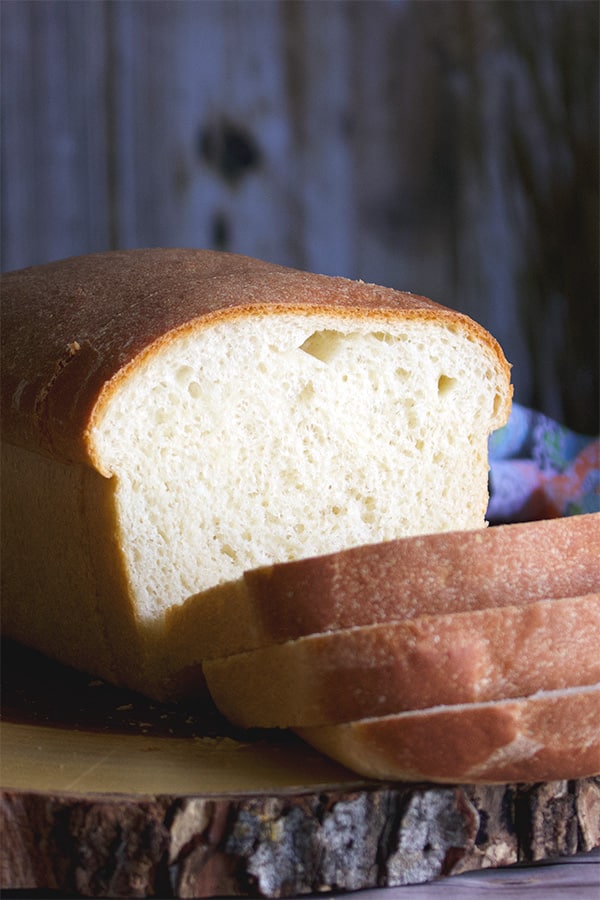
- While the loaves rise, preheat your oven to 375 degrees. When the loaves are fully risen, bake for 35-45 minutes, until they are golden brown and an instant read thermometer plunged into the center of one of the loaves registers between 190 - 200 degrees.
- Remove from the oven and use a dish towel to grip the top of each loaf to lift it from the pan onto a wire rack. Allow to cool completely.
- Once cool, the loaves can be wrapped in plastic and stored for 2-3 days at room temperature. For longer storage, wrap the bread airtight and freeze for up to 1 month. Thaw at room temperature, still wrapped.
Notes
If you add too much flour and your dough is dry and tough, just add in more milk, teaspoon by teaspoon until the dough is wet enough to stick ever so slightly to the bottom of the bowl.
controlling the temperature of the dough as it rises:
My husband and I are full time travelers, living and working in a 5th wheel RV as we travel the country. Because I am always baking in different locations, I nearly always use a Bread Proofer. Using a proofer is fantastic because if offers you total control over the temperature of the dough as it rises. For this dough I usually set the temperature of the proofer to 84 or 85 degrees and it comes out perfectly every single time.
- The proofer I use is this collapsable one from Brod and Taylor.
- I wrote a review of the Brod and Taylor proofer. You'll find that here.
You can also use your oven as a bread proofer: Fill a bowl or a pan with boiling water and place it in the bottrom of the oven. Set the dough inside the oven and shut the door. The boiling watter will create a warm, humid environment that supports the development of the dough. Refresh the boiling water as necissary to keep the inside of the oven nice and warm.
One reader left a comment about making this dough in her bread machine.
For anyone else who wants to try it, here's what she said: "I actually dumped all ingredients in my bread machine. Had it mix and kneaded it. Then once it formed a smooth ball I pulled out and gave it one last knead by hand and placed in oil bowl to proof. After it doubled I did the stretch and pull to the center routine a few times, then rolled to a rectangle then rolled up to size to fit in my bread pan. Let it proof and it baked up perfectly."
Recommended Products
As an Amazon Associate and member of other affiliate programs, I earn from qualifying purchases.


Nutrition Information:
Yield: 20 Serving Size: 1 sliceAmount Per Serving: Calories: 159Total Fat: 1gSaturated Fat: 0gTrans Fat: 0gUnsaturated Fat: 0gCholesterol: 2mgSodium: 364mgCarbohydrates: 32gFiber: 1gSugar: 3gProtein: 5g


Kim says
Hello! I tried this recipe as a last shot of ever being able to make my own bread. I've been trying and failing off and on for 42 years. To make bread was one of my goals for 2023. I read your recipe thoroughly and gave it a try. I realized by following your very detailed recipe--two things that I'd never done right. One was kneading the appropriate time and the other waiting until the yeast was creamy. I think most of my failures were due to the yeast being killed or never activated and some due to not kneading long enough. I was so overwhelmed with happiness as I watched the dough double in size, and then shaped the loaves and watched them rise and bake to a golden brown. My husband and I just stood in our kitchen in shock as he cut a slice of it and we saw how perfect it looked inside. The taste...out of this world. I've now made 4 loaves since the end of December and they've all turned out. Thank you so much for posting this very detailed recipe. I would have never ever realized my dream and goal of making my own bread without it.
Rebecca Blackwell says
Kim! Your words just made my whole day! I am so happy that this recipe worked out well for you and so happy that you gave homemade bread another try! I think the experience of giving up on homemade bread when it isn't working out well is a common one and it's such a shame because the reward of eating bread you've baked yourself is one of the greatest pleasures. Your words have added so much happiness to my day. Thank you so much for taking the time to write! If I may, the next bread baking project I would recommend are these dinner rolls. It will give you the chance to work with an enriched dough (butter, milk, and eggs) and that one recipe as a jumping off point to make so many other things like cinnamon rolls! Please let me know if you ever have any questions! Happy baking!
Maira says
Hi! Do i need s dutch oven or a bowl of water at the bottom of the oven? Most recipes call for either of the 2 but I don't see it in your directions.
Rebecca Blackwell says
Hi Maria! There's no need to add a bowl of water to your oven or bake the bread inside a Dutch oven for these loaves. Baking bread in a humid environment is important when baking crusty loaves. The humidity gives French baguettes or sourdough bread its characteristically crispy exterior. This white bread recipe is created to give you soft, sliceable loaves so increasing the humidity inside your oven while they bake isn't necessary. I hope that helps! Please let me know if you have any other questions! xo
Dianne says
I made this bread today. easy to make and has a great taste. I will be trying more of your recipes because of good directions makes it easy.
Rebecca Blackwell says
Hi Dianne! I am so happy to hear that you liked this recipe and that you will be trying more of the recipes here! Please let me know if you ever have any questions about any of them. Thank you so much for taking the time to leave a comment for me. I truly appreciate it! xo
Danish says
Hi. Can I use half the ingredients for a smaller loaf?
And cook all of it in a bread machine ? Thanks.
Rebecca Blackwell says
Hi there! Yes to both questions. 🙂 I've never baked this bread in a bread machine myself, but have heard from a couple of readers that they have and have had success. So, as long as you understand your bread machine, I see no reason why that wouldn't work. Please let me know if you have any other questions! And, I'd love to hear how your bread comes out! xo
Nisha says
This is the best bread recipe I tried ever and it came out good even first time. Now everyone in the family wants this not store bought at all. Can we use the same recipe with wheat flour too?
Rebecca Blackwell says
I'm so happy to hear that you and your family like this recipe Nisha! Baking with whole wheat flour can be tricky because whole wheat flour absorbs more liquid than white flour and produces a stiffer dough that doesn't rise as well. I think you could substitute half of the white flour in this recipe for whole wheat flour and be fine. The loaves won't rise quite as high, but they should still rise and produce delicious loaves. You can also try this recipe for Simple Whole Wheat Bread. It's just as simple to make as this white bread recipe and is one of my family's favorites! Please let me know if you have any other questions! And thank you for taking the time to leave a comment for me. I truly appreciate it! xo
Nisha Yadav says
Thank you so much! I tried the whole wheat bread recipe too, came out good.
Rebecca Blackwell says
I'm so happy to hear that Nisha! Thank you so much for taking the time to let me know! xo
Stef says
Hi Rebecca,
Could you say how much gram (or oz) the 6 cups of APF wheighs?
(and if possible: Could you convert all the other meaurements to grams (or oz)?
Much appreciated!
Thanks and warm regards,
Stef
Rebecca Blackwell says
Hi Stef! Here you go...
600 grams whole or 2% milk (warmed slightly, to between 80–100 degrees Fahrenheit)
9.3 grams active dry yeast
25 grans granulated sugar
56.5 grams of butter, melted and cooled to at room temperature
750 grams (approximately) unbleached all-purpose flour (or bread flour)
Rachael says
Easy to make and so delicious! I plaited it and added an egg wash to a loaf, making the other a traditional loaf. Both tasted great and the whole family loved them!
Rebecca Blackwell says
Hi Rachael! I am so happy to hear that you and your family liked this recipe! Since you liked this recipe, you'd probably also like this one for Dinner Rolls. Just like these white bread loaves, I've been baking these dinner rolls for more than 20 years and never get tired of them: https://ofbatteranddough.com/homemade-dinner-rolls/
Thank you so much for taking the time to leave a comment. It truly means a lot to me! xo
Donna says
Couldn't this recipe be reduced by 1/4 and be completely made and baked by my Zojirushi?
Rebecca Blackwell says
Hi Donna! I've never used a Zojirushi, so I'm not sure. But, if you've successfully made other breads using it, this one should work too. If you try it, would you let me know how it comes out for you? Thank you!
Maggie says
Do you have a suggestion for how to make this gluten free? Can I simply sub in cup-4-cup gf multipurpose flour?
Thanks!
Rebecca Blackwell says
Hi Maggie! Unfortunately, you really can't substitute gluten free flour for all purpose flour in most bread recipes. Often, this works out well in cakes and cookies and other baked goods that are meant to have a tender crumb. But, in bread, the gluten provides the majority of the structure, so taking it out will cause the loaves to be flat, dry and hard. I know there are a lot of recipes out there for gluten free bread. Some are probably better than others, so some experimenting will likely be necessary. But, you'd be better off starting with a recipe that was created specifically as a gluten free bread recipe. If you find a good one, will you let me know? I'm sure there are other readers who would be interested. Thank you! xo
Lorelei says
OMG this was the best white bread recipe I have found. It was super easy. I actually dumped all ingredients in my bread machine. Had it mix and kneaded it. Then once it formed a smooth ball I pulled out and gave it one last knead by hand and placed in oil bowl to proof. After it doubled I did the stretch and pull to the center routine a few times, then rolled to a rectangle then rolled up to size to fit in my bread pan. Let it proof and it baked up perfectly. So soft and fluffy. Hubby made a pb&j sandwich as soon as it was cool. I highly recommend this recipe is too easy and I am not a bread maker.
Rebecca Blackwell says
Hi Lorelei! Thank you so much for taking the time to leave a comment for me! I am so happy to know that this recipe worked well in your bread machine. I'm going to add a note in the recipe with your instructions for other bead machine owners. It's super useful information! Thank you, thank you! FYI - since you liked this recipe, I think you'd also like this one for Dinner Rolls. Along with this white bread recipe, I've been making those rolls for years and we always love them. xo
Jami says
First time making bread...ever...and it turned out beautiful! Thank you such detailed instructions.
Rebecca Blackwell says
I am so happy to hear this Jami! Thank you so much for taking the time to leave a comment for me. It means more to me than I can say. As an aside, if you liked this recipe, I think you'd also like this Dinner Roll Recipe. I've been making it almost as long as I've been making this white bread recipe and we aren't tired of it yet. 🙂 Please let me know if you ever have any questions or concerns. Happy baking! xo
Kristina says
I just made this yesterday and it turned out great! This will be my go to Bread recipe for sure. My kids couldn't get enough of it!
Rebecca Blackwell says
Hi Kristina! I am so happy to hear this! I've been baking with this same recipe for years and we still can't get enough. 🙂 FYI - if you like this recipe, you'll probably also like this one for Dinner Rolls. It's another favorite recipe that I've been making for years. Plus, the same dough can be used to make all sorts of different things, like cinnamon rolls and cinnamon bread. Thank you SO MUCH for taking the time to leave a comment for me! It means more to me than I can express! xo
Donnalene says
This recipe produced beautiful bread and rolls. I split it to make one large perfect loaf and 9 delisous dinner rolls in an 8x8 pan. Thank you thank you.
Rebecca Blackwell says
I am so happy to hear that you liked this recipe! Thank you so much for taking the time to leave a comment for me. I appreciate it more than I can express. I also wanted to share another recipe with you - I've been using the same recipe to make dinner rolls for at least 20 years and thought you might like it as well. You'll find it here: https://ofbatteranddough.com/homemade-dinner-rolls/
Happy Baking! xo
Juanita says
I LOVE this recipe. It was my first time making bread from scratch and it was divine! 2 questions, how can I keep the bread moist if I am storing it for longer than 2 days? I put it in the fridge and it really dried out. 2- can you make rolls with this recipe too? Thanks for posting this!
Rebecca Blackwell says
Hi Juanita! I am so happy that you like this recipe! To answer your questions - it's best to store the bread at room temperature. I usually wrap it in plastic wrap or put it in a ziplock bag. It will keep at room temperature for several days. Usually after a couple of days we toast it, but I've had it remain toast-worthy for as long as 5 days. Storing bread in the refrigerator will keep it from spoiling, but as you already discovered, it also dries it out.
You could make rolls from this recipe, but I would recommend using a different recipe - My favorite Dinner Rolls. I've been baking rolls with that dinner roll recipe for over 20 years and they are soooooo good. You'll also see a list of other recipes right before the recipe card that use the same dough to make cinnamon rolls, cinnamon bread, caramel rolls, doughnuts, and apple fritters. It's a really versatile dough!
Finally, one more recipe you might like is this Whole Wheat Bread recipe. Just like this white bread recipe, it doesn't take long to make and, if you like whole wheat bread, is just as satisfying.
Welcome to bread baking! If you ever have any other questions, please let me know! xo
Sayde says
It turned out AMAZING. My 11 year old son decided he wanted to make it and did it all his self. It was the best 2 loaves of bread that has come out of my oven in years. Thank you so much for sharing this recipe. Its definitely going in the recipe box!
Rebecca Blackwell says
I am so happy to hear this Sayde! Tell your son "Good job!" for me. Also, I think it's wonderful that you are instilling a love for baking in your son. When my son got his first apartment at the age of 19, the first thing he asked for was a standing mixer so that he could make homemade bread and tortillas. It was one of my proudest moments. 🙂 Speaking of which, if your son wants another rewarding baking project, Homemade Tortillas are super fun to make (and so delicious!). Another thing I used to bake with my kids all the time is homemade pizza, with homemade pizza dough. Thank you so much for taking the time to let me know how your bread came out. I appreciate it more than I can express. xo
Sayde says
I'm super excited to try this recipe. I love making homemade bread but want to try a recipe that works great with a stand mixer. I aure hope this is the one! It's easier for me to make bread than it is to buy it because I have a soy allergy and its super hard to find bread that doesn't have soy in it.
Rebecca Blackwell says
I'm super excited for you to try this recipe too Sayde!!! I've been baking bread with this exact same recipe for over 20 years, and it's still a treat. There is simply nothing better than homemade bread. Please let me know if you have any questions along the way. And, I would LOVE it if you'd let me know what you think of this recipe after you bake it. xo
Ronda says
This is it!
I'm always looking for the perfect white bread recipe. One that turns out soft and yummy... This is it! This will be my "go to" bread recipe from here on out. I used half all purpose flour and half bread flour. I followed the recipe exactly and it's perfect!
Thank you!
Rebecca Blackwell says
I am SO happy to hear this Ronda! I've been using this same recipe to bake bread for over 20 years and I still feel like it's a treat. There's just nothing better than homemade bread. Thank you so very much for taking the time to leave a comment for me to let me know you enjoyed this recipe as well. I cannot express how much that means to me. BTW - I've also been using this Dinner Roll Recipe for over 20 years, and think you might like it too. xoxo
Mindy Davis says
I started out going well but then it didnt rise at all 🙁 I hope it rises more the second round.
Rebecca Blackwell says
Hi Mindy! What a bummer that the dough didn't rise for you. If I may, there might be a couple of causes... when you added the milk to the yeast, did the yeast get foamy? If not, it means that the yeast was no longer active and that's probably the issue. If it did get foamy, there are a couple of other things that could have happened. If at any point in the process, the dough gets too warm, it will kill the yeast. So, if the milk was at (or above) 120 degrees, that could have killed the yeast. Or, if the dough was rising in a particularly warm place, like inside a too warm oven, that could also do it. Do you think any of these issues might have been the problem?
mary schaffrath says
Finally!!!!! a bread recipe that is everything it claims to be!!!
This is the 4th recipe I have tried!
This was easy & delicious & light & fluffy!
I was worried as I only had evaporated milk - but I added water to the 12 oz can to bring it to 2 1/2 cups and it obviously worked- cause these loaves are virtually perfect!
Thank you soo much!!
oh & ps I used some the time I had waiting for the dough to rise to take a look at your other blog-A Little and A Lot. So beautiful! Can't wait to try some of those recipes!!!
Rebecca Blackwell says
I am so happy to hear that this recipe worked for you Mary!!! Please let me know if you ever have any questions or concerns about any recipe you see on either site. I can't wait to hear what you think of whatever else you decide to make! Also - thank you so much for taking the time to leave a comment for me. It means more than I can express. xo
Carla Wagner says
I have been baking my own bread for 40 years. And baked professionally for nearly a dozen of those years. Few things in life give me as much satisfaction. Fragrant,crackly loaves. Soft buttery buns. Brioche. Ciabatta. Levain. Never a dull day baking!
Rebecca Blackwell says
Yeeeeesssss! I understand completely. There is nothing better than fresh baked bread. 🙂
Carla Wagner says
A good basic recipe for every day or for someone starting out in this most satisfying of tasks. After you get this one in your apron pocket you can go on to many more! How sweet the house smells on bake day!
Rebecca Blackwell says
Hi Carla! The smell of freshly baked bread is truly one of the best things in the whole world, isn't it? This recipe was one of the first I used when I started making bread and even though I've made many different kinds of loaves over the years, I still come back to it. 🙂 Thank you so much for taking the time to leave a comment for me and a high rating for this recipe! It means more to me than I can express. xo
Lisa says
Hey!Thanks for the recipe。Just wanted to know if i can substitute water for the milk。Thanks!
Rebecca Blackwell says
Yes - you can use water instead of milk, although the milk does help to make the texture of the bread softer and richer tasting. To make up for it, I'd suggest increasing the amount of butter to 5 tablespoons. The bit of extra fat in the dough should keep the texture of the bread nice and soft. Please let me know if you have any other questions! And, I'd love to hear what you think of this bread after you make it. xo
Lisa says
Thanks,I'll probably give it a try tomorrow and let you know what i think :)
Lisa says
Thanks!I'll probably give it a try tomorrow and let you know what i think :)
Megan says
Can the recipe be cut in half to one loaf. If so which ingredients should be cut, if not all?
Rebecca Blackwell says
Hi Megan! Yes - you can cut this recipe in half. The only caution I have is that if you have a large stand mixer (larger than 4 quarts), it might take a bit longer for the dough hook to grab the ingredients and bring them together into a dough. Stop the mixer and scrape down the sides of the bowl if you need to from time to time. Smaller mixers shouldn't have this issue. And, of course, if you're kneading the dough by hand this won't be an issue at all. Keep all the ingredients, just cut their amounts in half. So, you'll need 1 1/4 cup milk, 2 tsp yeast, 1 tbsp sugar, 2 tbsp butter, 3 cups of flour (star with 2 and add only as much of the third cup as you need), and 2 tsp of salt.
Please let me know if you have any more questions! Happy baking! xo
Stephen says
I am a new baker who had never baked homemade bread, but I decided to give it a go and am so happy that I did. It was much easier than I thought it would be and the taste and texture is so superior to store bought bread that I can tell you I'll be making this over and over and over again. Thank you for inspiring me to try! I'm going to try your homemade dinner rolls next.
Rebecca Blackwell says
I am so happy to hear this Stephen! I felt exactly the same way the first time I made a loaf of homemade bread. That was close to 25 years ago, and it's still just as much of a treat now as it was then. I can't wait to hear what you think of my dinner roll recipe! You chose a good one for your next bread baking project - the rolls are just as easy to make as this white bread recipe. Also, the dough is very versatile. You'll see in the post, right before the recipe, a list of other things you can make with the dough - cinnamon rolls, caramel rolls, doughnuts, apple fritters... the list goes on and on. Please let me know if you have any questions along the way! Happy Baking! xo
Amanda says
Thank you so much for your story and for this wonderful recipe. I really want to make my own bread and every time I have tried it has been a disaster with wasted ingredients. I found this recipe and gave it a try..... and for the first time ever, I made bread! It was delicious and it came out just like your photos. I'm going to keep trying and hopefully gain some confidence and try other of your recipes too.
Rebecca Blackwell says
I am SO happy to hear this Amanda!!! Homemade bread is the best, isn't it? If I could suggest another bread recipe, this Dinner Roll recipe is my absolute favorite and just as easy as this homemade white bread. I've been making it for years. And, the best thing about it is that once you know how to make it, the same dough can be used to make Cinnamon Rolls, Caramel Rolls, doughnuts, and apple fritters.
Please let me know if you every have any questions! Thank you so, so much for taking the time to leave a comment for me! I truly appreciate it! xo
Stacie says
I am trying to limit my plastic wrap use in an effort to be more environmentally friendly. Is there another option you would recommend?
Rebecca Blackwell says
Hi Stacie! That's fantastic! You can use use anything to cover the dough while it rises as long as it protects the dough from the air so that it doesn't dry out. So... you could put it in a pot or bowl with a lid or cover the pot/ bowl with a baking sheet. You could also use any plastic wrap alternative products. I know there are a few options on the market now, and I'm sure any of them will work. Please let me know if you have any other questions! And, I'd love to hear how your bread comes out! xo
Leslie Crittenden says
The old fashioned way to let the dough rise without covering with plastic wrap is to put the dough in your greased bowl, then flip it over so that both sides are coated. Then cover the bowl with a clean dampened dish towel. I've made my bread this way for many years, taught by my mother in law, who was raised on a farm, cooking on a wood range!
Looking forward to trying this recipe, it's very similar to one I loved years ago and lost track of!
Rebecca Blackwell says
Love that tip Leslie! Thank you so much! I can't imagine what it must have been like to bake bread (probably every day!) with a wood range. Previous generations were tougher than me. 🙂 I can't wait to hear what you think of this recipe! Please, do let me know. xo
Emmajean says
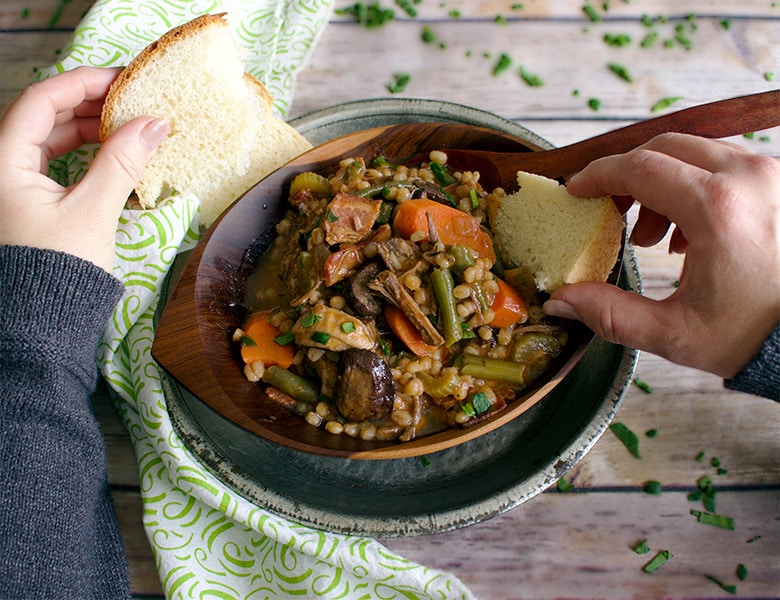
I want to know what is in the stew bowl you are showing I want to make that... Yum!!
Rebecca Blackwell says
Hi! Glad you asked! In the bowl is this recipe Beef and Barley Soup, published on my other blog, A Little and A Lot. It's one of my all time favorite soups and is soooooo delicious with homemade bread. If you make it, I'd love to hear what you think! xo
Kim says
This bread turned out perfect. Followed recipe and it was easy and delicious!
Rebecca Blackwell says
Hi Kim! I am so happy to hear that this bread turned out well for you! Thank you SO much for taking the time to leave a comment letting me know. I truly appreciate it! xo
Bill says
I made this bread in my kitchen oven. It came out perfect. My real goal is to make it in my outdoor, wood fired, brick oven. i wanted to make sure the recipe was right (and it is) before attempting. The difficulty with the wood fired brick oven, as you probably know, is that I cannot simply set the temperature to 375 degrees. I will be trying your pizza dough next. Any chance of helping me get other bread recipes like, Italian and semilnole bread? Thank you.
Rebecca Blackwell says
Hi Bill! I am so envious of your outdoor brick oven! How amazing! I've actually heard from a couple of other people that they've cooked my pizza dough recipe in outdoor brick ovens and that it worked well. So you should be good with that recipe. For more rustic loaves, I actually highly recommend two amazing books - Tartin Bread by Chad Robertson and Sourdough by Sarah Owens.
I've been baking weekly loaves of sourdough for years using those books as guides. I bake in a bread cloche - which I think would work in an outdoor brick oven, but have never tried it personally. I would LOVE to know if it works, though. So, if you try it, will you let me know?
Thank you so much for taking the time to leave me a comment! It's so fun to connect with other bakers! xo
Vickie says
I have been packing to move...could only find one bread (glass) baking pan,hope this is o.k.,as I am using a glass bowl,ovenproof type,for the other loaf...? They're on second rising now....Thankyou!
Rebecca Blackwell says
How did the bread come out for you Vickie? xo
Julie Caridi says
Can I use oil instead of butter and will it turn out just as nice
Rebecca Blackwell says
Hi Julie! Sorry - it's been a few days since you left this comment. I've been traveling, with limited internet. Anyway - oil will work fine, but it won't contribute the flavor that butter does. If I was going to use butter, I'd probably increase both the sugar and salt but just a tiny bit to try and compensate. Will you let me know how your bread comes out? xo
Laura says
Super easy recipe and very tasty. This was my first foray into bread making and I made this with my 4 year old. We decides to hand knead to have more hands on experiance, and it was great!
Thanks for the recipe. We'll definitely make it again.
Rebecca Blackwell says
Hi Laura! I am so happy to hear that you enjoyed this bread! And how fun that you hand kneaded the dough with your 4-year-old! There's something so enjoyable and satisfying about homemade bread, especially when you get your hands in the dough. It's wonderful that you are sharing that experience with your child from such a young age. Thank you so much for taking the time to leave this comment! xo
Dana Snyder says
Very tasty bread. So soft and fluffy. One whole loaf was devoured the first day. Thanks.
Rebecca Blackwell says
I'm so happy to hear that Dana! Thank you so much for taking the time to let me know that you enjoyed this recipe! xo
Dana Snyder says
I'm excited about trying this bread. It's rising as I write this. One clarification, does the recipe really call for 1 tbsp of salt like the ingredients list states? It's more than other similar recipes I've looked at. Thanks 😊
Rebecca Blackwell says
Hi Dana! By now, your bread is probably baked and tasted. 🙂 1 tablespoon of salt is correct. How did it taste to you?
Erin says
I only have dark bread pans. Do I need to adjust the cooking temp or time? Thanks!
Rebecca Blackwell says
Hi Erin! Your bread might bake a bit faster. I would suggest checking it at 30 minutes. Do you have a meat thermometer? That's the best way to make sure that bread is done - plunge it into the center of the loaf (sometimes I dump the loaf out of the pan and do this from the bottom). The bread should register 195 - 200 degrees when it's done. Does that help? Please let me know if you have any other questions! Happy Baking! xo
Rachel says
Beautifull bread and so easy!
Rebecca Blackwell says
I'm so glad to hear that you like this recipe Rachel! Thank you for taking the time to let me know ! xoxo
Meg says
I'm curious as to why in this variant of your bread recipe you use regular unbleached all-purpose flour, as opposed to bread flour. Is there a reason. Can I continue to us bread flour?
Rebecca Blackwell says
Hi Meg! Yes - you can absolutely use bread flour. I changed it because the bread also turns out beautifully with regular all-purpose flour, an ingredient that more people tend to have on hand. However, your comment made me realize that I should at least put bread flour as an option in the ingredient list for those who would rather use it. 🙂 Thank you for your question! xo
Judy says
Oh my, this couldn’t be any easier or more delicious. I’m not a huge white bread fan, but I’m with my young granddaughters who prefer white. The process was so easy, probably only 15 minutes of hands on time. Great directions, great results.
Rebecca Blackwell says
Thank you Judy! I'm so glad you liked this recipe! Thank you so much for taking the time to let me know! xo
MacKenzie Harkness says
What if we don't have a standing mixer? Would this recipe still work?
Rebecca Blackwell says
Yes! Absolutely! I made this bread fairly regularly before I ever had a stand mixer. You'll just have to knead the dough by hand, which is honestly a pleasure, I think. Have you ever kneaded bread by hand?
MacKenzie Harkness says
No, I've never made bread before, but I wanted to start making more home made items. I am good at baking home made cookies but that is about it for home made baking so far.
Rebecca Blackwell says
I love that you're wanting to bake more! Homemade bread is wonderful, and this recipe is a great place to start. Follow the recipe, but use your hands to incorporate the ingredients and knead the dough. This is a good video showing you how to knead bread dough: https://www.youtube.com/watch?v=ySOj0fFWo1U
If you're not quite ready to tackle sandwich bread, here's a recipe for banana bread that's super simple. No kneading required. 🙂 https://ofbatteranddough.com/moms-banana-bread/
Please let me know if you have any other questions! Happy Baking! xo
Sheila says
I appreciated the tutorial and followed it to a T! Turned out wonderful! Thank you
Rebecca Blackwell says
I'm so glad Sheila! Thank you so much for taking the time to let me know! xo
Meg says
Hi. I'm on my 7th batch of this lovely bread and am coming back for some clarification now that i've had some seasonal variation in temperature and humidity. During the summer i was using almost all the 6 cups of flour. Then i had a week in September when 4 cups of flour produced a real tough dough, so i made again adjusting the liquid up a bit.
Mid-october 4 cups was perfect no adjustments. Today (Nov 4), I used about 5 cups flour, the dough cleared the sides and stuck only slightly to the bottom. As I tried to transfer to another bowl, it was really sticky to hands, etc. I put back in and added a bit more flour, so the transfer was only mildly sticky.
As i'm still learning how the dough should feel, could you comment on how sticky it should be when you go to transfer? Thank you.
Rebecca Blackwell says
Hi Meg! I'm so glad you're getting so much us out of this recipe! I have also found that bread doughs need more or less water/ flour depending on the time of year and the weather. You're looking for a dough that sticks to the bottom of the bowl slightly while kneading, but that clears the sides of the bowl with no sticking. The dough should feel tacky - not dry - but if you're having trouble keeping it from sticking to your hands, it's too wet. Does that help?
Meg says
Sure does. And my loaves turned out beautifully.
Rebecca Blackwell says
I'm so glad! xo