
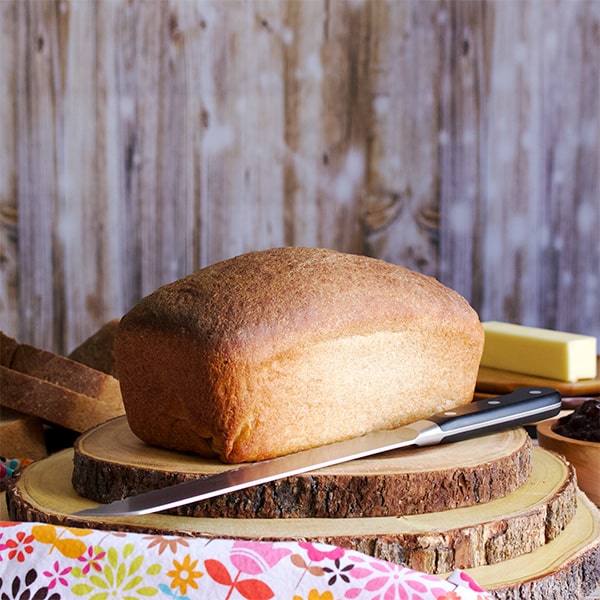
Just like my favorite homemade white bread recipe, two loaves of this simple Honey Wheat Bread will be ready to eat in about 3 hours, with only about 20-minutes of hands-on effort.
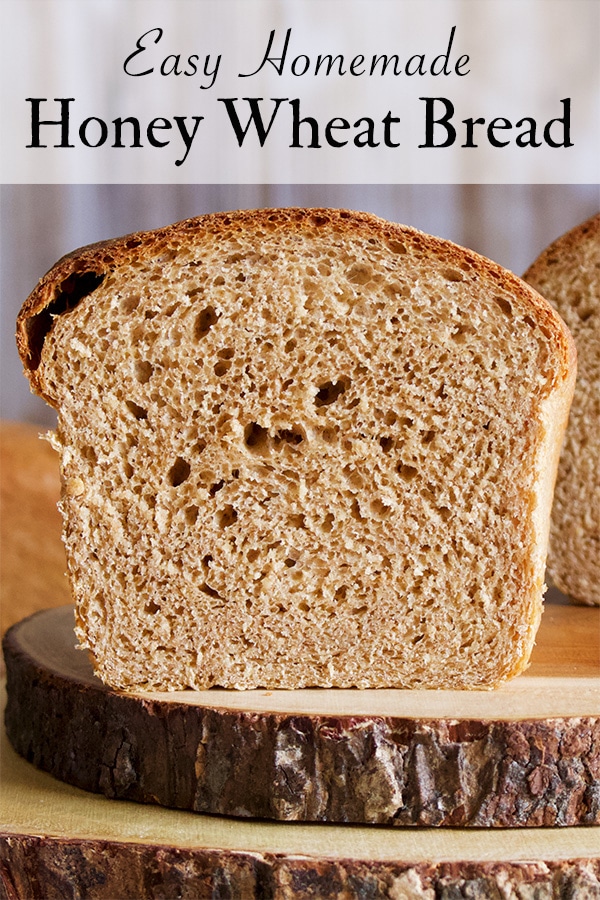
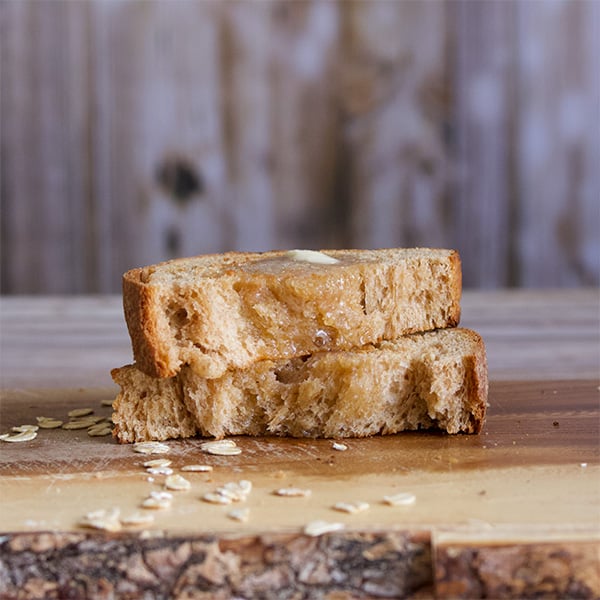
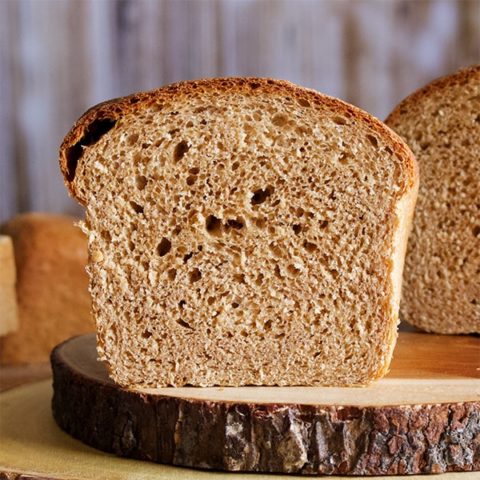
Thanks to a touch of olive oil and milk, this bread has an exceptionally soft and tender crumb. The loaves are hearty and substantial, but not heavy, dry, or overly dense.
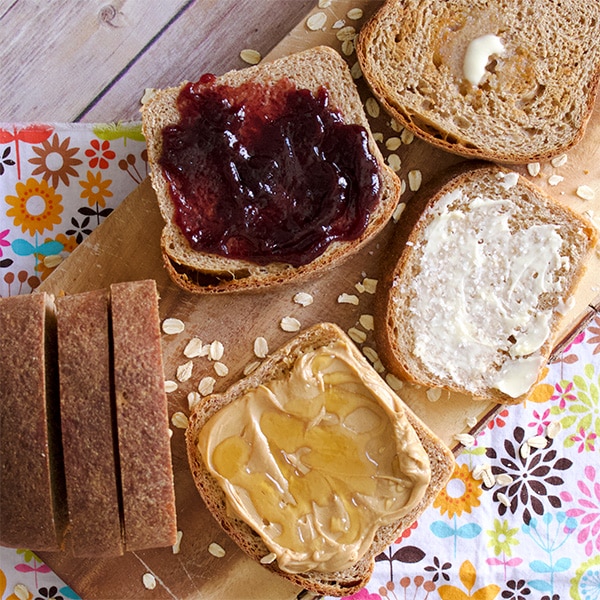
Lightly sweetened with honey (or molasses), each slice is slightly nutty and supremely comforting, like only homemade bread can be.
Simple Homemade Whole Wheat Bread with Honey and Oats
Homemade bread is always a treat no matter how often I bake it.
I've been baking bread nearly every week - sometimes two or three times in a week - for at least 25 years. And yet, every single time a warm, fresh loaf comes out of the oven, we all hover over it, impatiently waiting for it to cool enough to slice.
Simple sandwich loaves like this whole wheat recipe (and this white bread recipe) require a ridiculously minimal amount of time when weighted against the immensely satisfying reward of baking - and eating! - homemade bread.
Tips for Making Homemade Honey Wheat Bread
What ingredients do you need for these honey whole wheat loaves?
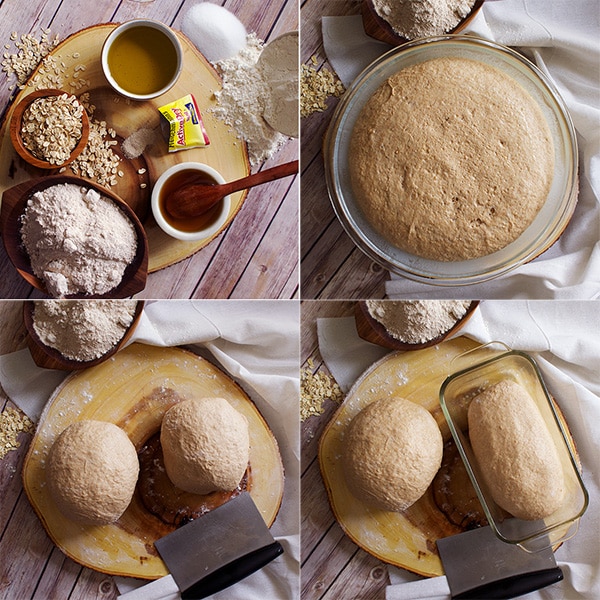
Two loaves of homemade whole wheat bread require only 9 ingredients, and one of them is water. Here's what you need:
- Water
- Milk
- Honey (or molasses)
- Active Dry Yeast
- Extra Virgin Olive Oil
- Old Fashioned Oats
- Whole Wheat Flour
- All-Purpose Flour (or Bread Flour)
- Salt
Should you use an electric stand mixer to knead the dough?
If you choose to use a standing mixer to knead the dough, the actual hands on time for producing 2 gorgeous honey wheat bread loaves is only about 20 minutes. 👏👏👏
You can, of course, knead your bread by hand instead of letting your mixer do the work - an enjoyable activity that I sometimes choose over machine kneading when:
- I've been sitting at my computer for too long and feel antsy and restless.
- I'm aggravated, frustrated, or outright angry. I can't help but think that the world would be a MUCH better place if more people chose to make bread before responding to someone who's driving them crazy. Honestly.
- I'm listening to a super awesome audio book or podcast and want an excuse to keep listening.
- I just feel like it. (Probably the best reason of all.)
No oats? No problem.
Just ¾ cup of ground old fashioned oats gives these loaves a heartier texture and slightly more complex flavor without messing up the super soft tender crumb.
But, if you don't happen to have any in your kitchen on the day you plan to bake, or if you just don't really care for oats, leave them out, adding a bit more whole wheat flour in their place.
These homemade honey wheat loaves are delicious with or without the oatmeal. In addition, the dough accepts many other additions exceptionally well.
I've heard from people who have added all variety of grains and seeds to their dough with great success. So, don't be afraid to experiment with additional add-ins.
How to make bread dough with the perfect consistency
One of the challenges to homemade bread is finding the right balance between flour and liquid.
The key is to add the last cup and a half of flour slowly, using only as much as you need.
How much flour bread dough requires depends on a lot of different factors. In humid climates, or seasons, you'll need more flour than during times of the year - or areas of the world - when the air is dry.
Before you begin mixing the dough, add all the ground oats and whole wheat flour. But, only add some of the all-purpose flour to the dough to start.
Then, slowly add more, bit by bit, just until you have dough that's soft and smooth, not sticking to the sides of the bowl at all, but still wet enough to stick slightly to the bottom of the bowl.
If you accidentally add too much flour, so that your dough is looking overly dry, no worries. Bread dough is remarkably forgiving. Simply add more milk - teaspoon by teaspoon - until the dough is damp enough to stick to the bottom of the bowl slightly.
Honey (or molasses) adds a slight sweetness and additional flavor to the dough
Molasses imparts a deeper flavor and darker color to whole wheat bread, while honey creates a lighter loaf with a slightly milder flavor.
Both are equally delicious, and so I generally alternate between the two, using whichever strikes my fancy in the moment.
More Popular Homemade Bread Recipes:
- Simple Homemade White Bread
- Homemade Cinnamon Bread
- Buttery Homemade Dinner Rolls
- Homemade Flour Tortillas
- Simple Homemade Pizza Dough
- Soft, Buttery Potato Rolls
- Homemade Cinnamon Rolls {Overnight Recipe}
- Homemade Overnight Caramel Rolls
- Homemade Hamburger and Hot Dog Buns
- Simple Cream Biscuits
- Chocolate Almond Babka
The other kind of bread I make on the regular is sourdough bread. I mostly follow this recipe and method from Tartine Bakery and it's absolutely delicious. I also highly recommend the Tartine Bread Book.
This Honey Wheat Bread is a Building Block Recipe
Building block recipes are tried-and-true recipes that I consider foundational to great home baking. They are the kind of recipes I come back to over and over again, sometimes baking them as is, but often using them as a jumping off point to create something new. > Scroll through all Building Block recipes.
If you give this recipe a try, let me know! Leave a comment, rate it, or take a picture and tag it #ofbatteranddough on Instagram.
Happy baking!
📖 Recipe
Honey Wheat Bread
This honey wheat bread recipe creates exceptionally soft and tender loaves, thanks to a touch of milk and olive oil. Lightly sweetened with honey (or molasses), each slice is slightly nutty and supremely comforting, like only homemade bread can be.
Ingredients
- 1 ¼ cup (296ml) water, at room temperature
- 1 cup (236ml) milk, at room temperature
- ¼ cup (3tbsp) honey - OR molasses
- 1 tablespoon (⅓oz/ 9g) active dry yeast
- 2 tablespoon (25g) extra virgin olive oil
- ¾ cup (67g) old fashioned oats
- 3 cups (339g) whole wheat flour
- 2 ½ cups (192g) all-purpose flour OR bread flour
- 1 tablespoon (8g) kosher salt - Or 2 teaspoon (9g) table salt
Instructions
- Add the water, milk, and honey to the bowl of a standing mixer, and stir to combine. Sprinkle the yeast over the top of the liquid and stir briefly. Let the mixture stand for 5 minutes, until the yeast is activated and looks creamy. Stir in the olive oil.
- Put the oats in a food processor or spice grinder and process to a fine powder. Add the ground oats to the mixing bowl along with the whole wheat flour and 1 cup of the all-purpose flour.
- Fit the mixer with the dough hook and begin mixing the dough on low (speed level 2 or 3 on a KitchenAid mixer) to bring the dough together. As the dough beats, slowly add only enough of the remaining all-purpose flour to bring the dough together into a soft dough. The dough should clean the sides of the bowl, but still stick to the bottom. (*See note.) This will take about 7-8 minutes.
- With the mixer continuing to knead the dough (keep it on low speed), slowly sprinkle in the salt. Once the salt is incorporated, let the mixer continue to knead the dough for another 3 minutes, until the dough is elastic, smooth and soft. Your total knead time should be about 10 minutes.
- Spray a bowl large enough to hold double the amount of dough with non-stick spray, or coat it with a bit of melted butter. Remove the dough from the mixing bowl, shape it into a ball, and plop it down into the greased bowl. Spray a sheet of plastic wrap with non-stick spray, or brush it with a bit of melted butter, and use it to cover the bowl.
- Let the dough rest at room temperature until it has doubled in size. Depending on the temperature of the room, this will take between 60 and 90 minutes. (*See notes below about controling the temperature of the dough as it rises.)
- Spray two 8 & ½ by 4 & ½ inch loaf pans with non-stick spray, or coat with a bit of melted butter. Dump the dough out onto a clean work surface and divide into two pieces. Lift one piece of dough and form it into a ball by using your thumbs to gently stretching the outside of the dough into a ball, pinching the dough together at the bottom. Bring the opposite sides together and pinch together at the bottom. Lay the ball of dough on your work surface, and roll it back and forth a few times to create an oblong ball. Lay the dough, seam side down, into one of the loaf pans. Repeat with the other half of dough.
- Spray two sheets of plastic wrap with non-stick spray, or brush them with a bit of melted butter and loosely cover each loaf.
- Allow the loaves to rise at room temperature until they double in size again, rising over the tops of the pans, 45 minutes – 1 ½ hours.
- While the loaves rise, preheat your oven to 375 degrees F (190 degrees C). When the loaves are fully risen, bake for 35-40 minutes, until they are golden brown and an instant read thermometer plunged into the center of one of the loaves registers between 190 – 200 degrees.
- Remove from the oven and use a dish towel to grip the top of each loaf to lift it from the pan onto a wire rack. Allow to cool completely.
- Once cool, the loaves can be wrapped in plastic and stored for 2-3 days at room temperature. For longer storage, wrap the bread airtight and freeze for up to 1 month. Thaw at room temperature, still wrapped.
Notes
What to do if the dough is dry:
If you add too much flour and your dough is dry and tough, just add in more milk, teaspoon by teaspoon until the dough is wet enough to stick ever so slightly to the bottom of the bowl.
How to control the temperature of the dough as it rises:
My husband and I are full time travelers, living and working in a 5th wheel RV as we travel the country. Because I am always baking in different locations, I nearly always use a Bread Proofer. Using a proofer is fantastic because if offers you total control over the temperature of the dough as it rises. For this dough I usually set the temperature of the proofer to 84 or 85 degrees and it comes out perfectly every single time.
You can also use your oven as a bread proofer: Fill a bowl or a pan with boiling water and place it in the bottom of the oven. Set the dough inside the oven and shut the door. The boiling water will create a warm, humid environment that supports the development of the dough. Refresh the boiling water as necissary to keep the inside of the oven nice and warm.
Recommended Products
As an Amazon Associate and member of other affiliate programs, I earn from qualifying purchases.


Nutrition Information:
Yield: 20 Serving Size: 1 sliceAmount Per Serving: Calories: 239Total Fat: 3gSaturated Fat: 1gTrans Fat: 0gUnsaturated Fat: 2gCholesterol: 1mgSodium: 364mgCarbohydrates: 50gFiber: 3gSugar: 17gProtein: 6g


Philip says
Where in recipe is the extra virgin olive oil used?
Rebecca Blackwell says
Hi Philip! Stir in the olive oil after the yeast is activated and creamy - The last part of Step #1. Please let me know if you have any other questions!
Dianne K says
I have two questions regarding this recipe. First, can I use quick oats? That's what I have on hand. Second, can the loaves be shaped by hand and baked on a sheet pan or will the loaves lose their shape? Thanks for any help.
Rebecca Blackwell says
Hi Dianne! Yes to both questions. Quick oats will work perfectly fine and the loaves will hold their shape while baking. I've had a couple of people tell me they had success shaping the dough into loaves and baking them on a sheet pan. Just keep an eye on the loaves as they bake. My guess is that they won't take as long to bake as they do when baked inside a loaf pan. Please let me know if you have any other questions! And, I'd love to hear how your loaves come out! xo
Dianne K says
This bread turned out perfect for me! I followed the recipe using quick oats and molasses, shaped into 2 oval loaves and baked on a sheet pan. They took just shy of the 40 minutes to bake through. Thanks for sharing this recipe. I will be adding this to my bread rotation and look forward to experimenting with additional add ins!
Rebecca Blackwell says
I'm so happy to hear that this worked well for you, Dianne! Thanks so much for taking the time to let me know! I truly appreciate it. xo
Becca Wooldridge says
Hi - I'm new to bread baking and I'm about to try this recipe because it sounds delicious, but I was wondering why it calls for AP flour and not bread flour.
Rebecca Blackwell says
Hi Becca! You can definitely use bread flour if you like. I wrote the recipe with all purpose flour just to make it more accessible for everyone - even those who have never made bread before and might not have bread flour in their pantries. But, bread flour will work great in this recipe. Please let me know if you have any other questions! And, I'd love to know what you think of this recipe after you make it! xo
Tina says
Such a great bread recipe. I’m a novice at bread baking, but this recipe is very forgiving. I’ve made these loaves 4 times, and they always come out great.
Rebecca Blackwell says
I am so happy to hear that you like this recipe Tina! Thank you so much for taking the time to let me know. I truly appreciate it!! xo
Bruce Watson says
I made 1 big tasty loaf with the above ingredients (used molasses), using my oven's proofing setting for both proofs at minimum time specified. I did the second proofing in a large banneton (I don't own any of the smaller bread pans called for) followed by 35 minutes as a standalone loaf (no pan) in the oven. Came out amazing - both visually and gastronomically.
Rebecca Blackwell says
I am so happy to hear that this recipe worked out well for you Bruce! Thank you so much for all the great information about how you made this into one large loaf! I'm sure other readers who want to do the same thing will find it super helpful. I appreciate your taking the time to write a comment! xo
C says
I'm using this recipe in an effort to finally crack bread making (also with a new Kitchen Aid). It's going well so far; I'm making some adjustments each time based on some of the comments above. I noticed other bread recipes require punching down the dough after the first rise. Is that something I should be doing here? Thank you!
Rebecca Blackwell says
Hi there! Punching down the dough and allowing it to rise a second time before shaping into loaves (and letting it rise a third time) is sometimes used to allow the dough to develop more flavor. It can be a useful technique, but isn't necessary with this recipe because you want to be careful to not overwork the dough. Instead, this recipe relies on milk, honey, whole wheat flour, and oats for plenty of flavor. Does that answer your question? Please let me know if you have any other questions! And I'd love to hear how your bread baking is progressing. Congratulations on the the new Kitchen Aid. I don't know what I'd do without mine. 🙂
cpwr says
I also made this bread and it was at pan level. Fresh King Arthur white whole wheat flour and unbleached flour. Used my Brod & Taylor bread proofer. Perfect amount of moisture in the dough (never dried out). 8.5 x 4.5 pan. The flavor is very nice, but since it didn't rise the bread is about half the size of a regular piece of sandwich bread. I saw many people have had this problem. Any other suggestions?
Rebecca Blackwell says
Hi there! Thank you so much for taking the time to leave a comment! Whole wheat bread can be tricky because the bran and germ in whole wheat flour interfere with the whole process. One of the biggest problems with whole wheat bread that doesn't rise properly is not enough water in the dough. The dough should be smooth, but still sticky. It sounds like your dough was properly hydrated, but I wanted to mention this because it really can make a big difference.
Another issue can be over-kneading. This is a more challenging problem, because it can be difficult to tell when the dough has been kneaded "enough". If you're using a stand mixer to knead the dough, be sure to keep the mixer running on low so that the kneading is nice and gentle, and stop kneading when the dough is smooth and cohesive.
Another idea is that the dough might simply need more time to rise. This is also tricky, because a lot of different factors can cause a loaf to rise quickly or slowly and you want to be careful to not "over proof" the dough (letting it rise for too long). A general rule of thumb is to press a finger into the dough. If the indentation rises back up slowly, the dough is ready. If it springs back up quickly, let it rise a while longer.
Just a few thoughts to hopefully help trouble shoot the issue... Does that help at all?
xo
Jean says
Can I make this in bread machine
Rebecca Blackwell says
Hi Jean! I think this recipe would work in a bread machine if you cut it in half. The recipe makes 2 loaves, which is likely too much for a standard bread machine. Having said that, I've never tried to make this recipe in a bread machine, so I can't guarantee it. But, if you cut the recipe in half, I don't see why it wouldn't work. Will you let me know if you try it and what your results were? That might be useful information for other bread machine bakers. Let me know if you have any other questions! xo
Becky says
My first loaves of whole wheat bread and first time using my new Kitchenaid mixer. I added unground oatmeal and sunflower seeds. YUM!
Rebecca Blackwell says
I just love that you chose this recipe for your new KitchenAid debut! Doesn't it make bread baking a breeze??? I'll be the addition of oats and sunflower seeds is delicious! Totally going to try that next time. Thank you so much for taking the time to leave a comment for me! xo
Bonnie says
I’m trying my new kitchen aid too for the first time. And I’ve never made bread before either. But I’m an avid baker. And home no thanks to Covid lockdown rules 😝. Fingers crossed.
Rebecca Blackwell says
I'm so happy to hear that you're trying out your new mixer with this recipe! Please let me know if you have any questions! And, I'd love to hear what you think of this bread after you make it. xo
Bonnie says
Success!!! First try. It’s probably not raised as much as it should be because I only have the 9 inch loaf pans, but it’s still quite light to cut and enjoy with a nice firm crust. I used sugar free maple syrup instead of honey too. and followed everything you said exactly. Thank you. Cant wait to try another one tomorrow if I’m still home.
Rebecca Blackwell says
I'm so happy to hear that your loaves turned out! I hope you get to bake more bread today! There's nothing quite as satisfying as homemade bread. 🙂 Thank you so much for taking the time to leave a comment for me! xo
Bonnie says
Question, I used the active dry yeast you recommended. It seemed to work fine. What’s the difference between yeasts and do you need to make the active dry yeast with water first like it says on the package? Why it why not?
Rebecca Blackwell says
Great question! The two most common types of yeast are active dry and instant. Both act essentially the same in most bread recipes, however active dry yeast should be dissolved in liquid before using, while instant yeast can be mixed right into dry ingredients. (Instant yeast is also sometimes called rapid rise or quick rise yeast, but it's all the same thing.) Active dry yeast is dormant until dissolved in liquid - water and milk in this recipe. Does that answer your questions?
Bonnie says
Hi can I ask how you added them? Just as is mixing them in or did you soak them or anything first?
Jackie says
Hi! Just wondering if this recipe can be adjusted to be made with only whole wheat flour and not all purpose? Thank you!
Rebecca Blackwell says
Hi Jackie! I have made these with all whole-wheat flour and they are delicious, but also super dense and compact. The all-purpose flour really helps them rise and keeps them from being too dense. But.... so much of that is just personal preference, so you might try it both ways and see what you think. Either way, I'd love to know how these loaves come out for you! xo
Stacia C Hastings says
How could I add amaretto to this recipe? I have an amaretto peach jam recipe with pectin but wand one without pectin.
Rebecca Blackwell says
Hi Stacia! Are you wanting to add amaretto to peach preserves? If so, just the amaretto at the beginning of cooking, at the point in the recipe where you are bringing the mixture to a boil. I would probably start with a half cup. But, taste the preserves about halfway through cooking and add more if you like. I'd love to know how these come out for you! Adding amaretto is a fantastic idea! xo
Patricia Zellers says
I made your wheat bread twice & it turned out great. I cut the recipe in half because I only wanted 1 loaf. the only problem I had was the bread didn't dome on top, it rose to the top of the pan but just stayed flat. Do you have any idea why?
Rebecca Blackwell says
Hmmmm.... Not getting that nice dome on top could be due to a couple different things. Let's trouble shoot a bit. My first question is, what brand of flour are you using? My second question is about the temperature of the room the dough is rising in. What do you think the approximate room temperature of your kitchen is?
So glad the bread tastes good! xo
Patricia Zellers says
king Arthur white whole wheat. my kitchen is 68. I wondered if maybe the flour wasn't fresh enough?
Patricia Zellers says
Finally! loaf number four, perfect. even though they all tasted great. thanks for this recipe, even my Granddaughter loves it!
Marti says
The bread was delicious however mine did not rise above the pan with the bread dome. Also, I made one loaf and with the other half I rolled out little rolls and put them rolled up in muffin pans, brushed the tops with melted butter. Yummy.. great recipe, I will use again and hope I figure out how to make bread look and rise like bread.
Rebecca Blackwell says
Hi Marti! I am so glad you liked the taste of this bread! As far as it's not rising... there are a lot of different factors that can interfere with a bread's rise. Here are a few things that might possibly have caused your loaf to not rise as high as it should have: If you baked your loaf in a 9x5 inch loaf pan instead of a 8 1/2 by 4 1/2 inch pan, that could have made a difference. You wouldn't think that such a small thing would matter, but it sometimes does. The other thing that can have an impact on how well a dough rises is how much moisture is in the dough. The moisture level can be affected by how humid the air in your kitchen is. You want the dough to be wet enough to stick to the bottom of the mixing bowl, but not so wet that it sticks to the side of the bowl. It should feel kind of tacky - but not stick to your hands. Likewise, loaves won't rise as well if the top of the dough is allowed to dry out. So, if you cover your loaf with a dish towel instead of plastic wrap, that might have had an effect as well.
I hope this helps! If you make it again and it rises better, will you let me know what worked for you? Thanks so much for taking the time to leave a comment for me!!! xo