This doughnut recipe can be used to make pretty much any kind of homemade doughnut you can imagine. Chocolate or vanilla glazed? Of course. Cream filled? Absolutely. Doughnut holes? You betcha. Rolled in sugar, frosted or glazed, covered in cereal, sprinkled with bacon, filled with fruit or pastry cream... whatever you can imagine, this is the only doughnut recipe you will ever need.
But, you want to know the best thing about this doughnut recipe?
The dough is super simple, and cut-out doughnuts can rise in the refrigerator overnight so that all you have to do to enjoy homemade doughnuts in the morning is cook them. In your bathrobe, of course.
While I lack the imagination to envision a world in which everyone doesn't inherantly love doughnuts, I will concede that mediocre doughnuts exist. All over the place. In fancy packages that lure you in and convince you to spend too much money on what turns out to be somewhat disappointing.
For example, the doughnuts at my local grocery store are... ok. Good enough. And this is exactly why I usually regret eating them. Because, here's the thing: if I'm going to indulge in little bits of fried, sugary dough for breakfast, I want them to be so good as to be worth every calorie.
Every. Single. One.
Otherwise, later in the day, when I'm rummaging around in the refrigerator trying to find enough green vegetables to counteract my sugar hangover, I start to regret my breakfast decisions.
And "regret" and "doughnuts" should never, ever, be in the same sentence.
If you're going to eat doughnuts, homemade doughnuts are the way to go.
I'm not saying you should eat them every morning. But, every now and then, treating yourself, your family, and maybe even your friends and neighbors to warm, tender, freshly made homemade doughnuts that melt in your mouth and are impossibly delicious, is a praise worthy deed deserving of lavish praise. And maybe a foot rub.
This doughnut recipe makes the reality of homemade doughnuts possible, without having to get up at 4am.
Here's what you do:
- Make the doughnut dough about 2 ½ hours before you want to turn in for the night.
- If you want to fill some or all of the doughnuts with pastry cream (highly recommended), make that after you get the dough going, cover it and put it in the refrigerator.
- Roll out the dough, shape into doughnuts, lay them out on a baking sheet, cover with plastic wrap and place in the refrigerator to rise while you sleep. Go to bed and dream of pillowy clouds of dough.
- In the morning, set the doughnuts out on the counter for an hour or so to finish rising. Pour a cup of coffee and linger over the newspaper. Or go back to bed. Your choice. This is not the time to get dressed and start doing something productive.
- Fry them up, fill them, glaze them, roll them in sugar. Eat. Share. Enjoy your life.
Homemade doughnut tips and tricks:
It's important to use a deep fry thermometer when cooking doughnuts so that you can monitor the temperature of the oil. Several different factors can affect frying temperature. I suggest cooking one "test" doughnut in your hot oil before proceeding with the rest. If your test doughnut is overdone on the outside and undercooked on the inside, lower the oil temperature a bit. If your test doughnut is overly greasy and heavy from having absorbed too much oil, raise the oil temperature.
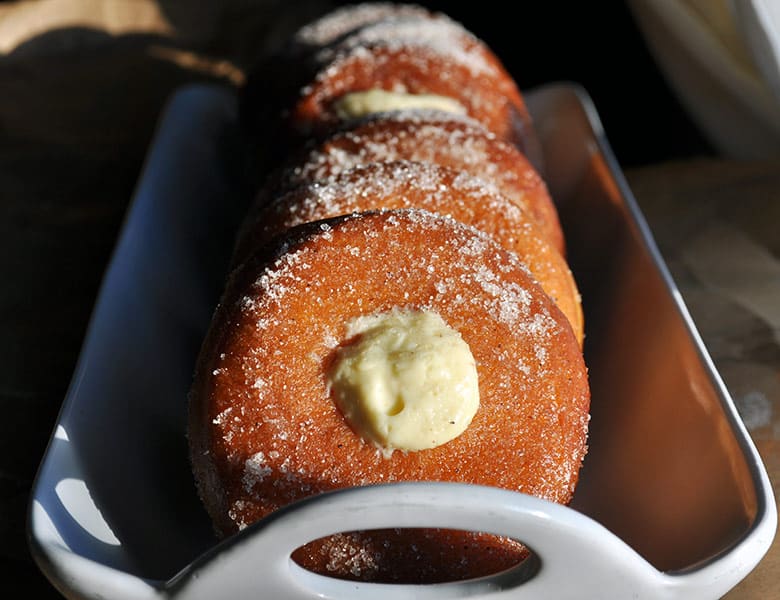
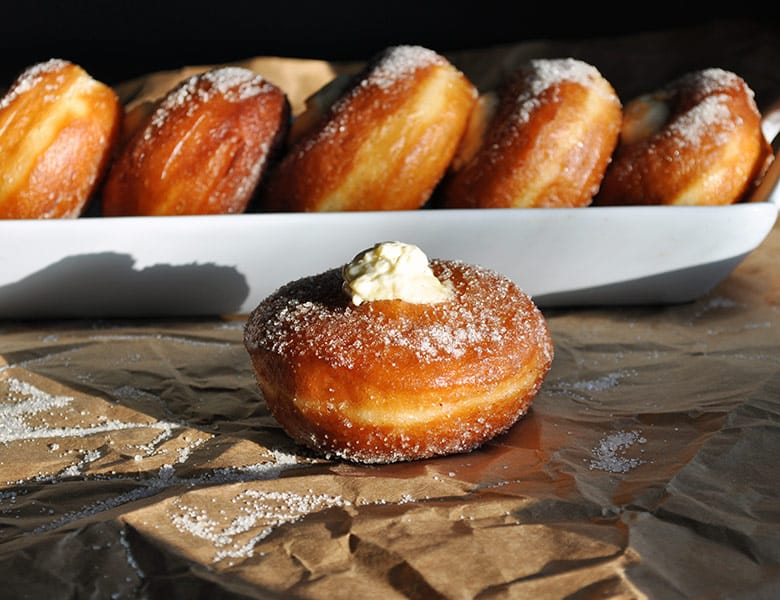
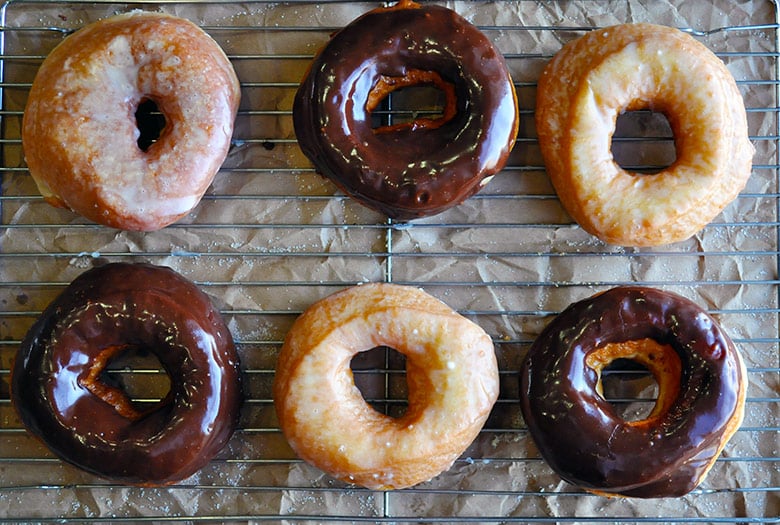
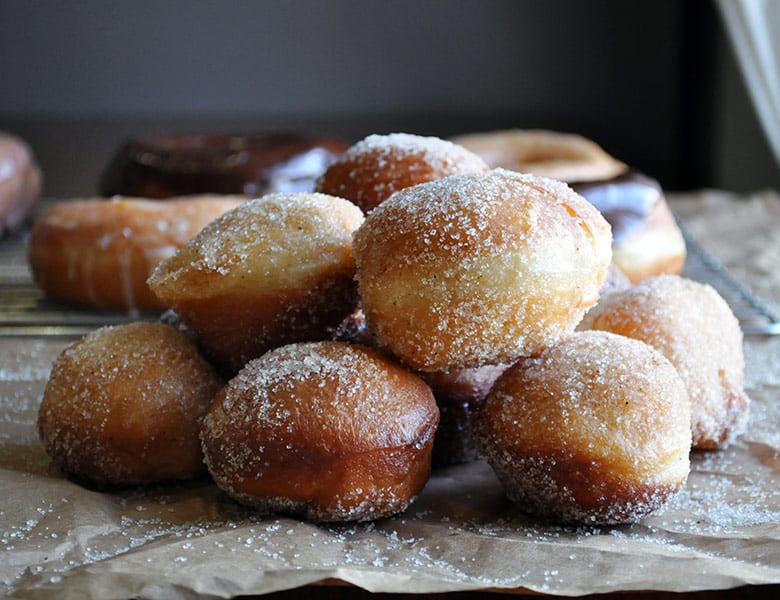
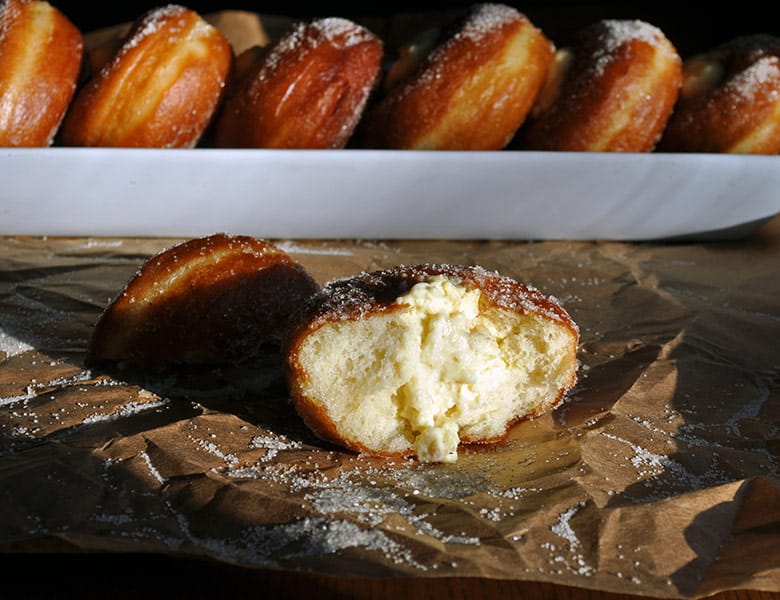
These doughnuts are fantastic rolled in sugar with a sprinkle or two of nutmeg blended in, or covered in vanilla or lemon icing, or chocolate ganache. My personal favorite is to roll them in sugar and fill them with pastry cream.
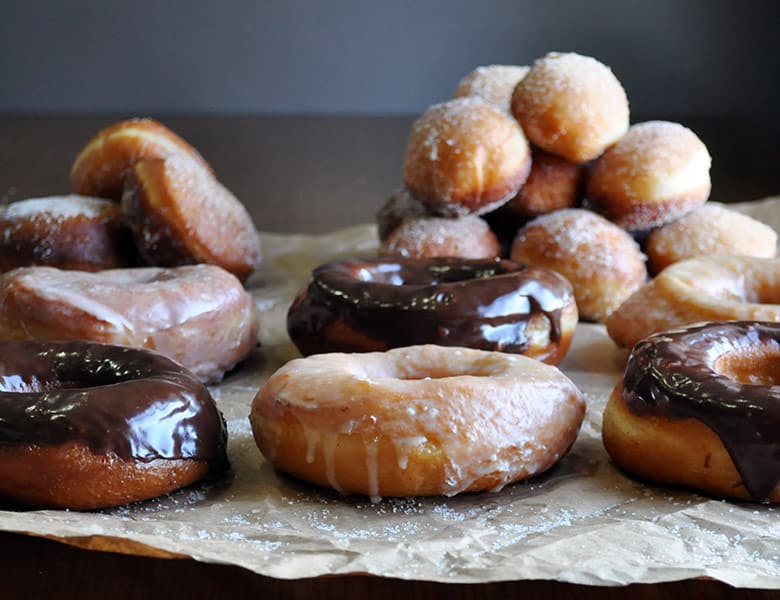
Make them whatever size or shape you like. I purchased a set of double sided round dough cutters on Amazon a while back and use them all the time. The package comes with 6 different sizes. In the doughnuts pictured here, I used a medium sized one for the pastry cream filled doughnuts, and one slightly larger for the vanilla and chocolate glazed doughnuts. The smallest one is perfect for doughnut holes.
More recipes that use the same dough as these doughnuts:
- Extra Soft and Buttery Dinner Rolls
- Homemade Cinnamon Rolls
- Homemade Caramel Rolls
- Homemade Cinnamon Bread
- Apple Fritters with Maple Glaze
- Doughnut Holes Filled with Salted Caramel Pastry Cream
- Cinnamon Bread
Homemade Yeast Raised Doughnuts are a Building Block Recipe
Building block recipes are tried-and-true recipes that I consider foundational to great home baking. They are the kind of recipes I come back to over and over again, sometimes baking them as is, but often using them as a jumping off point to create something new. > Scroll through all Building Block recipes.
If you give this recipe a try, let me know! Leave a comment, rate it, or take a picture and tag it #ofbatteranddough on Instagram.
Happy baking!
📖 Recipe
Homemade Doughnut Recipe
This delicious doughnut recipe is versatile & simple. Doughnuts rise in the refrigerator overnight. All you have to do in the morning is cook them.
Ingredients
- 2 cups whole milk, at room temperature, between 75 and 85 degrees
- ½ cup granulated sugar
- 3½ teaspoon active dry yeast
- 1 large egg + 1 large egg yolk, slightly beaten
- 6 tablespoon butter, melted and cooled to room temperature
- 1 tablespoon pure vanilla extract
- 1 teaspoon finely grated lemon zest
- 6 cups unbleached, all-purpose flour
- ½ teaspoon ground nutmeg
- 2 teaspoon salt
- Vegetable oil for frying
Optional glazes and icings
Instructions
*NOTE: This recipe makes approximately 24 doughnuts that are 3 ½ inches in diameter. The recipe will make more or less depending on the size of your doughnuts.
MAKE THE DOUGH:
- Pour the milk into the bowl of a standing mixer, and sprinkle in the sugar and yeast. Stir to combine and then let sit for about 5 minutes to let the yeast begin to come alive. Whisk in the egg, egg yolk, melted butter, vanilla and lemon zest.
- Fit your mixer with the dough hook, add 5 cups of the all-purpose flour and mix on low speed (speed number 2) until the dough begins to come together. Slowly add enough of the remaining cup of flour so that the dough comes together into a soft, slightly sticky ball. Depending on the humidity in the air, this might take the entire remaining cup or only a bit of it. What you're looking for is a soft, smooth ball of dough that clings to the dough hook, and does not stick to the sides of the bowl, but does stick slightly to the bottom of the bowl. If you stop the mixer and touch the dough, it should feel slightly sticky, but not so wet as to be confused with cookie dough.
- Once the dough has come together, sprinkle in the nutmeg and salt. Continue to kneed in the mixer for about 8-10 minutes. The dough should look very soft and smooth.
- Butter a large bowl and dump the dough into the bowl. Butter a piece plastic wrap (or spray with non-stick spray) and use it to cover the bowl. Let the dough rise at room temperature for 1-2 hours, until the dough has doubled in size.
- While the dough rises cut out 24 squares of parchment paper, each square about 1-inch larger on all sides than the cutter you will be using to cut out the doughnuts. (This is unnecessary if you are only making doughnut holes. For doughnut holes, simply cover a baking sheet with parchment paper.)
- Set 2 baking sheets out on the counter. After the dough has risen, dump it out of the bowl onto a clean countertop and roll out to ½ inch thick. Cut out the doughnuts using a dough cutter. Place each doughnut on one of the individual squares of parchment paper and lay it on a baking sheet. Continue to roll out the scraps and cut doughnuts from the dough until you've used all the dough.
- Spray sheets of plastic wrap with non-stick spray and cover the doughnuts. At this point you can leave the doughnuts on the counter to rise for about 1 hour before frying, OR you can place the doughnuts in the refrigerator to let rise overnight. If refrigerating the dough, let rest at room temperature for 1 hour before frying.
FRY THE DOUGHNUTS:
*NOTE: Several different factors can affect frying temperature. I suggest cooking one "test" doughnut in your hot oil before proceeding with the rest. If your test doughnut is overdone on the outside and undercooked on the inside, lower the oil temperature a bit. If your test doughnut is overly greasy and heavy from having absorbed too much oil, raise the oil temperature.
- Pour enough vegetable oil into a large, deep saucepan to come up the sides 3 or 4 inches. Heat the oil to 370 - 375 degrees.
- Place 2 or 3 of the doughnuts into the hot oil, parchment and all. Immediately after lowering them into the hot oil, use a pair of kitchen tongs to remove the parchment. Let the doughnuts cook in the hot oil until the bottom is a deep golden brown, 3-5 minutes.
- Using a slotted spoon, gently flip the doughnuts over in the oil and cook another 3-5 minutes until both sides are golden brown. Using the slotted spoon, transfer the doughnuts to paper towels to drain. Do your best to keep the temperature of the oil between 360-370 degrees.
Notes
If coating the doughnuts in sugar, let the doughnuts rest on the paper towel for 10-20 seconds and then roll in sugar to coat (a sprinkle or two of ground nutmeg mixed into the sugar is a nice touch).
If icing the doughnuts, let them drain on paper towels for at least 10 minutes before covering them with icing.
If filling the doughnuts with pastry cream let them cool completely before filling. Scoop pastry cream into a pastry bag fitted with a large round tip. Use the tip to puncture the bottom or the side of the doughnuts and squeeze some pastry cream into the center of the doughnuts.
© Of Batter and Dough. All images & content are copyright protected. Please do not use my images without prior permission. If you want to republish this recipe, please re-write the recipe in your own words, or link back to this post for the recipe. Some of the links above are affiliate links, which pay me a small commission for my referral at no extra cost to you! Thank you for supporting Of Batter and Dough.
Mattie says
Awesome donuts and so easy to make!! Crispy on the outside and pillow-y soft on the inside. Making these didn't require causing a big mess in the kitchen either! Will definitely make again.
Rebecca Blackwell says
I am so happy to hear that you liked this recipe Mattie! Thank you so much for taking the time to leave a comment for me. I truly appreciate it! xo
R says
Despite the fact that I make lots of bread, I have never made doughnuts before. One of my children wants homemade doughnuts for their birthday later this month. Have you tried these as jelly-filled? If so, do you fill them before frying or after and do you use a thinner jelly? I make my jellies so am trying to determine the best way to fill these with the jellies the child is asking for 🙂
Rebecca Blackwell says
Hi there! Great question. I suggest filling the doughnuts with jelly after you fry them. I've never filled these with jelly, but I have filled them with pastry cream many times and always fill after frying. Pastry cream is quite thick, and squirts into their soft middle easily, so I don't think you'll have any issue with even the thickest jam or preserves. It is important to allow the doughnuts to cool before filling them, or the jam will melt and leak out all over the place. 🙂 Please let me know if you have any other questions! And, I'd love to know what you and your family thinks of these doughnuts after you make them! xo
Minahil says
I ABSOLUTELY LOVED THE DONUTS, I've tried a couple of recipes before but they were not even close to how the donuts from your recipe turned out. Loved them.
Rebecca Blackwell says
I am so happy to hear this Minahil! Thank you so much for taking the time to let me know! The secret is the dough... I use it for everything from dinner rolls to cinnamon rolls to apple fritters and, of course, doughnuts. I'm so pleased that this recipe worked out well for you! xo
VV says
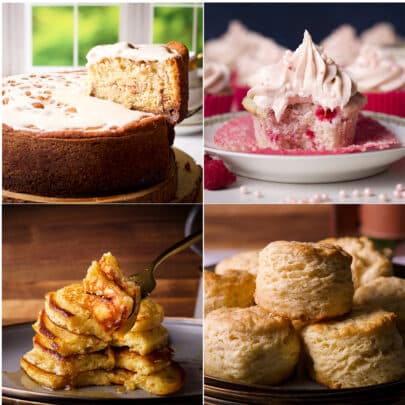
I made these per the instructions the first time and they were perfect. It was a trifecta weekend for me as I made the vanilla cake, the Italian meringue butter cream and the donuts all for my daughter's birthday. Loved the recipes, tips and tricks. I had some left over dough from the donuts so I cut them out and froze them. This weekend I pulled them out and tried to bake them instead of deepfrying. They didn't rise overnight as I was hoping, so ended up being a little denser than I would have liked. How do I correct that next time? Also, any modifications to the recipe if I wanted to bake instead of deep-fry?
Rebecca Blackwell says
Wow! You were a baking queen this weekend! I'm so happy to hear that all three recipes worked out well for you. ♥️ To answer your question, my guess is that the yeast simply ran out of "food". Freezing this dough works great, but it's important to get it frozen before the second rise. It sounds like the dough you froze had already risen once, then been shaped and risen again. Yeast needs a steady supply of food in the form of flour and water and when they run out, they die and the dough will stop rising and even deflate. I'm thinking that's what happened here. In the future, if you want to freeze this dough, freeze it right after shaping the doughnuts, then allow them to thaw overnight in the refrigerator. Please let me know if you have any other questions! xo
Shaikha says
Hands down the best doughnut recipe I’ve tried ! They we’re perfect !! The doughnut had a lovely bready but light texture a not oily at all . It was as if it was made at a bakery but with a homemade taste ! Just perfect thank you Rebecca
Rebecca Blackwell says
Hi Shaikha! I am so happy to hear that you liked this recipe so much! Thank you so much for taking the time to let me know. I appreciate it so much! xo
Katrín Huld Vignisdóttir says
Hi I wanted to try this recipe but was wondering if you could leave the dough in the refrigerator for longer maybe 2 days?
If not how do you store them so they keep fresh the next day?
Rebecca Blackwell says
Hi there! I wouldn't recommend keeping the dough in the refrigerator for longer than 24 hours because refrigeration slows down the yeast, but doesn't stop it. I'm afraid that longer than 24 hours might overproof the dough. The dough can be frozen for a few months, however. You could even freeze the cut-out doughnuts. Cut them out and place them on a baking sheet that's been covered in parchment paper. Freeze them in a single layer, covered with plastic wrap, for a few hours, until the doughnuts are frozen enough to stack, at which point you can put them in zip top bags or other containers. The night before you want to make them, lay them out on parchment covered baking sheets and let them thaw in the refrigerator overnight. Let them come to room temperature before frying. I hope that helps! Please let me know if you have any other questions! xo
Christine says
This is my go to donut recipe. I love being able to pull the tray out of the fridge in the morning, get the coffee ready, feed my animals, warm up the oil and by the time I'm done with all that, the donuts are "warm" enough to fry. It really does make this is a treat I can make once or twice a month without too much fuss.
Rebecca Blackwell says
Hi Christine! I am so happy to hear that you like this recipe so much! Thank you so much for taking the time to leave a comment for me to let me know. I appreciate it more than I can say! xo
Barrie Kaplan says
Hi, I've been researching how to make doughnuts that rest in the fridge overnight, I found your blog ( looks good ) and wanted to ask a question regarding proving the dough. Are you suggesting to make the dough then cut the shape and prove overnight or should they be proved first and then cut to shape and put in the fridge?
Normally one would make the dough and let it rise until doubled in size then shaped and allowed to rise a little for a second time before frying!
Hope you can help, look forward to trying your method.
Kind regards
Barrie
Rebecca Blackwell says
Hi Barrie! Your thinking is correct - make the dough, let it rise until doubled in size, then shape it into doughnuts, cover, and put them in the refrigerator to rise overnight. In the morning, just take the doughnuts from the refrigerator and fry them. Does that answer your question? Please let me know if you have any more questions! And, if you make these, I'd love to hear what you think of them! xo
Lisa P says
Can these be baked instead of fried? If so, what temp and how long?
Rebecca Blackwell says
Hi Lisa! I haven't ever tried baking them... but, it could work. The constancy will be more like bread rolls, but in theory, they should bake up just fine. I would bake them at 375 degrees, for 15 - 25 minutes. Sorry for the long range of time... having not done it before, I'm guessing. I think the will actually take 20 minutes - but, I'd check them 15 minutes in just to be sure. You might have to cut into one to make sure they are baked all the way through. If you try baking these, will you let me know how they come out for you? xo
paula says
Can I leave the dough (not yet cut into donut holes) to rise or rest in the fridge and continue in the morning? I'm so tired, I need to go to bed.... thinking of letting the dough come back to room temp to then proceed. Has it been tried? Will it work?
Rebecca Blackwell says
Hi Paula! By now, you would have either kept going with the recipe or put it in the refrigerator to rise overnight. I think that should have worked fine.... did it?
paula says
Oh yes! better than ever -- the dough actually stayed in the fridge even longer than I anticipated, as I didn't get to shape and fry them until after church. Thank you...
And to follow-up on your previous suggestion about the little squares of parchment paper: that works fabulous.
I found Reynolds makes parchment paper Sheets, which have squares printed on them... so it's been super easy to cut individual squares. And they do separate from the dough as soon as they hit the oil (easy enough to lift out). Happy Thanksgiving!
Rebecca Blackwell says
Great! I'm so glad to know that keeping the dough in the refrigerator worked out well. It's good to have options like that, so that you can organize baking around your schedule. Thanks for letting me know! Happy Thanksgiving to you! xo
paula says
My donut "holes" came out flat like coins... I like the trick of the parchment paper squares for the donuts. But how to do you transfer the little discs of donut-holes from the sheet of parchment paper into the oil without them deflating?
PS--I didn't let these rise overnight; just gave them a little over an hour in a warm oven, could that also be contributing to the problem?
thanks for the help,
Rebecca Blackwell says
Hi Paula! A couple of things might have caused this issue.... Is it possible your oven was too warm while they were rising? If dough rises at temperatures over 80 to 85 degrees, there is a chance of killing the yeast. When this happens, the dough will still rise for a while, but then when you go to cook it, it will deflate. In answer to your question about transferring the doughnut holes into the oil - if each doughnut hole is on it's own little sheet of parchment paper, you can lower the doughnut into the oil while still sitting on the little square of parchment. Then, simply use tongs to lift the parchment square out of the hot oil. Does that answer your question?
Leviticus Bennett says
The chocolate glaze looks delicious, I am super hungry for doughnuts now. I wish I had the time to make these, it's difficult juggling school and work. Since my craving is still present, I am going to check for a local bakery. Thanks for the beautiful pictures and the recipe!
Rebecca Blackwell says
Haha! You're welcome! Were you able to track down some doughnuts?
Shoni says
Hi!
Would this recipe also work for Churros?
I have only ever come across one place that has made them properly without it being raw/doughy in the middle. Tastes gross undercooked!
So, I thought making them myself might be the goer.
Thanks for the above oil tips too.
Rebecca Blackwell says
Hi Shoni! I've actually never made churros, but my understanding is that churro dough is more similar to cruller dough than raised doughnuts. This is my favorite recipe for crullers - and it would be worth a try to use it to make churros. Worst case scenario is that you'd end up with churro shaped crullers. 🙂 One of these days, I'll tackle churros and post about it here. You've inspired me, so probably sooner rather than later! xo
Beth Carter says
How do you keep condensation off donuts when in the fridg. Even if they are covered with plastic wrap? Getting little bubbles all over donuts after frying
Rebecca Blackwell says
Hi Beth! My guess is that you're in a pretty humid area? You could gently blot any condensation with a paper towel after removing them from the refrigerator. Did the little bubbles affect the flavor or consistency of the doughnuts?
Beth Carter says
What I'm doing is making twist and putting them in fridge , I've used paper towels,plastic wrap and lids..no luck with that...It has totally changed the texture on the outside with the little bubbles has made them course on the outside. Would temp. Inside walk in cooler have any effect? It is at 40 . They don't taste bad but it's not how its supposed to be. I usually fry them right away instead of refrigeration..but we are growing so I'm trying to have some prepped for next day
Rebecca Blackwell says
Hmmmm... having not had this issue myself, I did some research and am guessing that the humidity in your walk in cooler is too high. Does the cooler allow you to control for humidity? I read a comment from a baker in a bagel shop who allowed the bagels to rise overnight in their walk-in cooler and he said, "This worked great as long as we kept the humidity down, as it tended to condensate if we weren't careful."
If you can't control for humidity, I'm wondering if you might want to try covering the dough with a towel? Unless you've already tried this? Covering dough with a non-terry-cloth towel will actually whisk moisture from the dough, but you'll run the risk of the towel sticking to the doughnuts. To prevent this, I'd suggest flouring the towel. I am concerned that a long rise under a towel might cause the bread to dry out too much... but, considering that it's a pretty wet dough and the humidity of the cooler is probably a bit high, it might be worth a try. What do you think?
Harriet Somohardjo says
Hi miss Rebecca,
Every time my donuts come out too oily. What is the problem? I hv put the dough in the fridge and rolled/cut out the next morning. Maybe rising time not enough, water instead of milk etc etc.. Glaze dropped out every tie.. Plse I need u help.. Thks in advance.
Rgds
Harriet
Rebecca Blackwell says
Oily doughnuts are no fun! Let's see if we can fix it for you. My guess is that the temperature of the oil is too low. It's important that the oil stay between 360 - 375 degrees. Do you have a good deep fry thermometer?
Marshay says
I felt the need to comment after making these doughnuts this morning. The dough was perfect and very easy to work with. Everything went pretty smoothly initially. It wasn't until I had fried and starting eating that I found a reason to be disappointed. I probably should have researched abit beforehand but I think your recommended oil temperature is too low. I kept the temperature hovering around 320-325 (using a thermometer) and these donuts were very heavy and greasy to the point of giving me a stomach ache. After looking around it seems that most people fry at 350-360 and this prevents the donuts from absorbing too much oil. Will try the recipe again as it's a pretty good base, just need to adjust the temperature next time 🙂
Rebecca Blackwell says
Hi Marshay! Thank you so much for taking the time to leave this comment. This is one of the things I love about food blogs - the recipes are dynamic and active, constantly being shaped and influenced by everyone around the world who bakes them. It's comments like these that help me become aware of issues happening outside my kitchen, which helps me adjust and perfect the recipes accordingly. So, I really appreciate it!
Before publishing this recipe, I tested frying these doughnuts at different heat levels, knowing that higher heat is the general recommendation for frying doughnuts. However, at higher temperatures, my doughnuts were overdone on the outside and somewhat raw on the inside. I did some research and learned that the richness of the dough can affect the way doughnuts cook and that cooking rich dough at slightly lower temperatures is sometimes the best option. That is, in fact, what worked best for me. But, to be honest, I was a bit worried about publishing instructions for a lower cooking temperature. Thanks to your comment, I am adjusting the temperature range in the recipe and including instructions to test one doughnut before proceeding with the rest. I think this is probably good no matter what, to allow for possible inaccuracies in frying thermometers.
Thanks again for taking the time to comment. I hope you will try these again - they are my family's favorite doughnuts in the world! xoxo
Daniel says
Always nice knowing what's IN your food...
These look great. I just might give it a try myself.
Rebecca Blackwell says
Isn't that the truth? One of the reasons that I make so much from scratch (beside the fact that I think it's fun!) is because I know each and every ingredient in the food I serve my family. I hope you do try these doughnuts! And, if you do, I'd love to hear what you thought of them. xo
Karly says
Holy perfection. These look like my favorite donuts from when I was a kid! And I love that you can leave the dough to rise overnight and pop 'em in the fryer in the morning. Totally trying these!
Rebecca Blackwell says
Thank you Karly! I can't wait to hear what you think after you try these doughnuts. And, in case you didn't know, today (January 12) is National Glazed Doughnut Day. The perfect excuse to whip up a batch! xoxo