
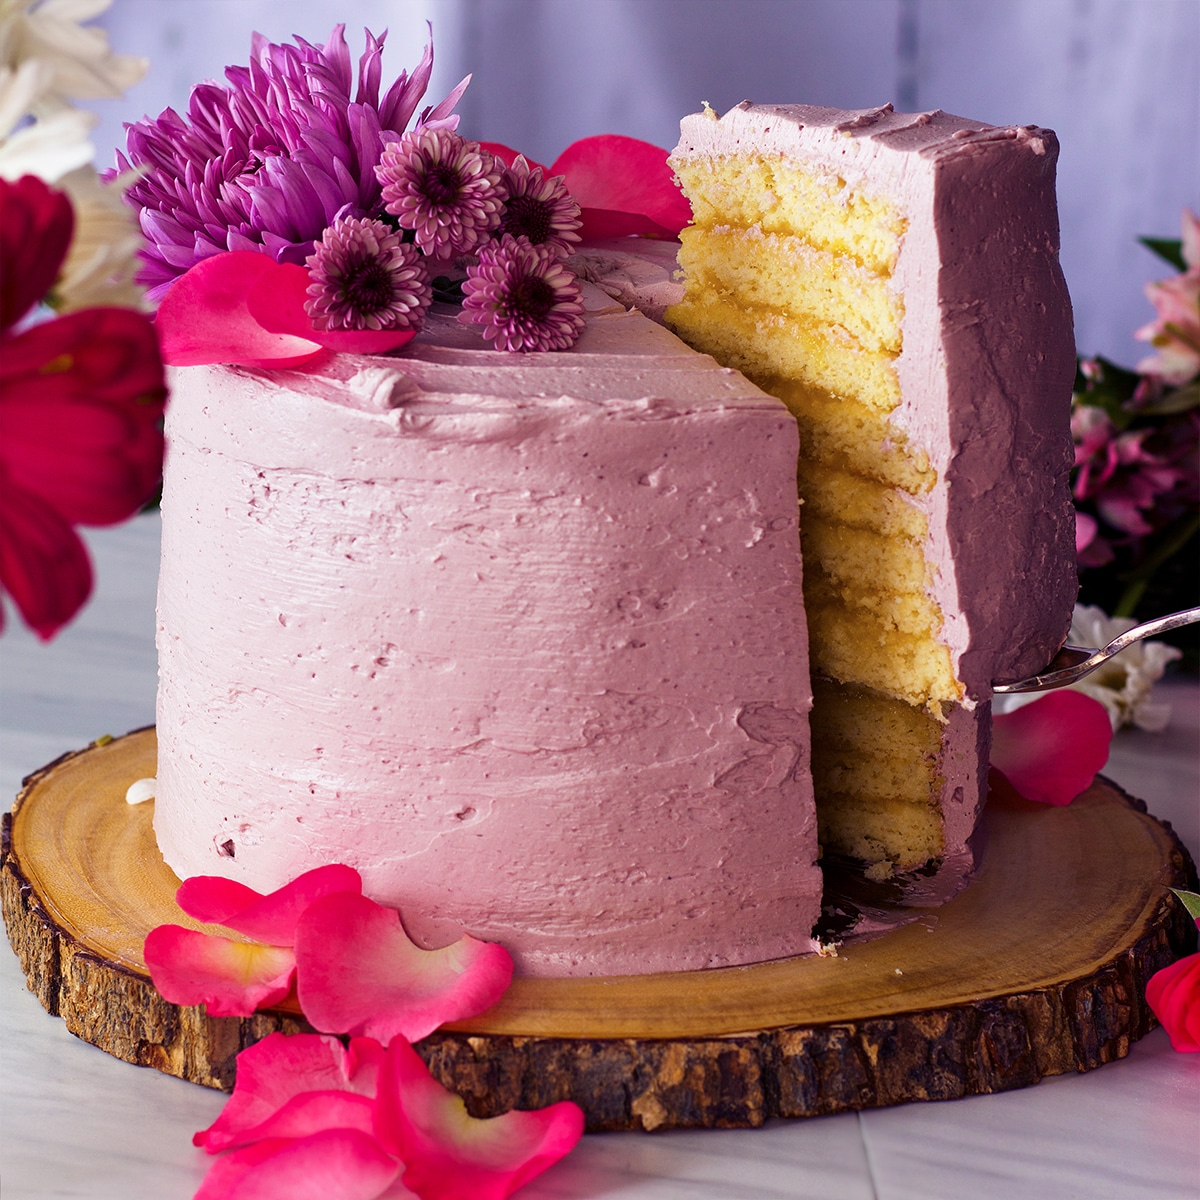
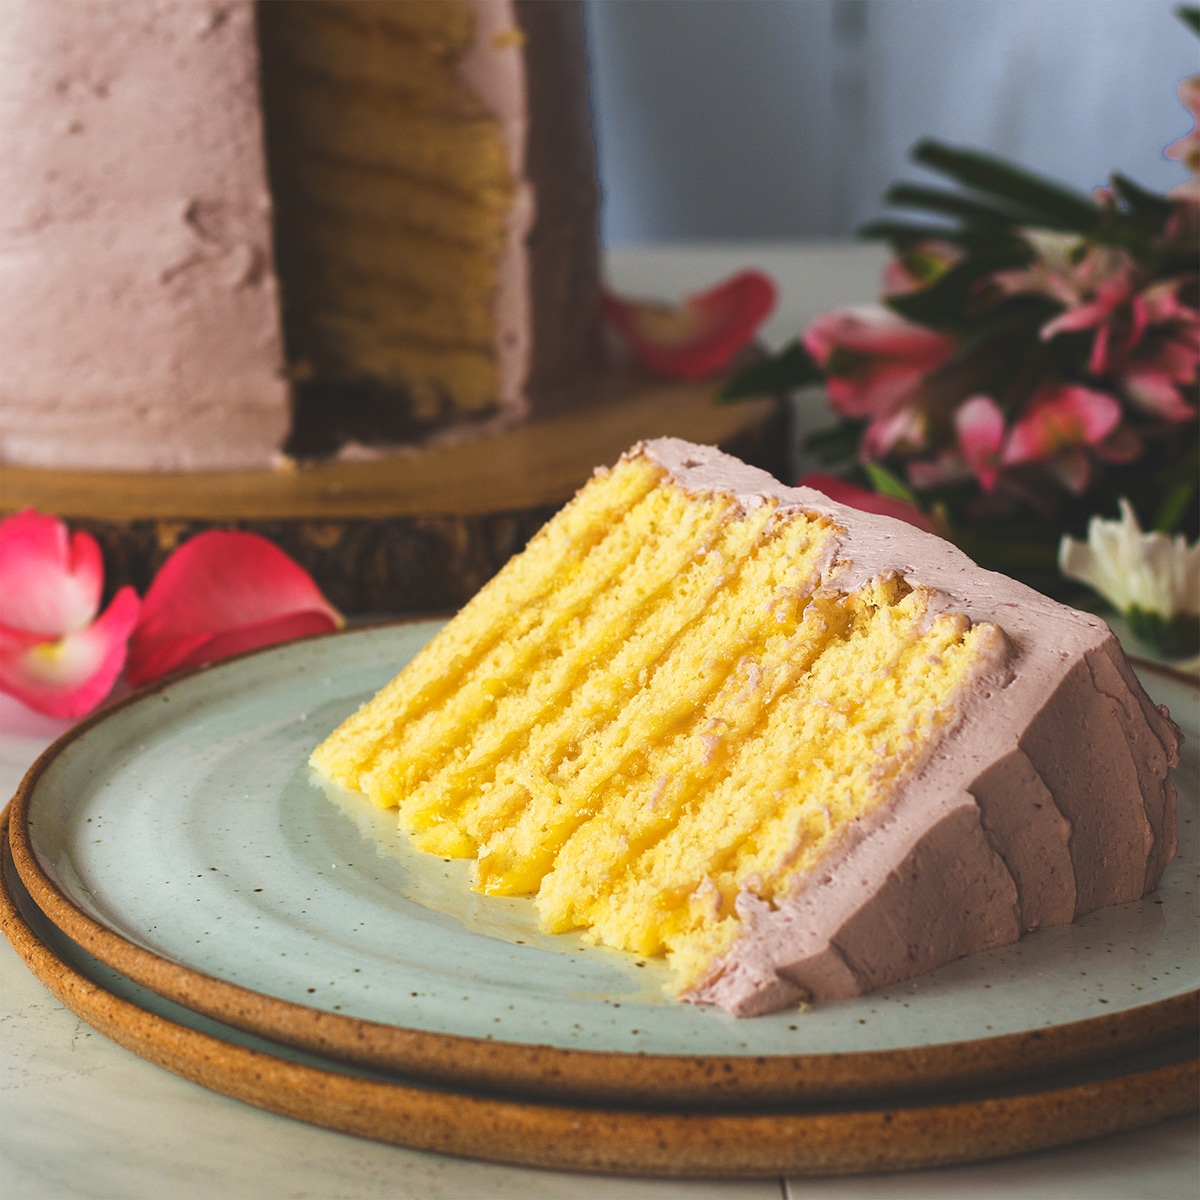
This Lemon Layer Cake boasts 8 buttery layers of yellow cake doused in Limoncello, separated with lemon curd, and covered in a thick layer of Blackberry Italian Meringue Buttercream.
The cake is spring on a plate and as delicious as it is impressive.
“This cake was a HUGE hit! I made it and then took it to some co-workers, who all asked for the recipe! Even my husband, who isn't really into lemon flavored things, was a fan.” -Suzanne
Jump to:

+ Subscribe to my newsletter for new and exclusive recipes in your in-box every month! As a full time traveler, living, working, cooking, and baking from a 5th wheel RV, it's also where I share our experiences of life on the road.
8-layer cakes are awesome because they are both impressive AND allow a much more even distribution of cake to filling. In cakes with two or even three layers, there is a lot more cake than filling. This is often how it should be - especially if you are filling the layers with frosting.
But sometimes I want the ratio of cake and filling to be a bit more even - like it is in this cake. In this lemon cake, I wanted every single bite of cake to also include some lemon curd, and with 8 thin layers, that's exactly what you get.
- You might think that you'll need mad knife skills to get 8 even layers of cake, but you won't. To avoid having to cut layers of delicate cake in half, each layer of this cake is baked individually. (Don't worry - you won't need 8 cake pans.)
- The layers will keep perfectly well, wrapped individually, at room temperature, for up to two days. So, you can bake the layers of cake one day, and assemble and decorate them the next.
3 Tips for Baking a Perfect Lemon Layer Cake
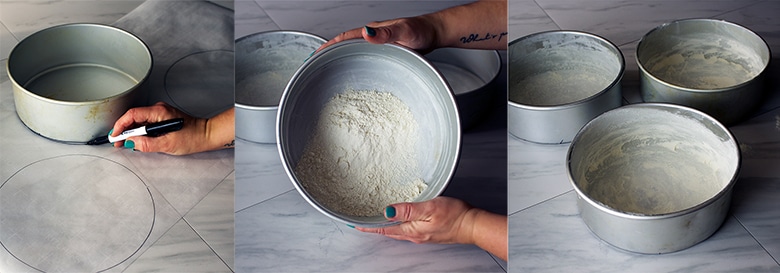
#1. Properly prepare your cake pans so the cake doesn't stick.
One of the most important steps in baking layer cakes is knowing how to properly prepare the cake pans so they don't stick. This is especially true when baking thin layers because there's less margin for error if the cake sticks to the pan.
To ensure each layer comes out of the pan perfectly intact, grease and flour your cake pans and line the bottom of the pans with parchment paper.
If you're a new baker and not entirely sure what I mean by "grease, flour, and line your cake pans with parchment paper", click here for a step-by-step tutorial.
- Most ovens will accommodate two or three 8-inch cake pans at a time, so bake the layers in batches
- In between batches wipe out your pans with a paper towel and re-grease, flour and line them with parchment.
- You can reuse the same piece of parchment paper but be sure to re-grease and flour it.
If you get all in a hurry and think this isn't necessary, you're probably going to end up with ragged layers of cake that have at least partially stuck to the pans. I speak from experience here friends.
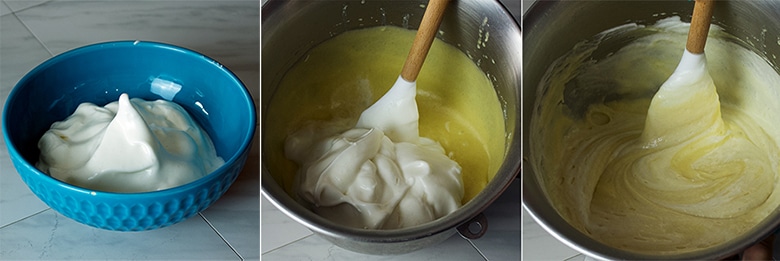
#2. Beating the egg whites separately gives this cake a light and fluffy texture.
One of the challenges of baking thin cake layers is achieving a light, fluffy consistency while maintaining enough structure so that the thin layers don't fall apart. In this cake, that delicate balance is largely achieved with eggs.
In baking, egg whites and egg yolks serve very different purposes. Egg yolks add richness and structure to cakes while the whites have the ability to trap air, creating a light, fluffy consistency. To maximize the unique qualities of the egg yolks and the egg whites in this cake, we're going to separate the eggs and incorporate them into the batter differently.
- Whisk the egg yolks into the buttermilk, butter, olive oil, and vanilla
- Then combine the egg yolk mixture with flour cornstarch, baking soda, and salt
- Beat the egg whites in a separate bowl with a bit of cream of tarter and sugar to help stabilize them. Beat until stiff peaks form when you lift up beater. Fold the beaten egg whites into the batter very gently to preserve as much air as possible.
The air in the beaten egg whites will give the baking soda plenty of little pockets to expand in the oven so that the cake layers rise evenly and have a lovely light and fluffy texture.
*This recipe calls for 9 egg yolks and only 5 egg whites, so save the extra 4 egg whites and use them in the Blackberry Italian Meringue Buttercream.
#3. Use room temperature ingredients.
In this recipe, as in most cake recipes, you’ll notice the words “at room temperature” after the butter, eggs, and buttermilk. This is important.
At room temperature, eggs and dairy form an emulsion that traps air. This is a good thing because all that trapped air expands in the oven, producing a fluffy consistency. Without this process, you’d end up with something more like a hockey puck than a cake.
The easiest way to bring eggs and dairy to room temperature is to just leave them out on the counter for a couple of hours. While many sources say that it’s safe to leave eggs out of the refrigerator for up to 8 hours, 2 hours is enough to bring them to room temperature and on the conservative side of the safety question.
But, what if you don’t want to wait two hours to bake that cake? I don’t blame you one bit. Here's how to bring eggs and dairy to room temperature lickity-split.
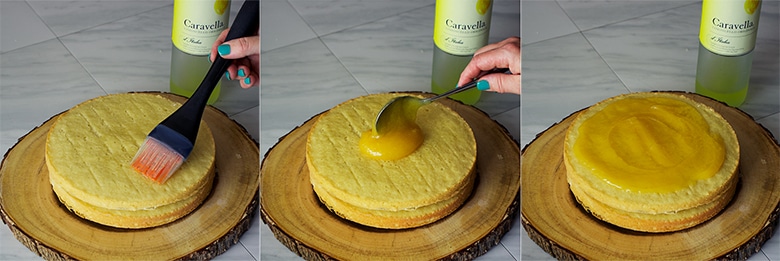
How To Assemble an 8-Layer Cake
To stack the cake layers, position the first layer on your serving platter and brush it with limoncello. Spread a few tablespoons of lemon curd over the cake so that it comes to within about 1-inch of the edges. Top with another layer and repeat until all 8 layers are stacked.
As you stack the layers, gently press down on each layer with your hands to compress them slightly. Do this very gently so you don't smash the cake.
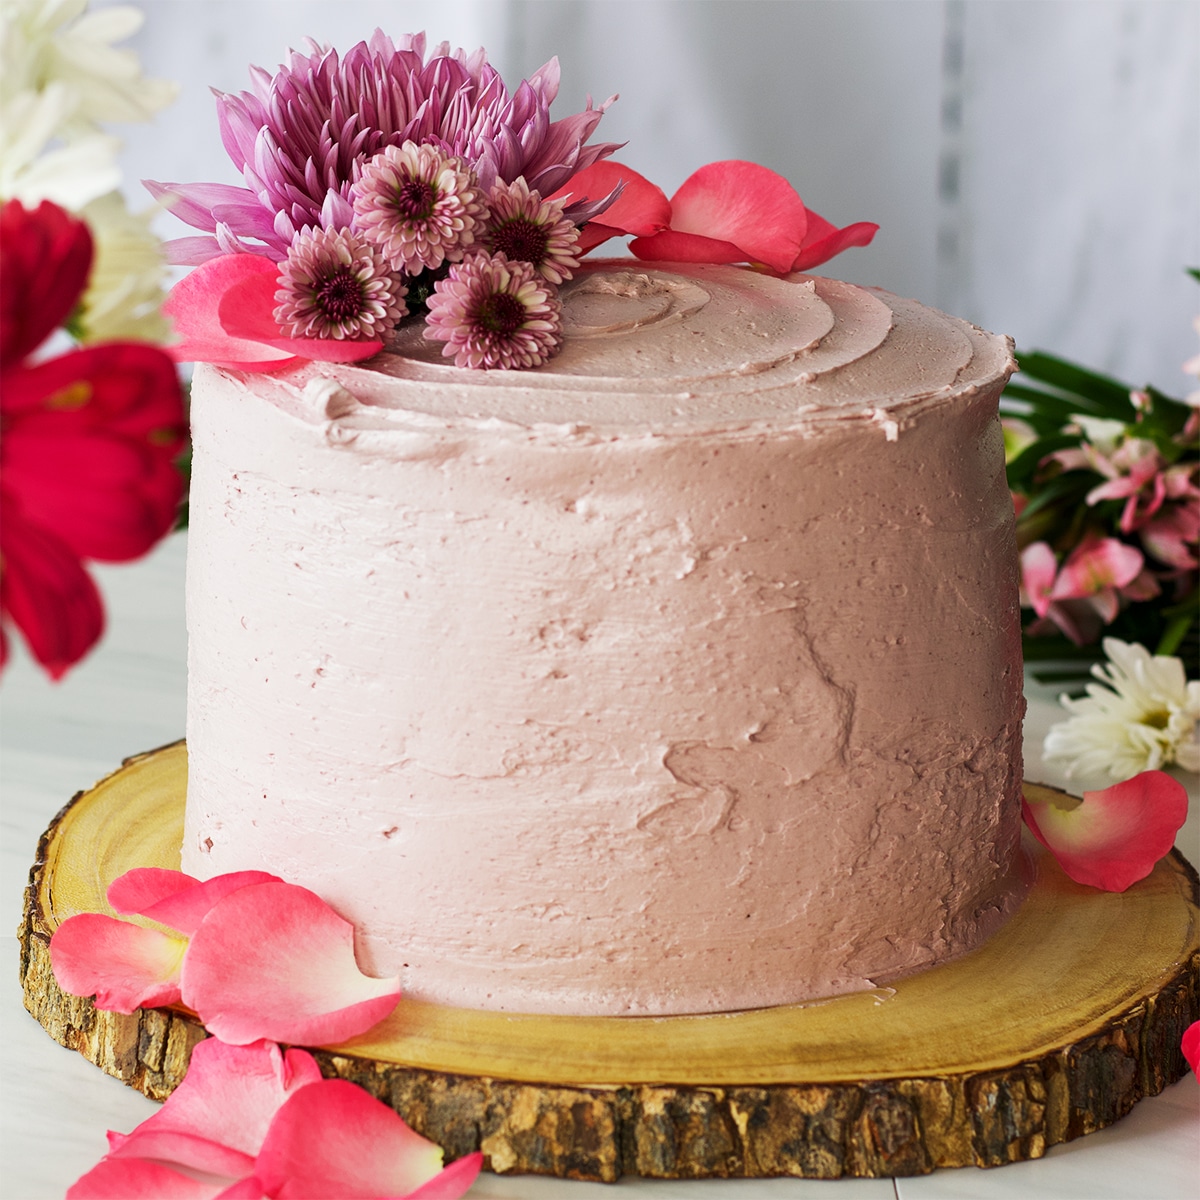
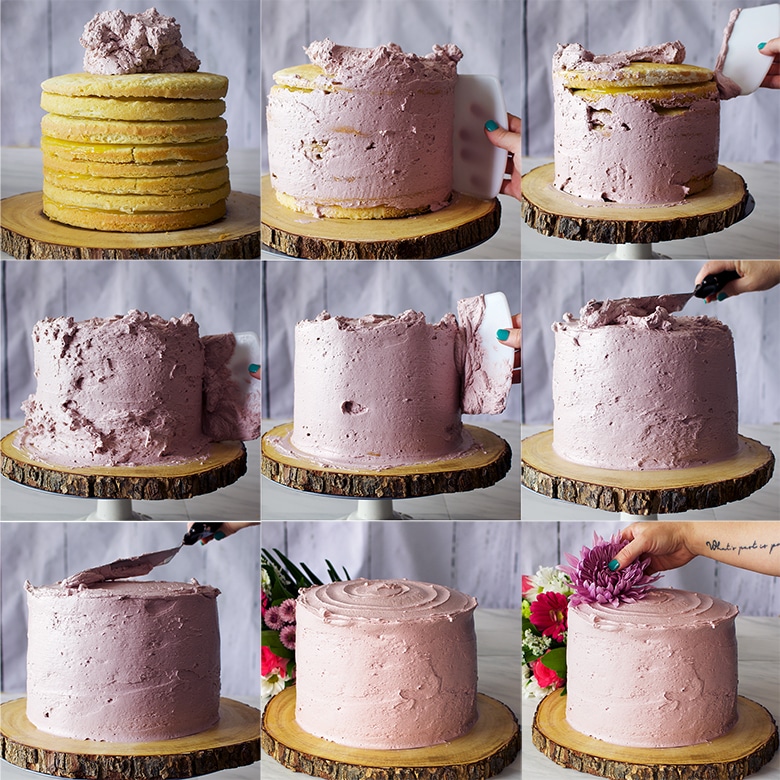
How to Frost and Decorate this Cake
Once all 8 layers of cake have been stacked, it's time to cover it in Blackberry Italian Meringue Buttercream. The key to covering a layer cake with buttercream without knocking over all those layers is to use a LOT of buttercream.
- Start by scooping a large amount of buttercream on the top of the cake.
- Use a spatula to gently smear the buttercream over the top and onto the sides of the cake.
- Using an icing smoother makes the process so much easier. Use the smoother to scoop more and more buttercream onto the cake, gently pressing it onto the cake as you do.
- Using a lot of buttercream means you can begin to press and smooth the frosting over the cake without accidentally scrapping the cake itself or pressing too hard and toppling the layers.
- Once every inch of cake has been covered in frosting, begin smoothing it out, removing excess buttercream as you do.
- Using a revolving cake decorating stand is ideal because you can slowly spin the top of the stand while holding the smoother against the sides of the cake.
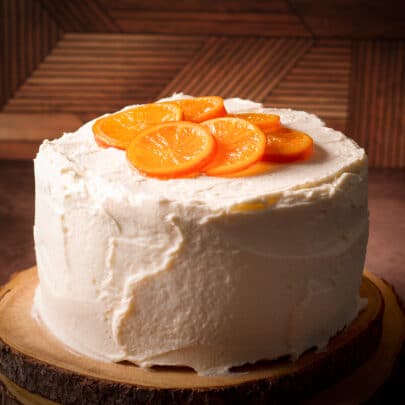
- Top the cake with flowers, fresh fruit or berries, or candied citrus slices.
How to Make Blackberry Italian Meringue Buttercream
If you've made Italian Meringue Buttercream in the past you might want to just skip to the recipe and dive in because you just KNOW the blackberry version is going to be fantastic. If you've never made Italian Meringue Buttercream, you're in for the biggest treat.
Here's what I tell people who are new to Italian Meringue Buttercream: Make it once, and you might never go back to any other kind of frosting. It's that good.
At first glance, Italian Meringue Buttercream appears complicated because the recipe includes a lot of very detailed instructions. This can be deceptive because the process isn't actually complicated at all. There are a few things that are important to get right, and so I've erred on the side of giving you too much information rather than not enough.
Think of the long instructions as having me there beside you looking over your shoulder while you make it, offering advice. (Ok. That sounds creepier then I mean it to be.) But the process itself can actually be boiled down to a few steps:
- Cook some sugar and water in a pan to create a sugar syrup.
- Beat 8 egg whites until stiff.
- Pour the hot sugar syrup into the egg whites to cook and stabilize them.
- Then beat in a lot of butter. (It's called buttercream for a reason.)
That's really it. Read all the way through the instructions so that you understand how the ingredients come together and how important temperature is to the process, then just go for it.
One of the greatest things about Italian Meringue Buttercream (besides its silky taste and texture), is how easily it incorporates a wide variety of flavorings.
For this lemon blackberry cake, I've added in blackberry jam, which makes it taste like blackberry frozen custard or gelato. You'll want to eat it by the spoonful. (Or, maybe that's just me. But I doubt it.)
FAQs and Expert Tips
A: Brushing each layer of cake with a bit of Limoncello increases the amount of lemon flavor in the cake and keeps the cake moist and fresh. I highly recommend it. By the way, I highly recommend using some of that Limoncello to make a super easy 3 ingredient lemon drop martini.
Having said that, the Limoncello is optional. This cake is also delicious without it.
A: You can bake all 8 layers for this cake one at a time, but it will take quite a while. A better option is to pick up one or two disposable cake pans at any supermarket and use them along with your one regular cake pan.
A: Yes! The cake layers can be wrapped individually in plastic wrap and kept at room temperature for up to 2 days before filling and decorating. If you plan to brush the layers with Limoncello, do so before wrapping them in plastic wrap.
The Italian Meringue Buttercream can be made in advance and stored in the refrigerator for up to 1 week or in the freezer for up to 3 months. See notes in the recipe for how to thaw and reconstitute Italian Meringue Buttercream after it's been refrigerated or frozen.
Once the cake is assembled and decorated, serve it within 4 hours or store the cake in the refrigerator for up to 24 hours.
A: If you have a good recipe for lemon curd and want to make it, go for it. If you're planning on purchasing it, like I did for this cake, give it a taste before you use it and consider how tart it is.
Having a tart lemon curd between the layers of this cake is pretty important, in my opinion, because it balances out the sweetness of the cake and blackberry buttercream.
If your lemon curd doesn't have a pronounced tart lemon flavor, adding in a bit of lemon extract or lemon oil can make a big difference in the finished flavor of your layer cake.My favorite brands of prepared lemon curd are Dickinson's and Bon Maman.
More Popular Layer Cake Recipes
- The Best Classic Vanilla Cake Recipe
- Carrot Cake with Cream Cheese Buttercream and Caramel Rum Sauce
- Olive Oil Cake with Lemon Mascarpone Pastry Cream
- Sinfully Rich Chocolate Devil's Food Cake
+ Subscribe to my newsletter for new and exclusive recipes in your in-box every month! As a full time traveler, living, working, cooking, and baking from a 5th wheel RV, it's also where I share our experiences of life on the road.
If you give this recipe a try, let me know! Scroll down to rate this recipe and leave a comment for me, or take a picture and tag it @ofbatteranddough on Instagram.
Happy baking!
📖 Recipe

Lemon Layer Cake with Blackberry Buttercream
This Lemon Layer Cake boasts 8 buttery layers of yellow cake doused in Limoncello, separated with lemon curd, and covered in a thick layer of Blackberry Italian Meringue Buttercream.
The cake is spring on a plate and as delicious as it is impressive.
Ingredients
FOR THE CAKE:
- 1 ½ cups (340 grams) buttermilk, at room temperature
- 16 tablespoons (226 grams/ 8 ounces) butter, melted and cooled to room temperature
- ¼ cup (50 grams) extra virgin olive oil
- 1 ½ tablespoons (21 grams) pure vanilla extract
- 9 large eggs, separated. You'll need 9 egg yolks, but only 5 egg whites. (*Save the extra egg whites and use them in the Buttercream.)
- ½ teaspoon (1.69 grams) cream of tartar
- 2 ⅔ cups (533 grams) granulated sugar, divided
- 3 ¼ cups + 2 tablespoons (405 grams) all-purpose flour
- ¼ cup + 2 tablespoons (42 grams) cornstarch
- ½ teaspoon (2.4 grams) baking soda
- 1 ½ teaspoon (8.85 grams) salt
- ½ cup (4 ounces) Limoncello (optional; see notes below), to brush over the baked cake layers
FOR THE FILLING AND FROSTING:
- 1 recipe Italian Meringue Buttercream
- 1 tablespoon (13 grams) vanilla extract
- 10 ounces seedless blackberry jam (*See note)
- 30 ounces lemon curd (*See note)
- 1 - 3 teaspoon lemon extract OR 1 teaspoon lemon oil (optional; see note below)
Instructions
MAKE THE CAKE:
- Preheat the oven to 350° F (176° C) and prepare two or three 8-inch round cake pans by greasing and flouring them, and lining the bottom of the pans with parchment paper. (Here's how to prepare cake pans.)
- Add buttermilk, melted butter, oil, vanilla, and 9 egg yolks to a bowl or large measuring cup and whisk with a fork to combine.
- Add 5 egg whites to a separate bowl and set aside. (*Save the 4 extra egg whites to use in the Buttercream.)
- Add the flour, cornstarch, baking soda, salt, and 2 cups (400g) of sugar to the bowl of the electric mixer. Fit the mixer with the paddle attachment and mix on low just to blend the ingredients.
- With the mixer running on low speed, gradually add the buttermilk mixture to the flour, mixing just until it's incorporated. Scrape down the sides of the bowl, then turn the mixer up to medium speed and beat for 15 seconds.
- Scoop the batter into a large bowl and rinse out the bowl of the mixer, being sure to dry it completely.
- Fit the mixer with the whisk attachment and beat the egg whites and cream of tartar on medium-high speed until soft peaks form when you lift the beater from the bowl. With the mixer running, gradually sprinkle in the remaining ⅔ cup (133 grams) of the sugar and beat until glossy, stiff peaks form.
- Using a rubber spatula, gently fold about ⅓ of the egg whites into the cake batter until incorporated. Fold in the remaining egg whites as gently as you can, mixing until just barely combined.
- Add about 1 cup of batter to each pan and use the back of a spoon to gently spread it in an even layer across the bottom of the pan.
- Bake the layers for 15-18 minutes, until the edges are golden and beginning to pull away from the sides of the pan. The cake should spring back when touched. Watch carefully - thin layers can over bake quickly.
- Remove the pans from the oven and place on wire racks. Let the layers cool in the pans for 5 minutes, then run a knife around the edge of the pans before flipping the pans upside down on the wire racks to remove the cakes.
- Re-grease, flour, and line the pans with parchment paper. (You should be able to reuse the same piece of parchment paper.) Fill the pans with 1 cup batter, and continue baking until you have 8 layers of cake.
- Once all the cake layers are baked and cooled, brush the tops of each layer with about 1 tablespoon of Limoncello. (Optional; see note below.)
FILL AND DECORATE THE CAKE:
- Make one recipe of Italian Meringue Buttercream. Once complete, beat in 1 tablespoon of vanilla extract and 10 ounces of good-quality blackberry jam.
- If your lemon curd is on the sweet side and you want it to be a bit more tart, stir in a bit of lemon extract or lemon oil.
- Lay one of the layers of cake on a cake board or serving plate. Spread 4-5 tablespoons of lemon curd in an even layer across the cake, leaving about a 1-inch gap around the edges of the cake round. Top with another layer of cake and more lemon curd. Repeat until all the cake layers have been used.
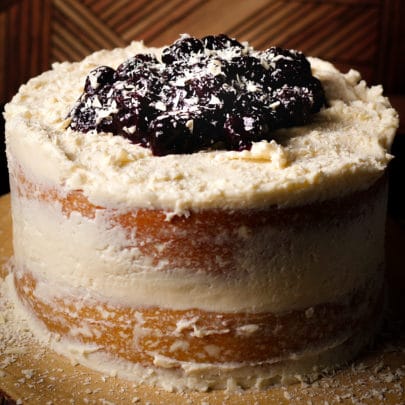
- Frost with a generous amount of Blackberry Italian Meringue Buttercream and decorate with flowers and fresh blackberries if desired.
Notes
- Brushing each layer of cake with a bit of Limoncello increases the amount of lemon flavor in the cake and keeps the cake moist and fresh. I highly recommend it. Having said that, the Limoncello is optional. This cake is also delicious without it.
- The two brands of lemon curd I like the most are Dickenson's and Bon Maman (see links below). You can also make it yourself. I love this Lemon Curd recipe from Ina Garten. Regardless of what brand of lemon curd you use or whether you make it from scratch, adding a bit of lemon extract or lemon oil gives the filling a stronger lemon flavor. The amount you use is completely up to you - start with a little, taste, and add more if you like. Remember that lemon oil has a stronger flavor than lemon extract.
- What if you only have one cake pan? You can bake all 8 layers of this cake one at a time, but it will take quite a while. A better option is to pick up one or two disposable cake pans at any supermarket and use them along with your one regular cake pan.
- One baker wrote to say that she wished there was more blackberry flavor in the buttercream. To add more blackberry flavor, simply increase the amount of blackberry jam. Add additional jam slowly and pay attention to the consistency of the buttercream to ensure it doesn't get runny.
How to make this cake in advance:
The cake layers can be wrapped individually in plastic wrap and kept at room temperature for up to 2 days before filling and decorating. If you plan to brush the layers with Limoncello, do so before wrapping them in plastic wrap. The Limoncello is optional but will help the layers of cake stay moist and fresh tasting.
The Italian Meringue Buttercream can be made in advance and stored in the refrigerator for up to 1 week or in the freezer for up to 3 months. See notes in the recipe for how to thaw and reconstitute Italian Meringue Buttercream after it's been refrigerated or frozen.
Once the cake is assembled and decorated, serve it within 4 hours or store the cake in the refrigerator for up to 24 hours.
Recommended Products
As an Amazon Associate and member of other affiliate programs, I earn from qualifying purchases.
-
 Puroma Rotating Cake Turntable with 3 Angled Icing Spatulas and 3 Icing Combs
 -
KitchenAid 6 Qt. Professional 600 Series Bowl-Lift Stand Mixer
-
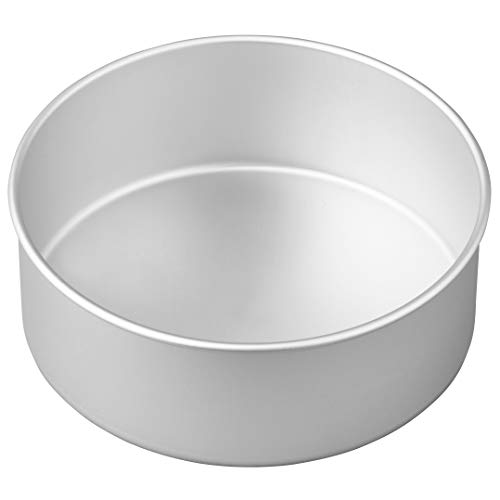
Wilton Aluminum Round Cake Pan, 8 x 3-Inch
-
Boyajian Pure Lemon Oil, 3.4 Fluid Ounce
-
OliveNation Pure Lemon Extract - 4 ounces
-
Dickinson's Lime Curd, 10-Ounce (Pack of 6)
-
Bonne Maman Curd Lemon, 12.7 oz


Nutrition Information:
Yield: 18 Serving Size: 1 sliceAmount Per Serving: Calories: 701Total Fat: 32gSaturated Fat: 18gTrans Fat: 1gUnsaturated Fat: 12gCholesterol: 208mgSodium: 440mgCarbohydrates: 96gFiber: 1gSugar: 76gProtein: 7g

Ellen says
Rebecca, my husband loves lemon cake, so I’m going to try this soon; however, I don’t like the color of the frosting. What do you suggest to make it prettier and not so “gray” ? I know it’s natural, but it’s not too appealing to me. Thanks
Rebecca Blackwell says
Hi Ellen! Just add some gel food coloring. Make sure to use gel coloring, not liquid drops. I hope that helps! Please let me know if you have any other questions! And, I'd love to hear what you and your husband think of this cake! xo
Ramona says
This looks amazing and i want to bake it for my mum’s birthday end of the month. Could you give me the ingredients in grams please
Rebecca Blackwell says
Hi Ramona! I added metric measurements to the ingredients in the recipe, so you should be all set. Please let me know if you have any other questions. And, I'd love to know what you and your mum think of this cake after you make it! Happy birthday to your mum! xo
Ramona says
Thank you! Made this today for my mum’s birthday and it was a massive hit with everyone! I used seedless Raspberry jam in buttercream and topped with a white chocolate drip. My sponges didn’t rise as well as yours in the photo ( not sure what i did wrong?) but it still tasted lovely. My buttercream also curdled and I initially panicked, but then read through your notes again and put a small amount in the microwave and it worked!
Rebecca Blackwell says
I am so happy to hear that everyone at the party liked this cake! I LOVE the idea of topping this cake with a white chocolate drip. There are several things that can affect the rise of a cake... because these are thin layers, my first guess is that your oven runs a bit hot. Most ovens are not 100% accurate. If yours runs hot, the cake might have set before it had a chance to rise completely. If you don't have an oven thermometer, I'd suggest picking on up one of these days just to test whether or not that might be the problem. The other thing to check is whether your baking soda is a bit stale. Toss a small spoonful of baking soda into a bowl and add a splash of vinegar or lemon juice. If the mixture gets super fizzy, your baking soda is fine. If the fizz is kind of lackluster, the baking soda should be replaced.
Not sure if either of those things might be the reason your layers didn't rise as well, but hopefully it's a place to start. Regardless, it doesn't sound like anyone minded. 😊 I'm so, so, so happy to hear that you didn't give up on the buttercream! Italian Meringue Buttercream can almost always be fixed when things like this go wrong and it breaks my heart when people give up on it too soon.
Thank you so much for taking the time to leave a comment for me! I love knowing how these recipes work out for people. Happy birthday to your mum! xo
Debbie M says
I had similar issues and realized your instructions have 2 different cake size pans. The instructions themselves say to use 9 inch pans (which I used) and then below in the "recommneded products" you show an 8 inch pan. My cake turned out lovely, but only 7 layers. I know if I had used the smaller pan, the cakes would have been a bit taller and 8 layers.
My only other thought would have been to have used more blackberry jam. I had an 11 ounce jar and used the entire thing and still would have like more blackberry flavor.
**One other question, why bake individual layers and not just bake regular size cakes and slice them into the layers?
Rebecca Blackwell says
Hi Debbie! Thanks so much for the feedback. I will clarify the cake pan's size in the recipe and note that some bakers might want to plan for more blackberry flavor. To answer your question, you could bake this cake in taller layers and then slice it into thin layers. Over the years I've received feedback from bakers who have had difficulty achieving flat, even layers from slicing thick cake layers and so decided to create a recipe for which no slicing is required. But, you could bake this cake in 4 layers that you would then slice in half for a total of 8 layers. Or, if your cake pans are tall enough (3-inch sides), you could bake 2 tall layers and then slice each into 4 thin layers. Either will work! Thanks again for taking the time to leave a comment with your suggestions! I truly appreciate it!
Hayley says
Hi, I am wanting to bake this cake in an 8 inch tin and make it a little taller. Would you reduce the amount of batter and make an extra layer? Or would you bake 8 slightly taller layers for a minute or two longer? I’m planning a nice sharp finish on the buttercream and hoping the cake will stand for this look.
Kind regards
Rebecca Blackwell says
Hi Hayley!
I would add a bit more batter to the pan - about 1 1/4 to 1 1/2 cups - and bake the layers for longer. This means you'll need to make a batch plus another half of batter. If it were me, I'd make a regular batch of batter and see how many layers I got that were the height I was looking for from that first batch. Most likely, I'd want to test a layer or two to determine how much batter was needed to get the height I was looking for. Then, I'd make a second batch, measuring the amount of batter to get layers the same height as the first. Making two full consecutive batches might mean you have more batter than you need... but you could always bake the extra layers and freeze them. Also, you'd have some extra in case one of them cracks or in case it takes you a layer or two to determine the right height.
Does that help? Please let me know if you have any other questions! And, I'd love to hear how your cake turns out! xo
Hayley says
Thanks so much for your reply!
Cait says
This looks amazing and I'm considering baking a variant for my mom's birthday with one caveat: we are both celiac. Do you think your gluten-free vanilla cake recipe would bake well and maintain crumb texture in these shorter layers or should I stick to your recipe as written and do a three layer cake? I'm planing to fill it with a blueberry curd, so shorter layers are super tempting!
Rebecca Blackwell says
Hi there! I've never baked Gluten Free Vanilla Cake in short layers... it might be fine, but I am a bit concerned that baking short layers might dry the cake out a bit. Here's what I would do: Bake the Gluten Free Vanilla Cake in three layers as directed in the recipe. After the layers cool completely, cut all three layers in half, so that you end up with 6 layers. From there you can proceed to brush the layers with limoncello (if you like) and stack the layers with blueberry curd (YUM!).
Cutting layers of cake in half can be a bit tricky if you've never done it. Use a serrated knife to cut each layer. To separate them, I like to use a large flat spatula to gently slide the top layer onto a baking sheet that I've lined with parchment (so the cake doesn't stick to the baking sheet.)
Does this help? Please let me know if you have any other questions! And, I'd love to know how your cake comes out after you bake it! It sounds delicious. xo
Cait says
Thanks for your response! Finally got around to baking the cake and it was a massive success. I decided to just go for it on trying to bake the gluten free cake in short layers-- the flavors were going to be an experiment anyway, so I just went whole hog. I thought less crumb exposed for the curd to seep through would be a good thing and I was curious what would happen! I also used King Arthur Flour's GF cup for cup because the grocery store I was at didn't have a great selection of alternative flours and I managed to forget to buy the buttermilk so I used a half cup full fat milk mixed with a half cup full fat greek yogurt and a tablespoon of lemon juice. Despite flying by the seat of my pants, the crumb texture ended up being fantastic and the flavor of the sponge was out of this world! Along with a blueberry curd layer I covered the whole thing in your chai Italian meringue buttercream. I was quite concerned that I messed up the buttercream at several points (some separation with the butter, I thought I overwhipped the meringue, and the instant chai was a little gritty at first), but your trouble shooting was dead on: when in doubt, just keep whipping. All of the issues fixed themselves and I ended up with a decadent, smooth Italian meringue buttercream. I'm excited to try more of your recipes!
Rebecca Blackwell says
I am soooo happy to hear that this cake was a success, Cait! Also, I'm thrilled to know that you can substitute King Arthur Flour GF Flour AND that the cake baked up well in short layers. I'm going to add those tips in the recipe notes so other bakers know they have options. 🙂 Also, I am so completely intrigued by the idea of a lemon cake with blueberry curd and chai IMB. It sounds like such an interesting and delicious combination that I'm already thinking about what else I could make with those flavors. And I'm SO happy that you kept beating the IMB and it came together! Sometimes I receive comments from discouraged bakers that they threw it out because the buttercream isn't coming together and I just want to cry 😩 because I know in most cases if they just would have kept beating it would probably have been fine.
Thank you so very much for taking the time to leave a comment for me about this cake and how you handled substitutions and problems as they came along. I appreciate it more than I can express! xo
Aubrey says
I want to make this recipe into cupcakes! I'm thinking of making a hole in the middle and putting the lemon curd in that way.
How many cupcakes do you think this recipe will make?
Any recommended adjustments?
Thanks!
Rebecca Blackwell says
Hi Aubrey! I would actually suggest that you use this recipe for the cupcakes: https://ofbatteranddough.com/buttermilk-caramel-cupcakes/
It's my go-to cupcake recipe. I've used it as the base for all sorts of different flavored fillings and frostings over the years. To flavor the cupcakes with lemon, just brush them with some Limoncello after baking. Filling them with lemon curd will be delicious - you shouldn't even have to make a hole in the cupcakes. Just fill a pastry bag with lemon curd, fit the bag with a large round tip, poke the tip into the cupcakes and squeeze some curd right into the center. Frosted with Blackberry Italian Meringue Buttercream, they'll be delicious! Will you let me know how they come out? xo
Suzanne says
This cake was a HUGE hit! I made it and then took it to some co-workers, who all asked for the recipe! Even my husband, who isn't really into lemon flavored things, was a fan.
Rebecca Blackwell says
I am so glad to hear that everyone love this cake!!! I have a daughter who, like your husband, isn't really into lemon flavored sweets. When I was testing out the recipe she had a bite and told me that "for a lemon cake, it's pretty good." And, that's when I knew I had a winner. 🙂 Thank you so much for taking the time to leave this comment and let me know you enjoyed it! xoxo