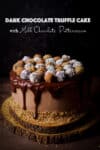
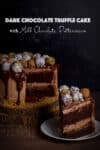
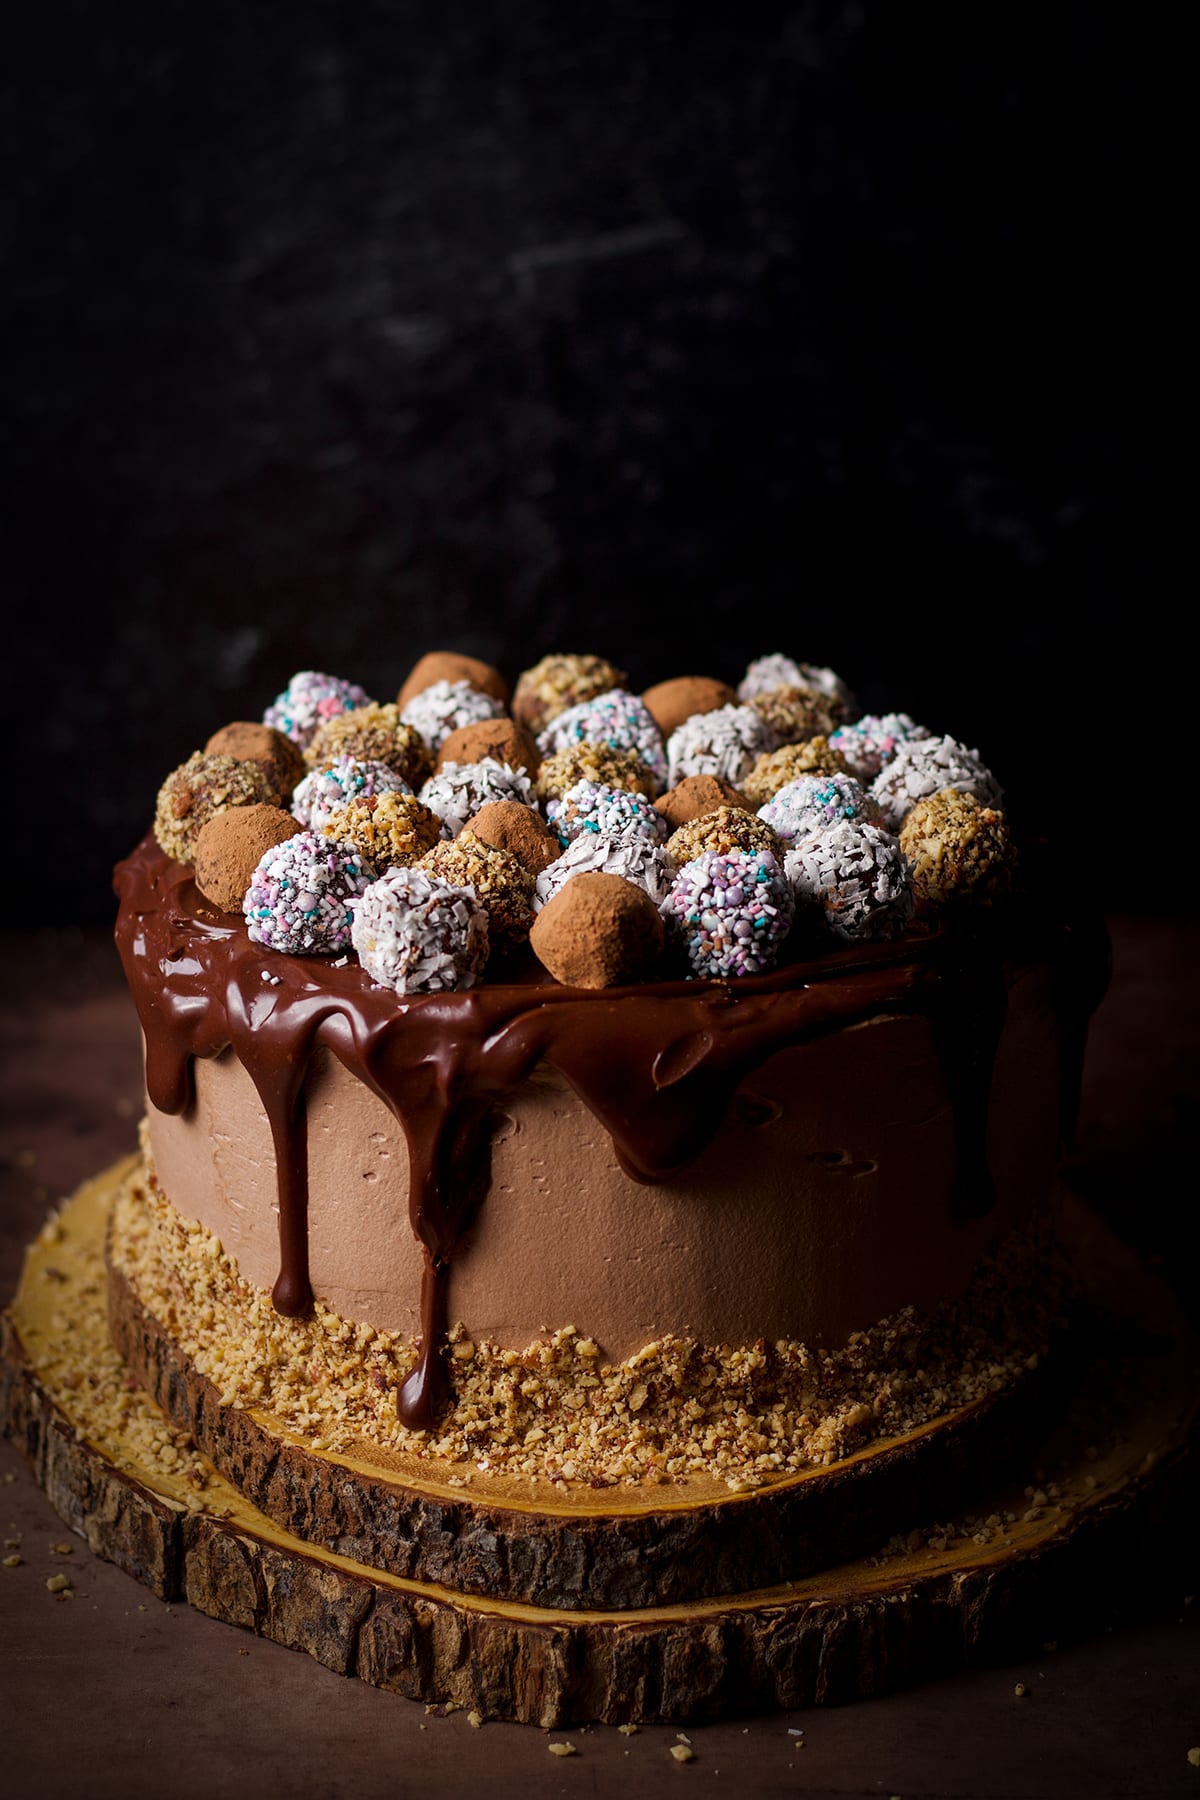
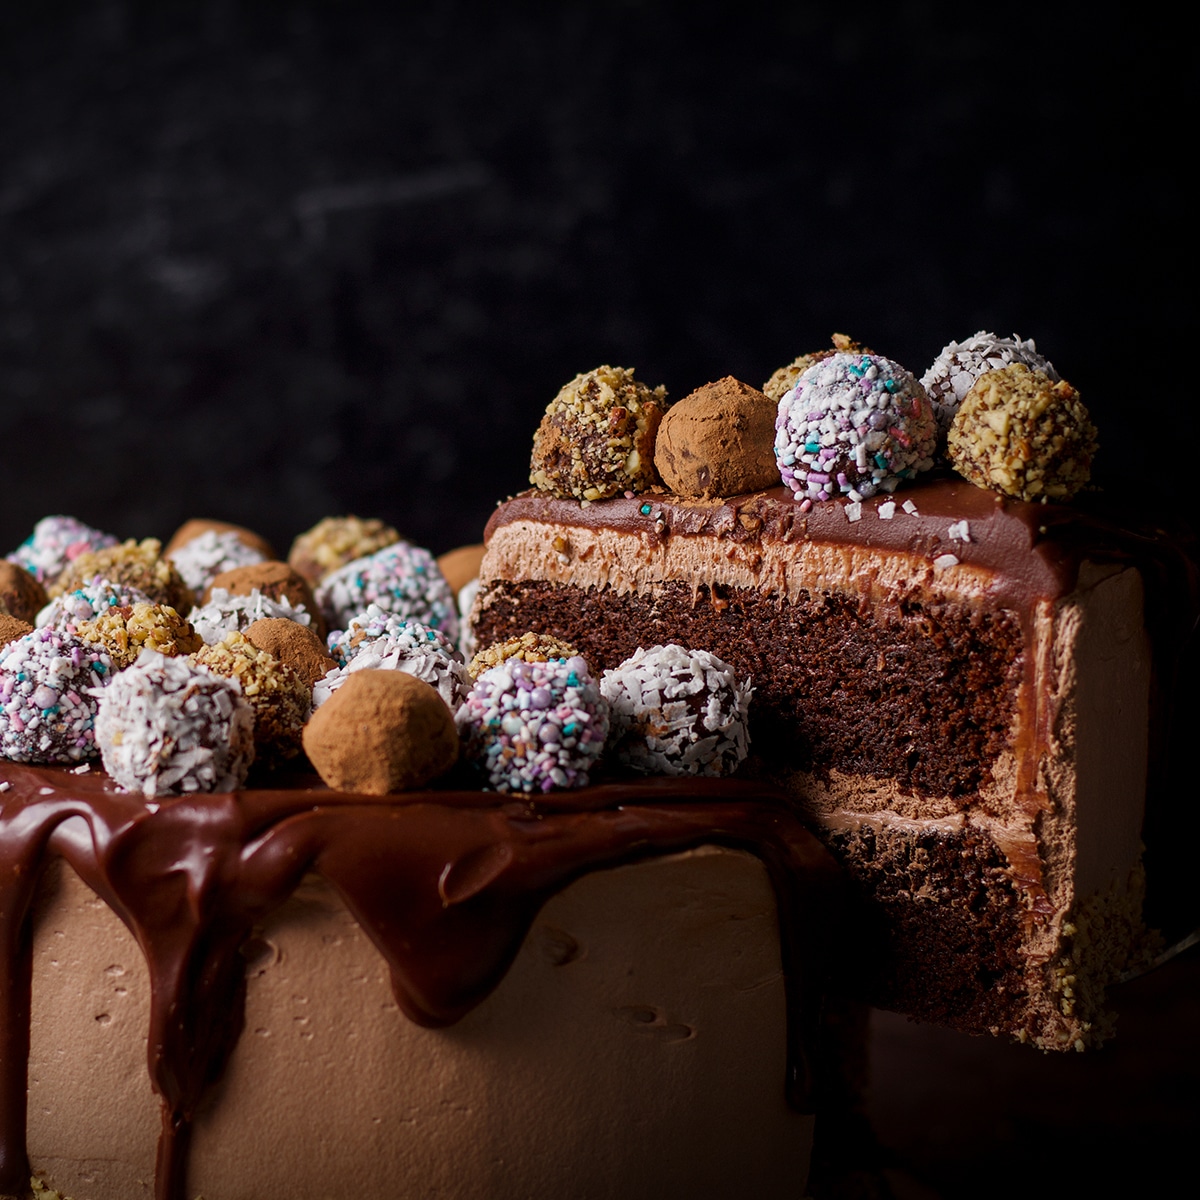
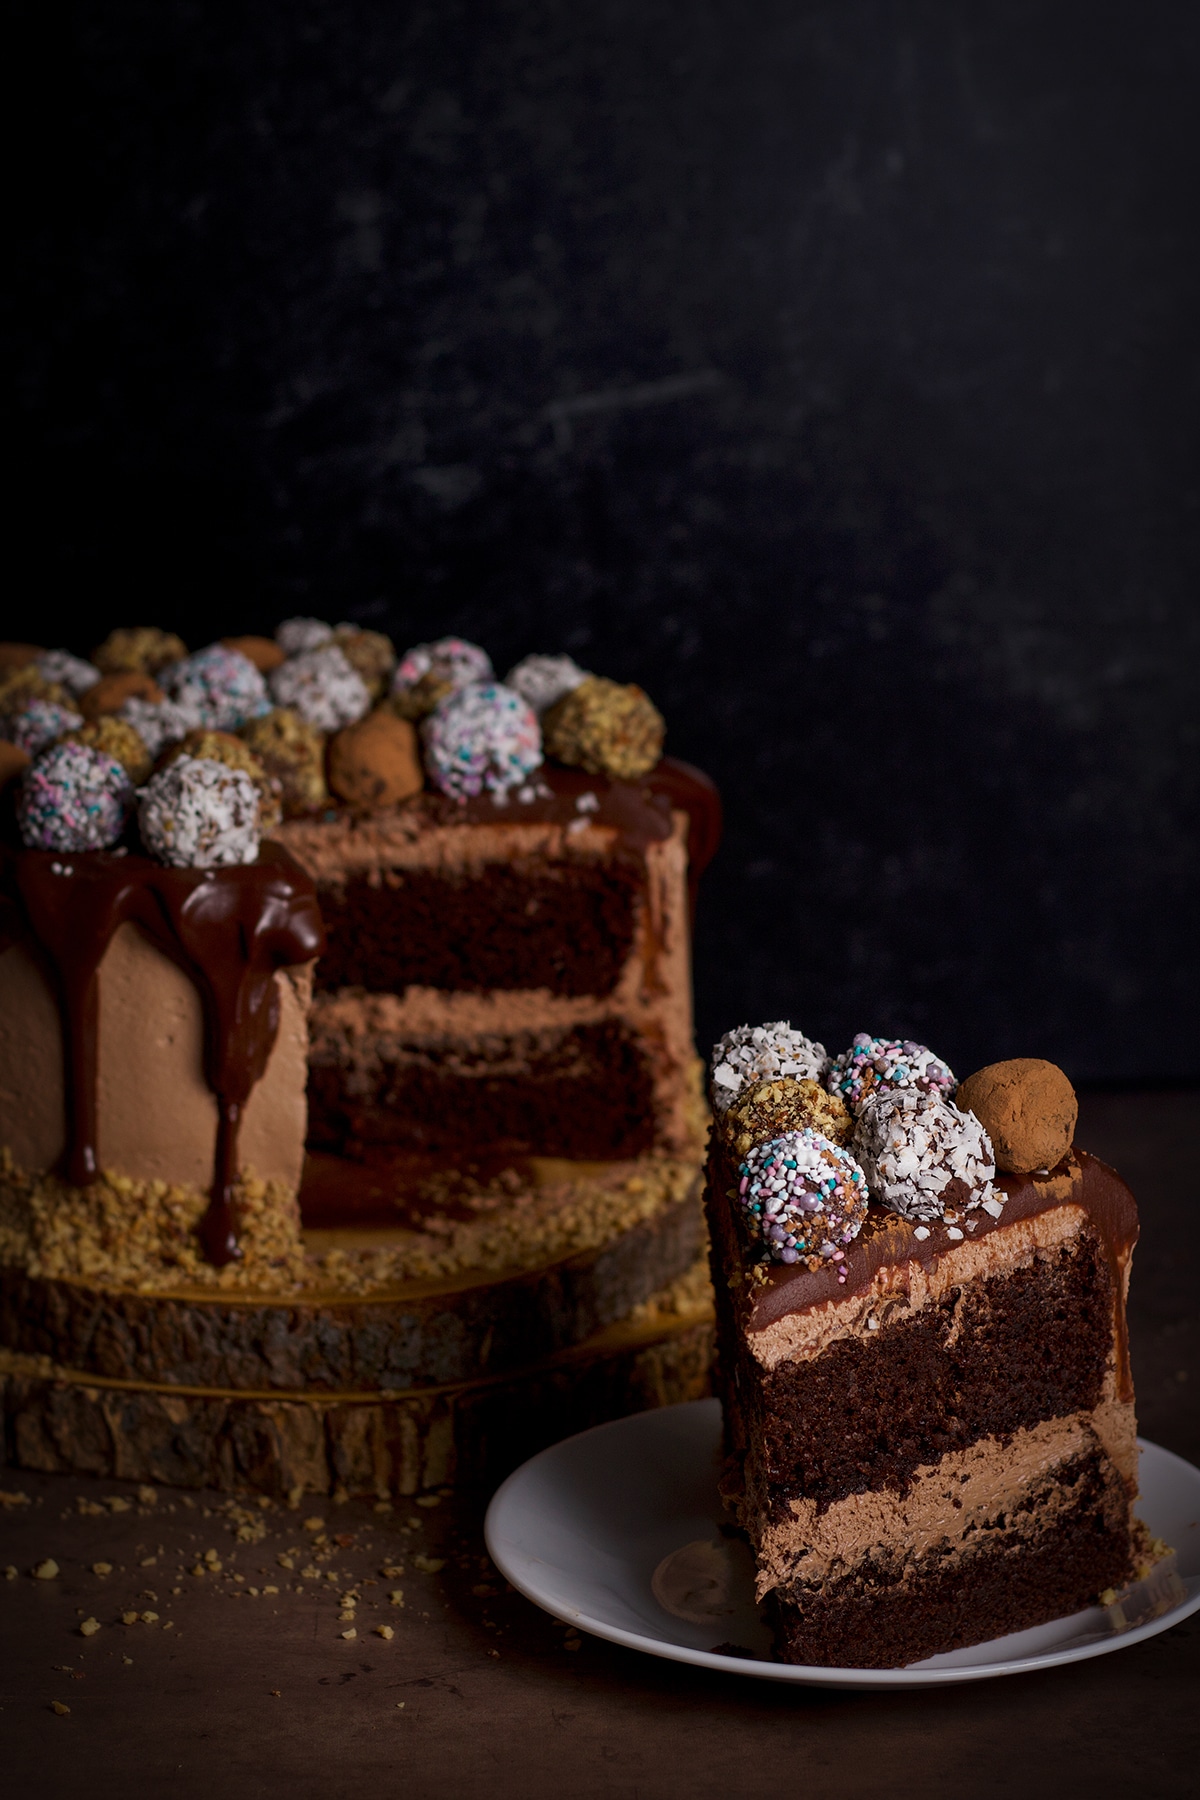
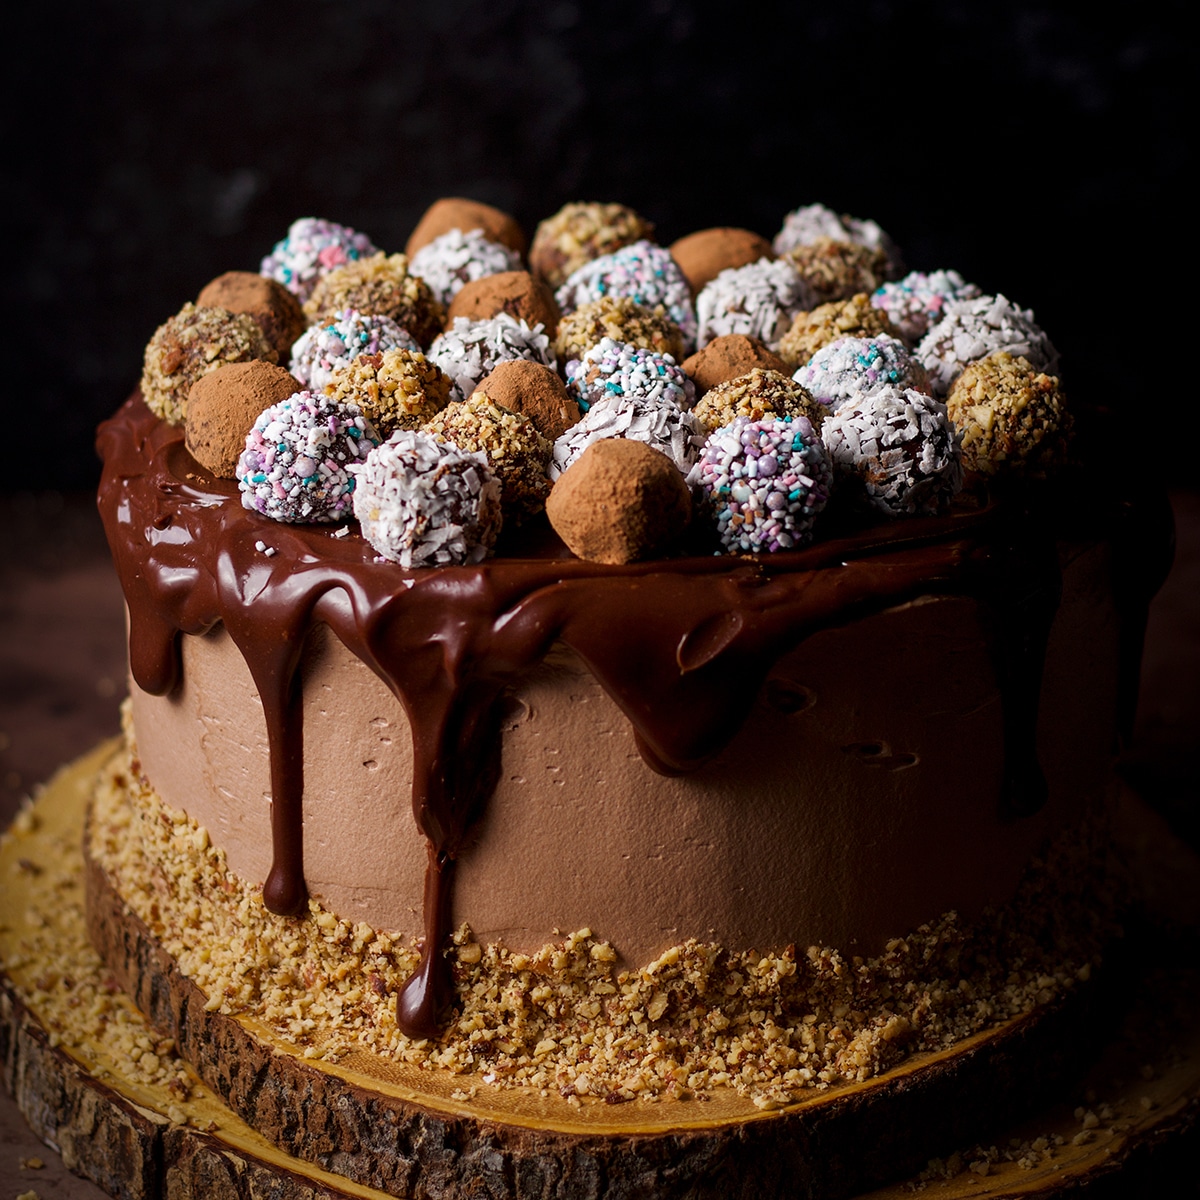
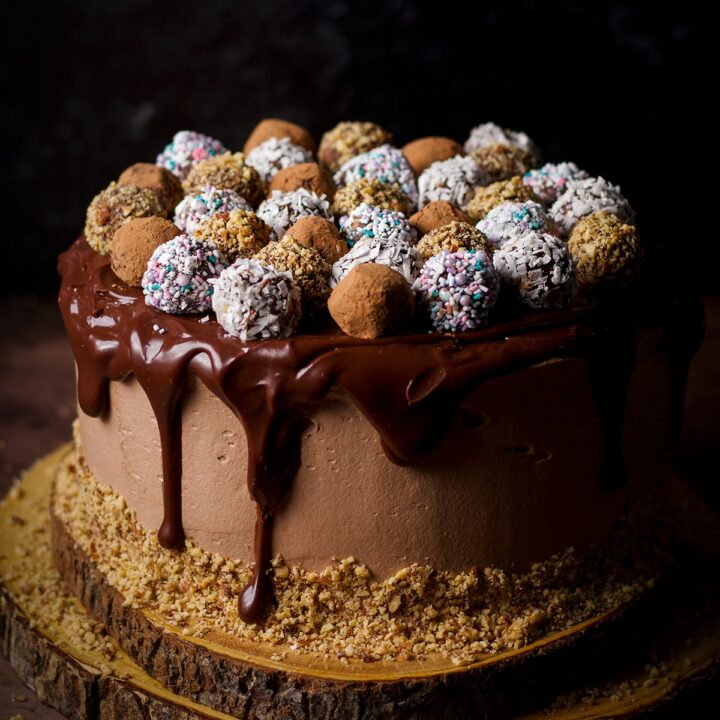
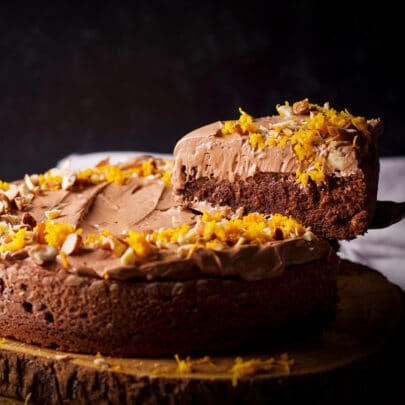
This chocolate truffle cake is exactly what it sounds like - a rich, decadent, supremely chocolate cake that's so fudgy and creamy it literally melts in your mouth. Just like a chocolate truffle.
Here's what we've got going on here:
- Two layers of dark chocolate fudge cake that blur the line between cake and brownie
- Ultra creamy milk chocolate buttercream that tastes just like the inside of a chocolate truffle
- Dark chocolate ganache, poured over the top of the cake until it drips decadently over the sides
- And plenty of Chocolate truffles, of course.
"Oh my word. This looks like a fancy cake and honestly, I was a bit intimidated by the picture. I also wasn't so sure about making this with Greek yogurt, but this recipe was very, very good. The cake part was sweet and rich, and the buttercream balanced the sweetness perfectly. And the step-by-step instructions were exactly what I needed to create this with my teenage daughters. We were all thrilled with how it looked, and especially how it tasted. This recipe is a keeper!!" - Abigail
Making a chocolate truffle cake is what I'd call a baking project.
Unlike a simple Loaf Cake or 1-hour Buttermilk Caramel Cupcakes, this isn't the kind of cake you throw together quickly to chase a craving or fulfill your promise to contribute to your 3rd grader's bake sale or class party.
This is the kind of cake you make for an occasion where decadence is not only expected but the main event.
I think it mostly goes without saying that chocolate truffle cake is the perfect cake for Valentine's Day. It's also the perfect cake for your chocolate-loving best friend's birthday party, or your father-in-law's retirement party, or a dinner party with the kind of guests that you want to both spoil and impress.
It's also the kind of cake you make on a Saturday afternoon after a busy week when a baking project feels absolutely essential to your health and happiness.
Nothing about this cake is difficult. It just takes a bit of time.
- Making the batter for chocolate fudge cake is basically a 3-step process.
- Milk chocolate buttercream requires 4 ingredients and takes less than 15 minutes.
- And, chocolate ganache, which is poured over the top of the cake and used to make chocolate truffles, requires nothing more than melting chocolate into cream.
There is nothing to be intimidated about here even if you're a novice baker. And the end result is guaranteed to impress everyone you decide to share it with.
Jump to:

+ Subscribe to my newsletter for new and exclusive recipes in your in-box every month! As a full time traveler, living, working, cooking, and baking from a 5th wheel RV, it's also where I share our experiences of life on the road.
Ingredients Needed to Prepare this Cake
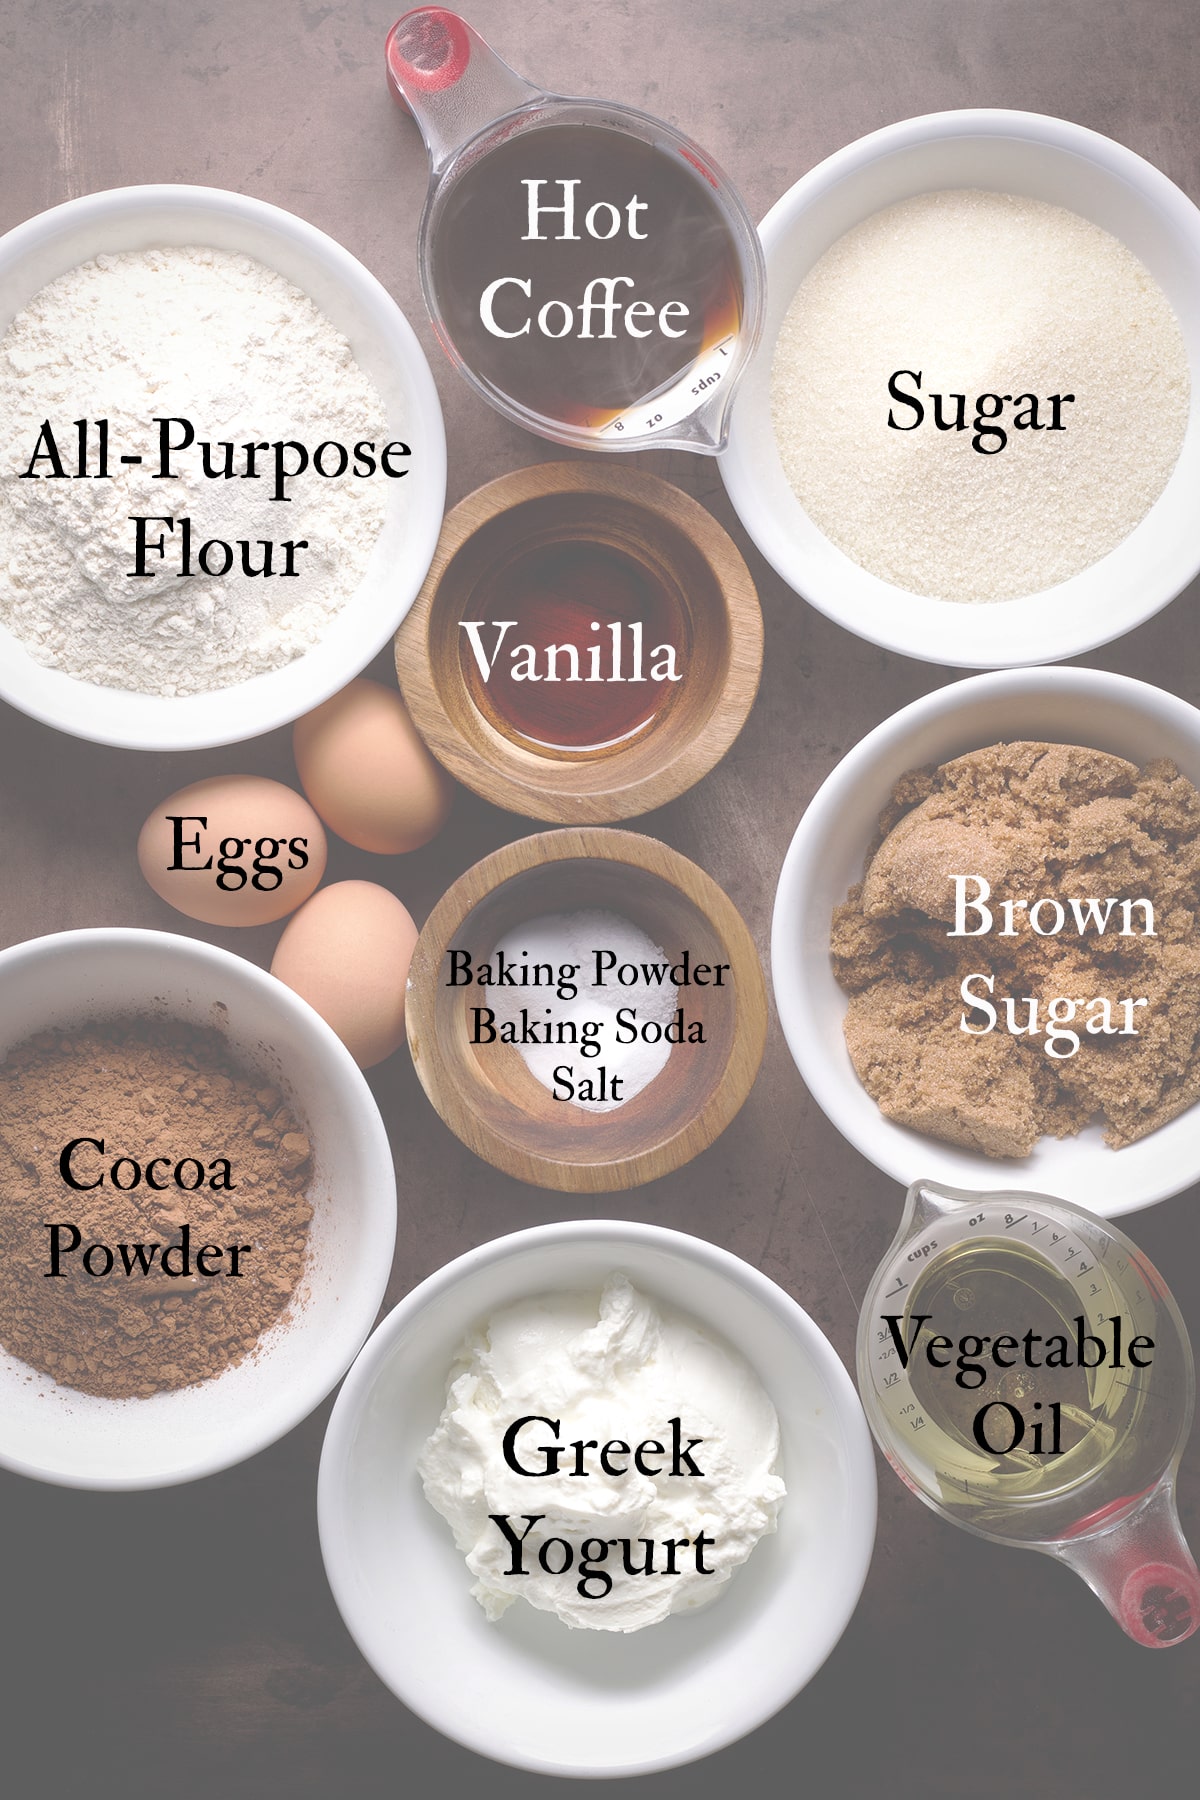
- Granulated sugar AND brown sugar. Brown sugar adds moisture and a caramelly flavor that's the perfect compliment to chocolate. But white sugar helps keep the texture of a cake light and aerated. So, to get the best of both worlds in this chocolate truffle cake - an incredibly moist and fudgy texture that's not dense, this recipe uses a 50/50 combination of both.
- All-purpose flour. I tested this cake recipe using both cake flour and all-purpose flour and preferred the one baked with all-purpose flour. There is so much moisture and richness in this cake that it needs the added structure that higher protein all-purpose flour provides.
- Unsweetened natural cocoa powder (not dutch process). Natural cocoa powder increases the acidity in this cake batter which keeps the cake tender and fudgy without being dense.
- Salt. Always and in everything but especially in chocolate desserts. Salt balances the natural bitterness of chocolate and brings out its natural flavor. It might sound counterintuitive, but if you want chocolate to taste more chocolaty, add a bit of salt.
- Baking powder and baking soda. Baking powder helps the cake rise while it bakes and baking soda works with the acid in the batter to create an impossibly tender crumb.
- 2 large eggs + 1 large egg yolk. Eggs create structure in this cake and that extra yolk gives it an extra fudgy texture.
- Vegetable oil. Oil based cakes tend to be more moist and tender than butter-based cakes. In this cake, oil is essential to creating a deeply chocolate, almost brownie-like texture.
- Unsweetened, plain full-fat greek yogurt. I LOVE using yogurt, sour cream, and buttermilk in cakes because all of these ingredients add flavor and acidity to the batter. In this recipe, yogurt was the best choice because its mild flavor didn't interfere with the star of the show - chocolate. Using greek yogurt is important because it doesn't contain as much water as regular yogurt.
- Hot strong-brewed coffee. Using coffee in this chocolate cake will NOT make the cake taste like coffee. Like, at all. My coffee-hating husband had absolutely no idea that it was in there. Coffee intensifies the chocolate flavor in this cake to a surprising degree. But, if you're still worried about tasting coffee in your chocolate cake, you can use boiling water instead.
- Pure vanilla extract. Imitation vanilla can give cakes and other baked goods an artificial, bitter aftertaste. So, use the real stuff.
Ingredients Needed To Assemble and Decorate Chocolate Truffle Cake
- Milk Chocolate Buttercream. This super easy and ultra creamy milk chocolate buttercream requires just 4 ingredients and takes less than 15 minutes to make. And, most importantly for a chocolate truffle cake, milk chocolate buttercream tastes just like the center of a really good chocolate truffle.
- Dark Chocolate Ganache. Chocolate ganache dripping down the sides of this chocolate cake is about more than decoration. The combination of dark chocolate cake, milk chocolate buttercream, and dark chocolate ganache is the perfect triple chocolate decadence worth of the name chocolate truffle cake.
- Chocolate truffles and ground nuts. Chocolate truffles are truly one of the easiest kinds of candy to make. Scroll down for easy step-by-step instructions for how to make the perfect number of chocolate truffles for this cake. Or, if you prefer, purchase some chocolate truffles and use those to decorate your truffle cake.
Step-by-Step Photos and Instructions
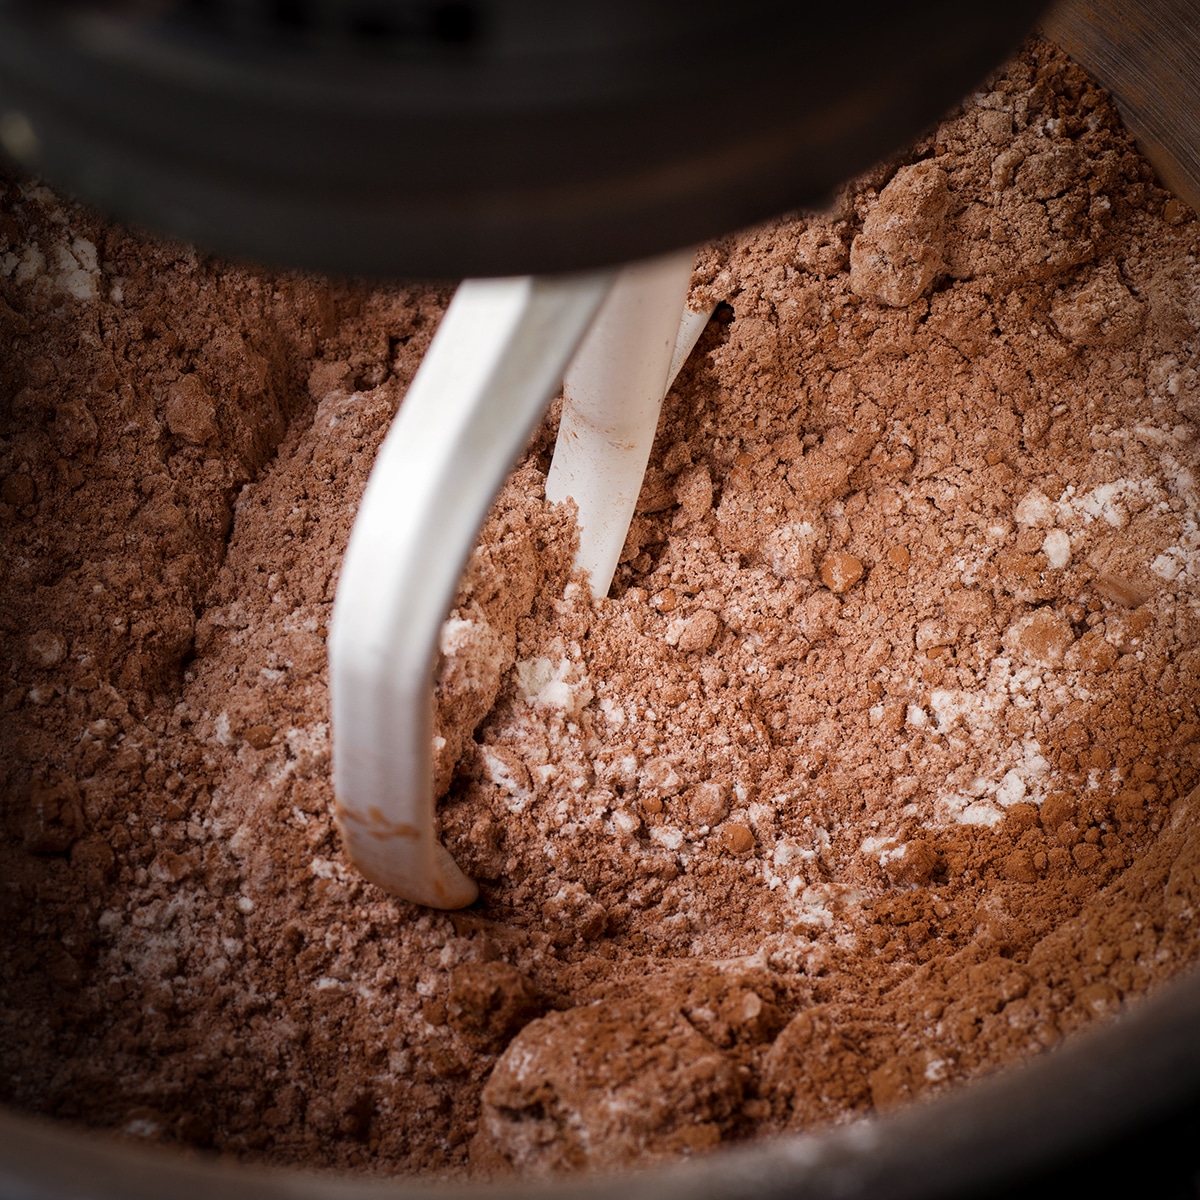
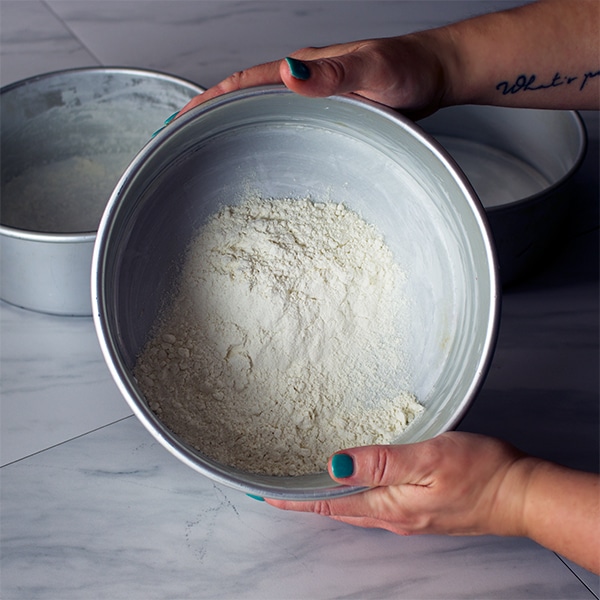
Add all the dry ingredients (sugar, flour, cocoa powder, salt, baking powder, and baking soda) to a bowl and stir it around a bit just to combine.
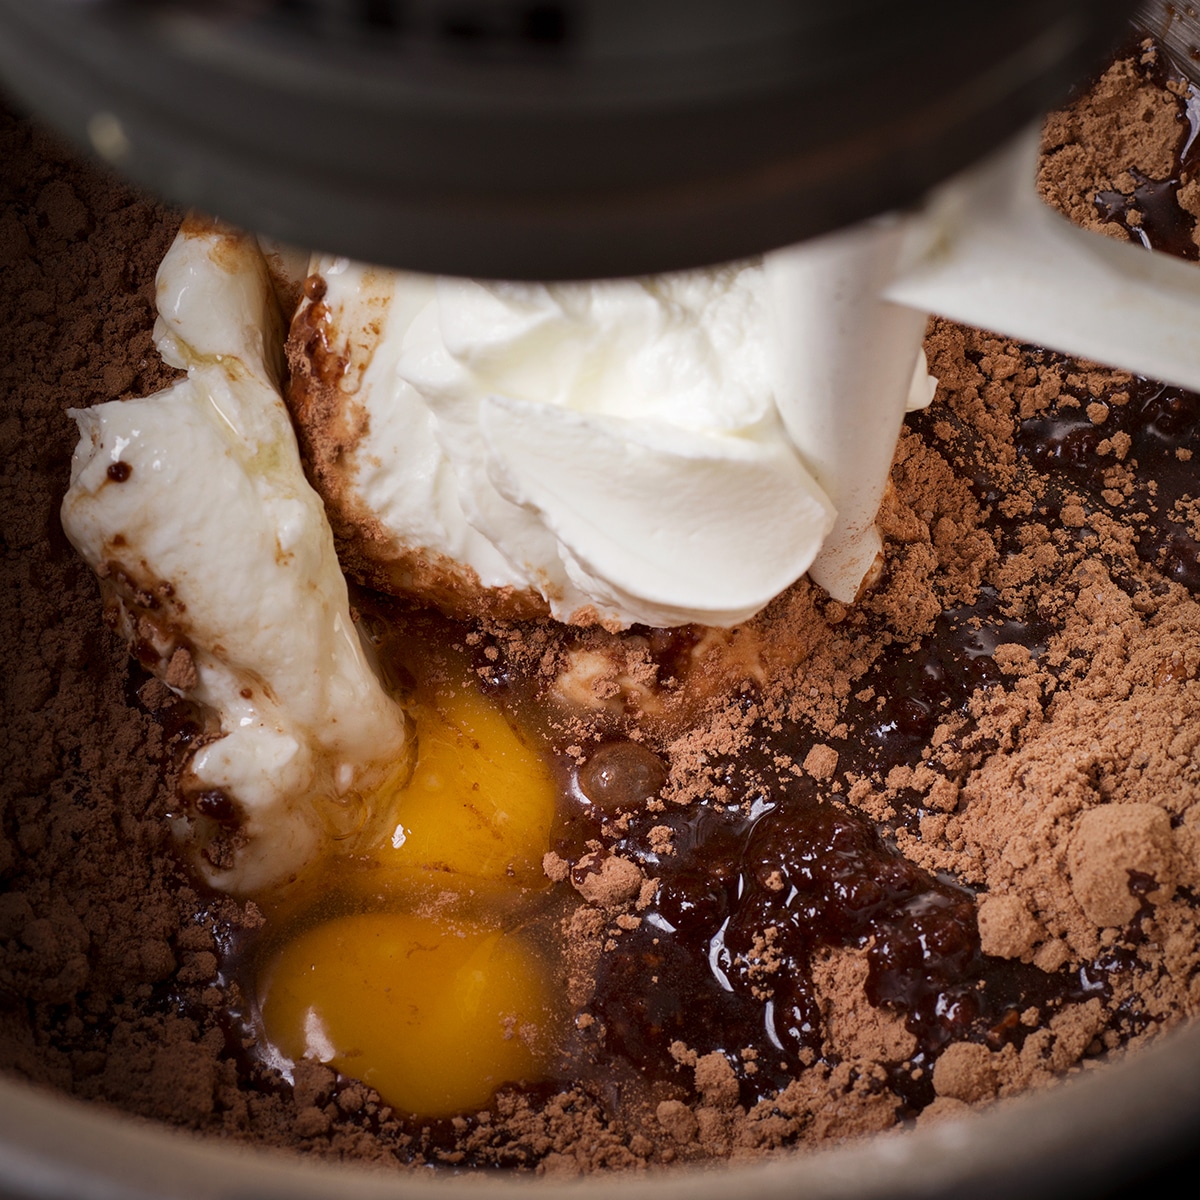
Use an electric mixer to beat the eggs, egg yolk, vegetable oil, yogurt, and vanilla into the dry ingredients, mixing for a couple of minutes to build the cake's structure.
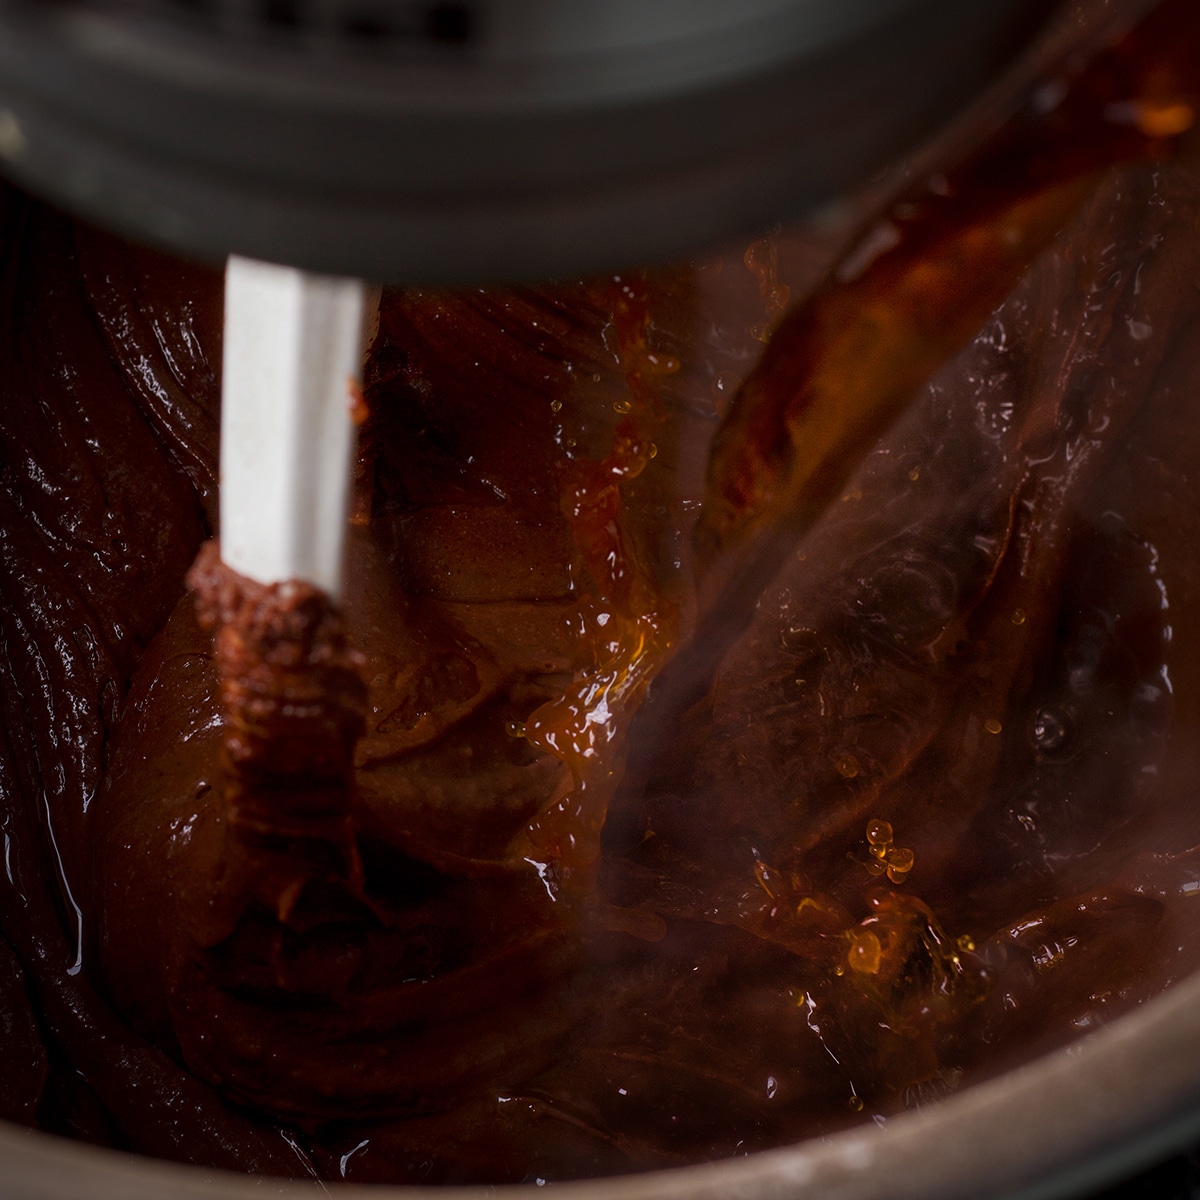
Pour the hot coffee into the chocolate cake batter while the mixer is running. Beat until the coffee is completely incorporated, then use a spatula to scrape down the sides of the bowl and give everything a final stir.
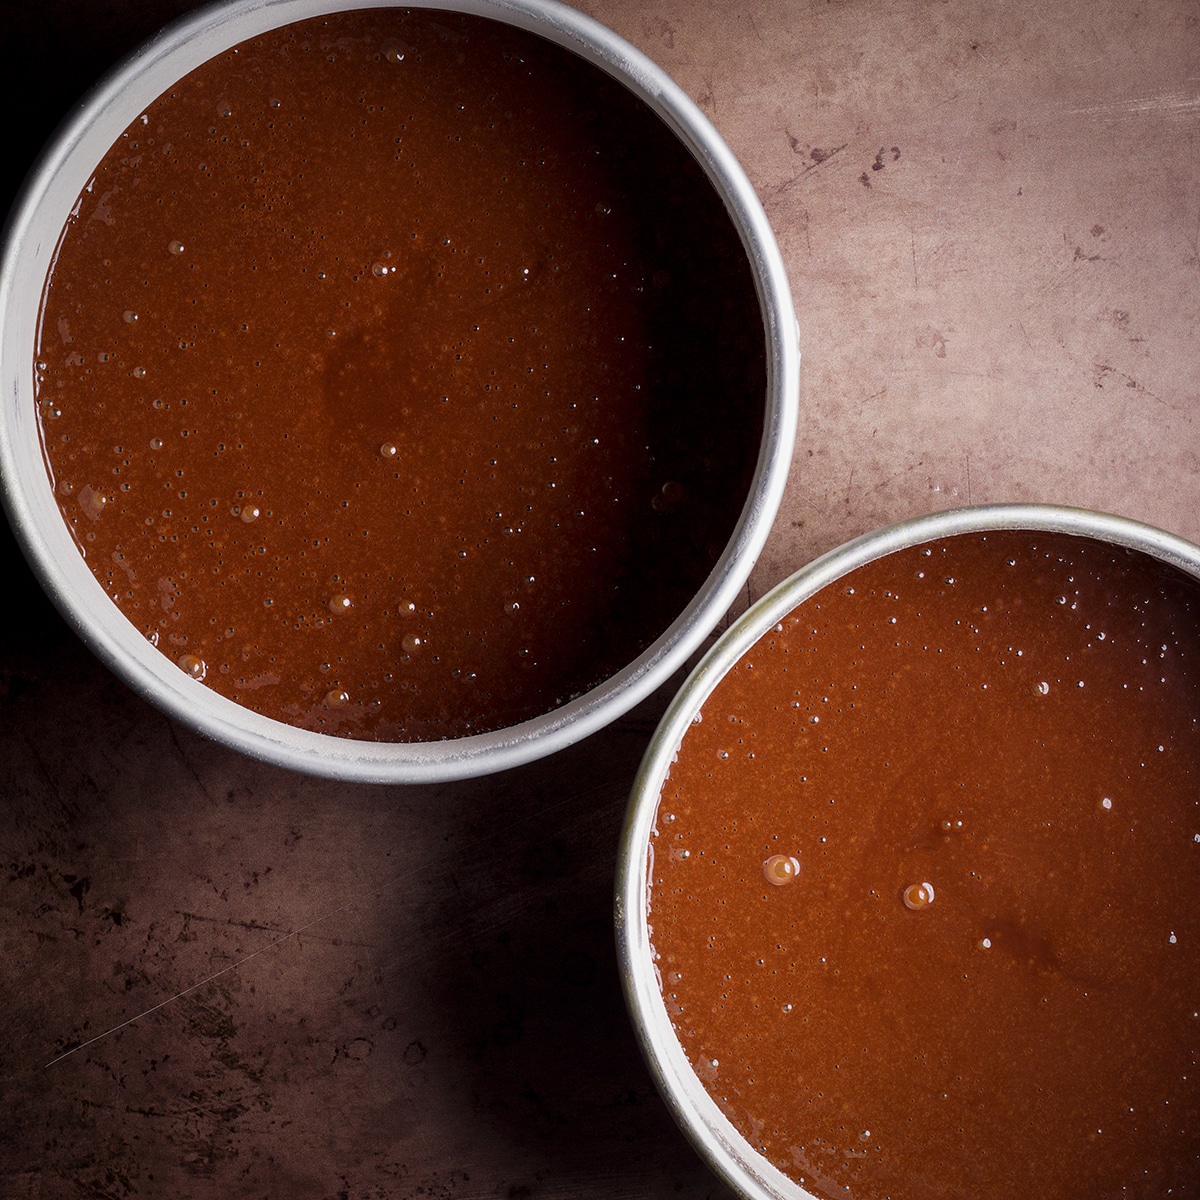
Distribute the batter between two prepared cake pans. If you want to be precise, use a food scale to add 920 grams of batter to each pan.
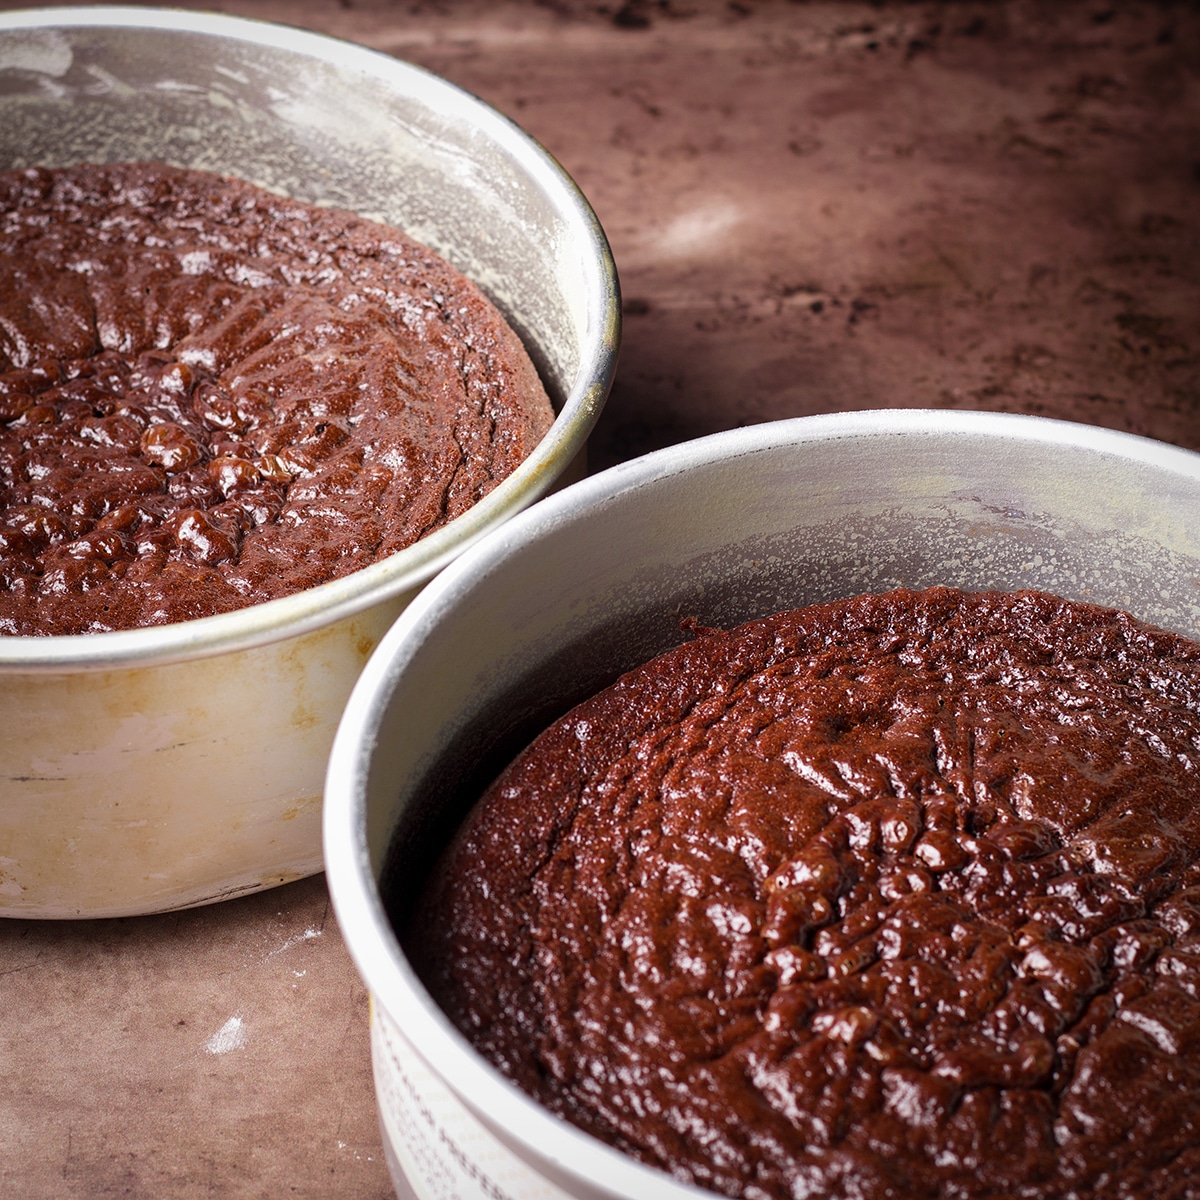
Bake the cakes for about 65 minutes.
Pro Tip! How to know when the cakes are done baking:
This is an extremely moist and fudgy cake, so it can be tricky knowing when the cakes are done baking and ready to be removed from the oven. When done, the tops of the cakes will look set and the cake will be pulling away from the sides of the pans.
Stick a toothpick in the center of one of the cakes and pull it out. Examine the toothpick for raw batter. There WILL be chocolate cake on the toothpick - it will not come out "clean". So, look for raw batter. If you don't see any, the cakes are done baking and can be removed from the oven.
Let the cakes cool in their pans for 5 minutes then turn them out onto wire baking racks.
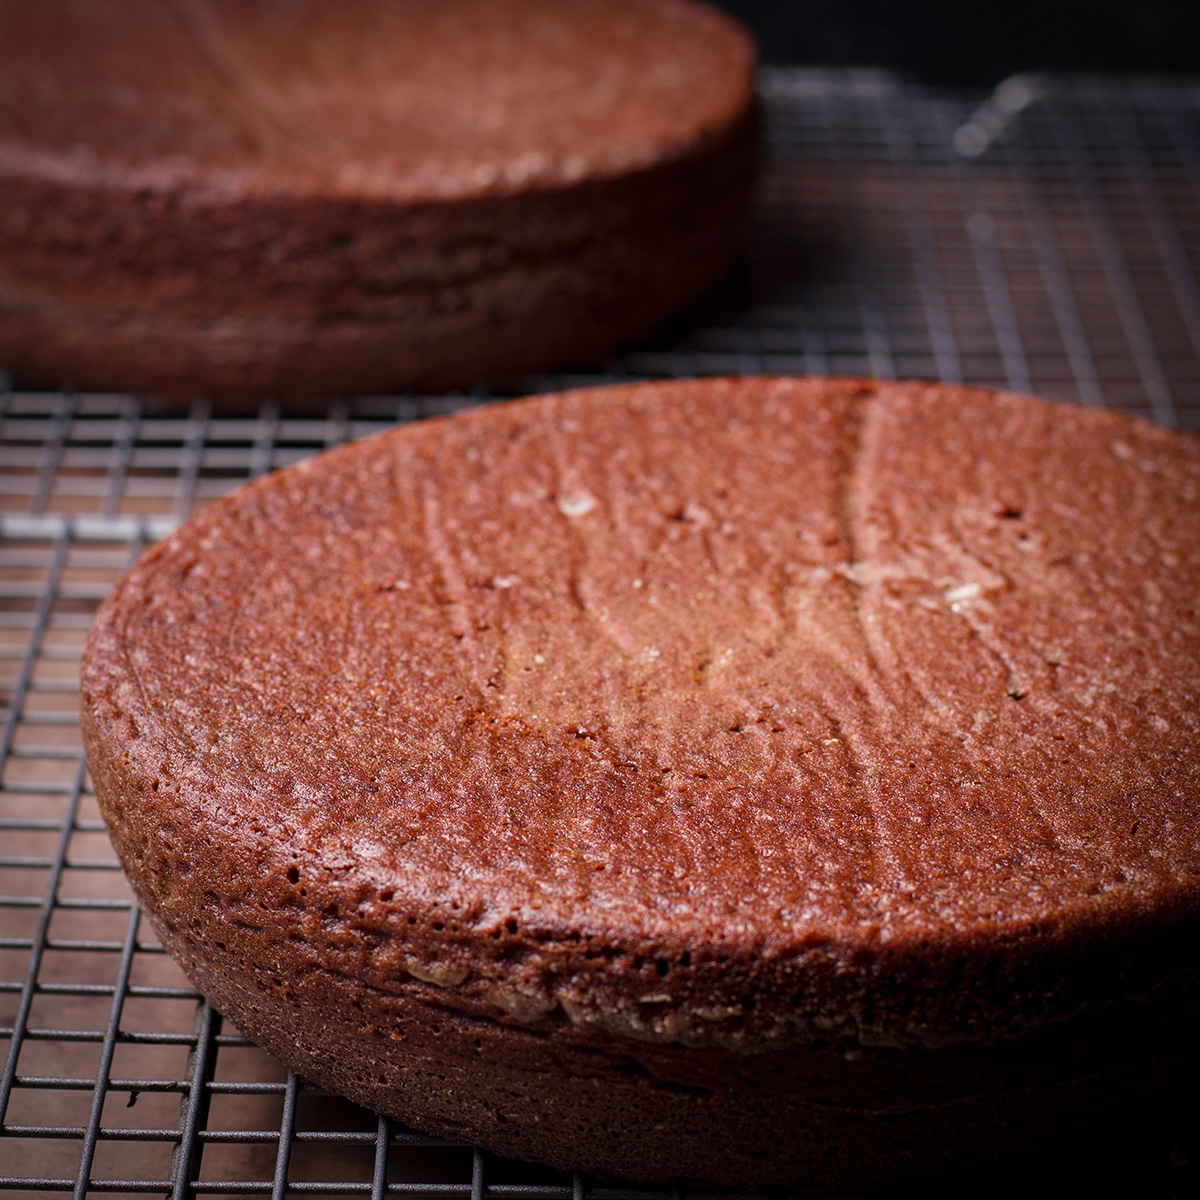
To turn the cakes out onto wire racks: position a rack over the top of one of the cake pans so it's resting on the top edge of the pan. Carefully flip the whole thing over, holding tightly to the pan and the wire rack as you do. The cake should fall out of the pan onto the rack. Repeat with the second layer and let the cakes cool completely before frosting.
Pro tip! How to keep your cakes from sticking to the pans.
It's important to grease and flour your cake pans and line the bottoms of the pans with parchment paper so this super fudgy chocolate cake comes out of the pans without sticking. If you're unfamiliar with this process, here's a detailed post about how to keep your cakes from sticking to the pans.
How to Make Chocolate Truffles
If you don't want to prepare homemade chocolate truffles, you can of course just purchase some. Lindt Chocolate Truffles are one of my favorite indulgences. And, of course, if there's a local chocolate shop near you they are likely to have an assortment of gorgeous truffles to choose from.
But, homemade chocolate truffles are truly one of the easiest candies you can make. They are nothing more than chocolate ganache that's been allowed to chill until it's firm then rolled into balls.
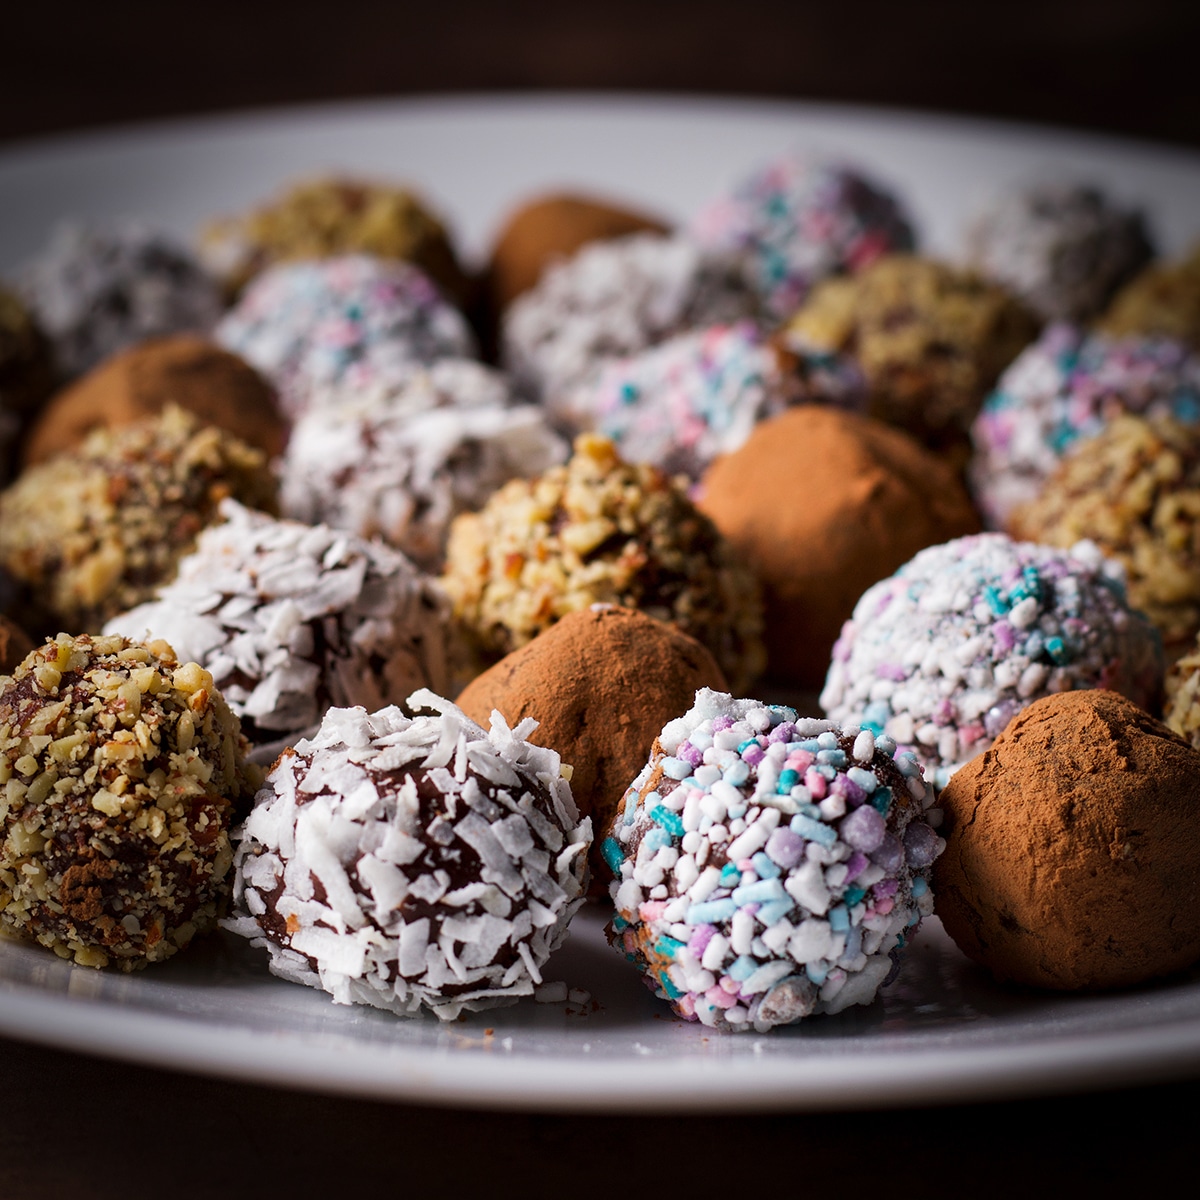
Coat the balls with anything you like. For this cake, I chose cocoa powder, coconut flakes, crushed roasted almonds, and candy sprinkles and was quite pleased with how they looked perched on the top of this truffle cake.
Here's how to make homemade chocolate truffles:
- Chop 8 ounces of semisweet or bittersweet chocolate into very small pieces and put them into a heat-proof bowl.
- Pour ⅔ cup heavy whipping cream into a small saucepan and heat it on the stovetop until it's just beginning to simmer (don't let it come to a full boil). You can also heat it in the microwave but watch it carefully so it doesn't boil over the sides of the container.
- Add 1 tablespoon of butter, salted or unsalted, to the chocolate and pour the hot cream over the top. Let the chocolate and cream rest for 3 or 4 minutes without disturbing it. Then, use a spoon or rubber spatula to stir until all the chocolate has melted and the ganache is smooth.
- Add flavorings: This is the time to add some vanilla or any other kind of extract you like. Adding extract is optional. If you prefer a pure chocolate flavor, leave it out.
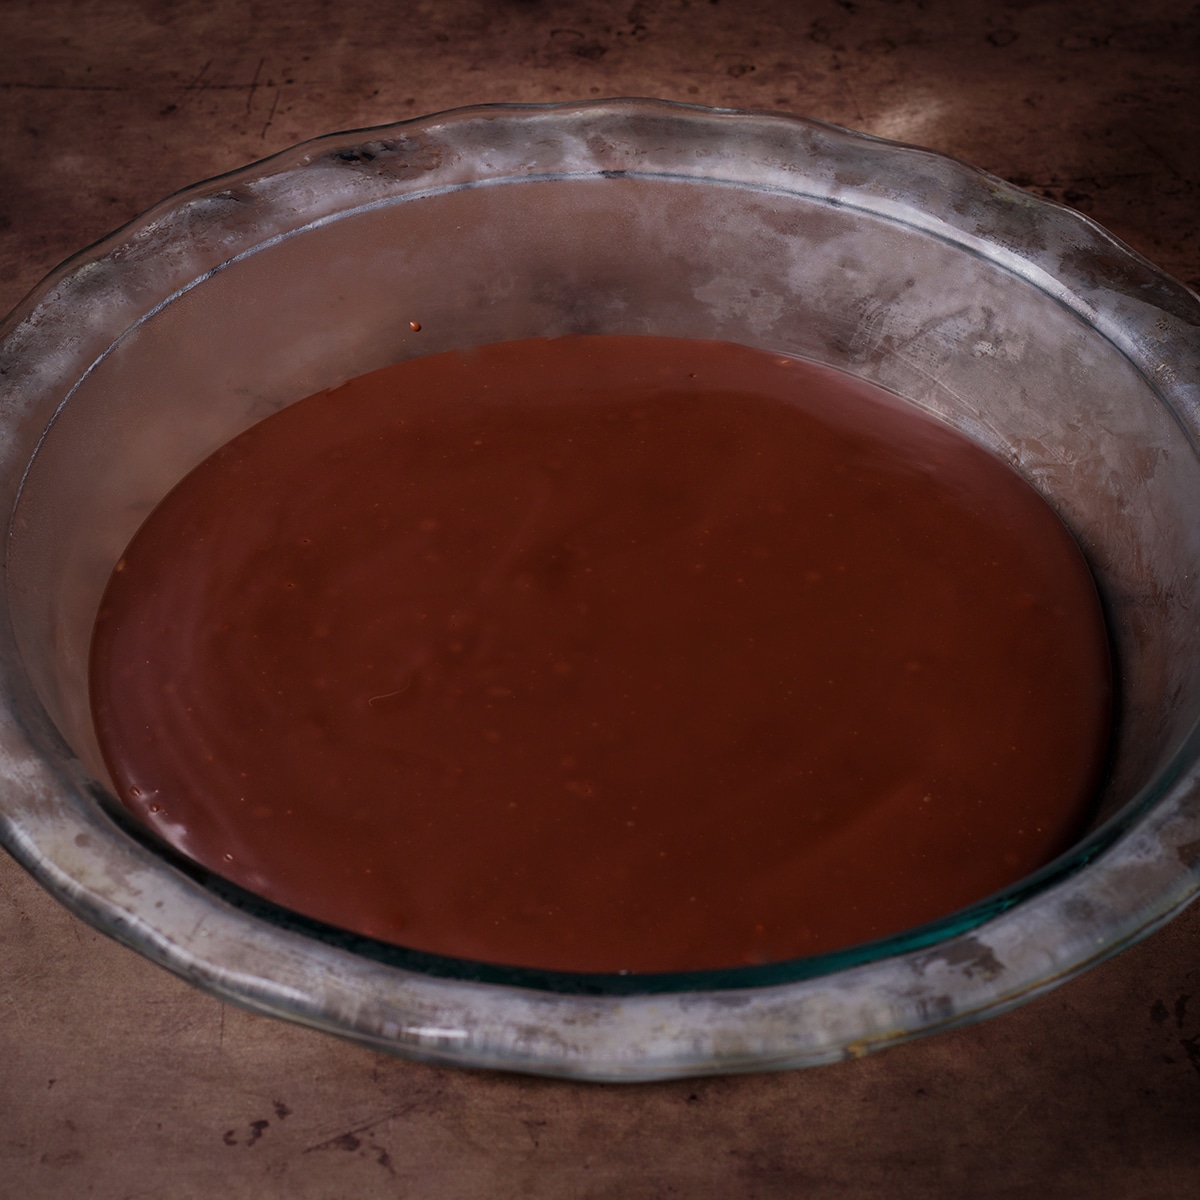
- Pour the ganache into a shallow dish - I used a pie plate. Cover the surface of the ganache with a piece of plastic wrap. Placing the plastic wrap on the surface of the ganache will prevent condensation. Put the dish in the refrigerator and let it chill until firm, about 1 hour. (The ganache will keep well in the refrigerator for up to a week.)
- Remove the ganache from the refrigerator and divide it into 35 equal portions by using a spoon to scoop little mounds of ganache onto a plate. If you want to get them all the same size, use a food scale to measure 10-ounce portions. Pop the plate into the refrigerator, uncovered, for 20 minutes.
- Gather your toppings! For the truffles you see here, I used ground roasted and salted almonds, coconut flakes, cocoa powder, and sprinkles. I ground the almonds, coconut flakes, and sprinkles in the food processor, pulsing a few times until they were the consistency I wanted.
- Shape the truffles: Remove the plate of chocolate mounds from the refrigerator, roll each one between your palms to form a round ball then roll it in a topping.
The truffles are now ready to decorate your cake! If you're not going to use them right away, put the truffles in an air-tight container and store them in the refrigerator for up to 2 weeks. It's also safe to leave truffles at room temperature for up to 2 days.
Want a more in-depth tutorial about making homemade chocolate truffles? Check out this recipe for simple chocolate truffles!
How to Frost and Decorate This Chocolate Truffle Cake
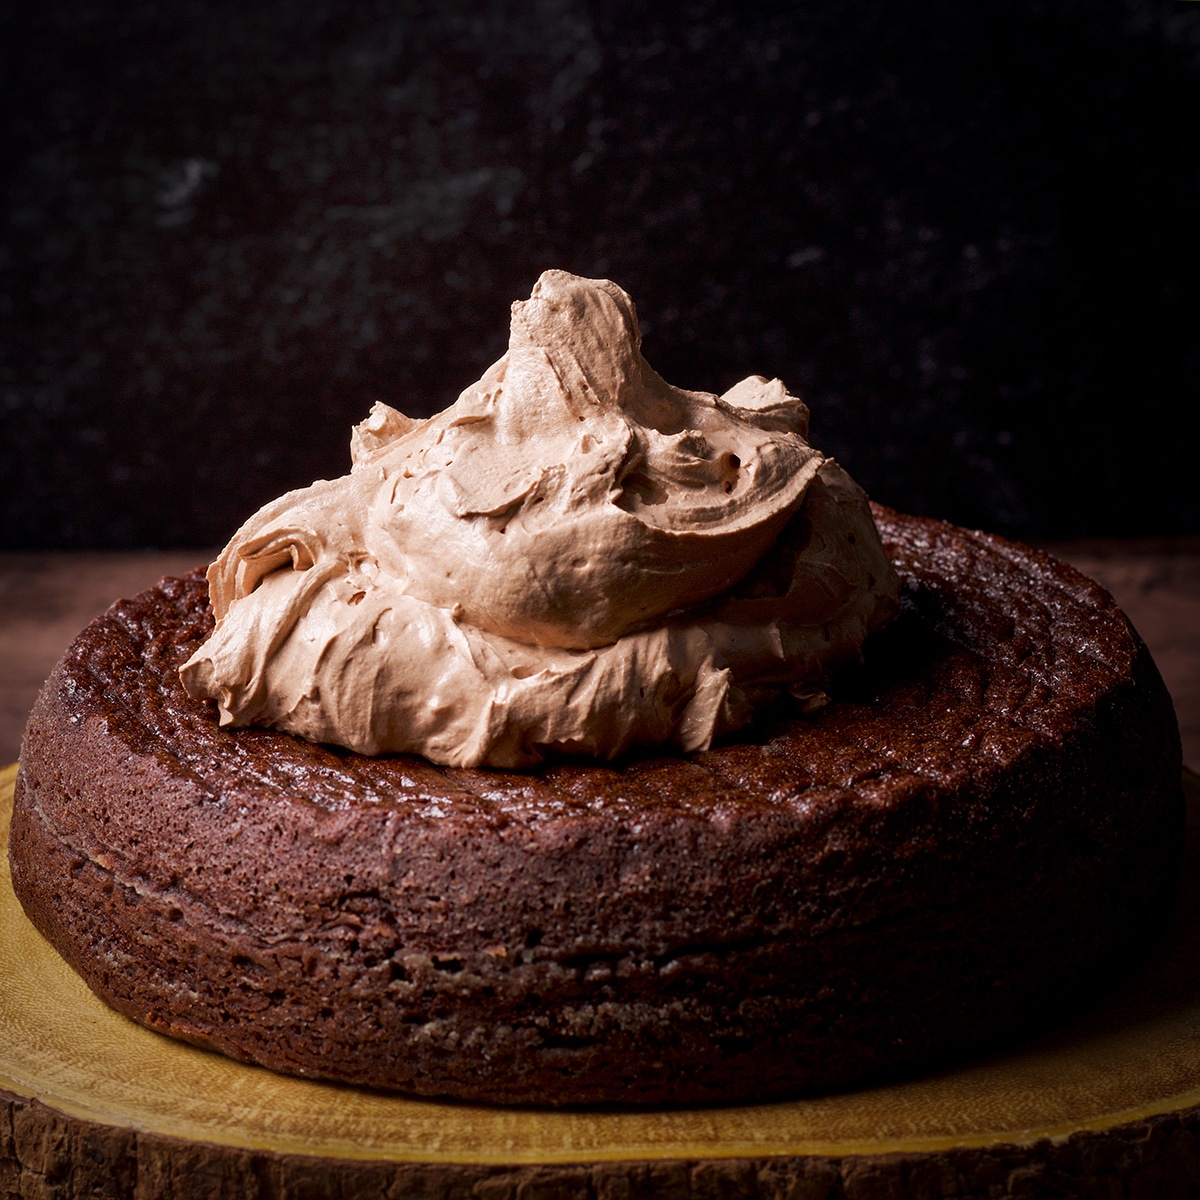
Place one of the cake layers right side up on a cake board or serving plate and scoop a generous amount of milk chocolate buttercream frosting onto the center.
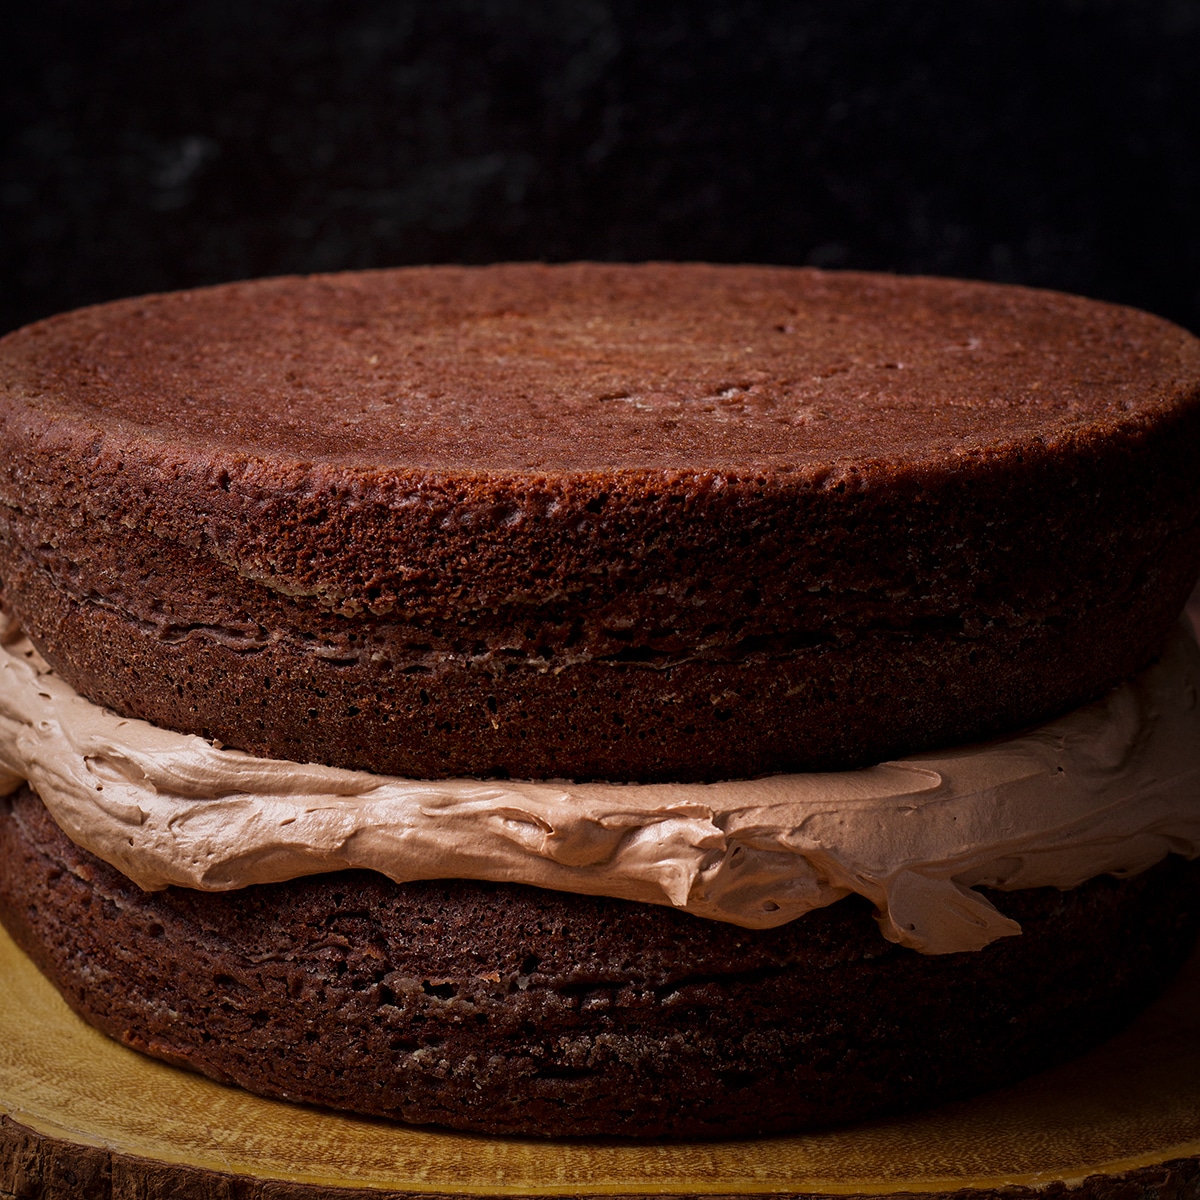
Spread the buttercream into a thick even layer that reaches over the edges of the cake. Top it with the second cake layer, placing it upside down.
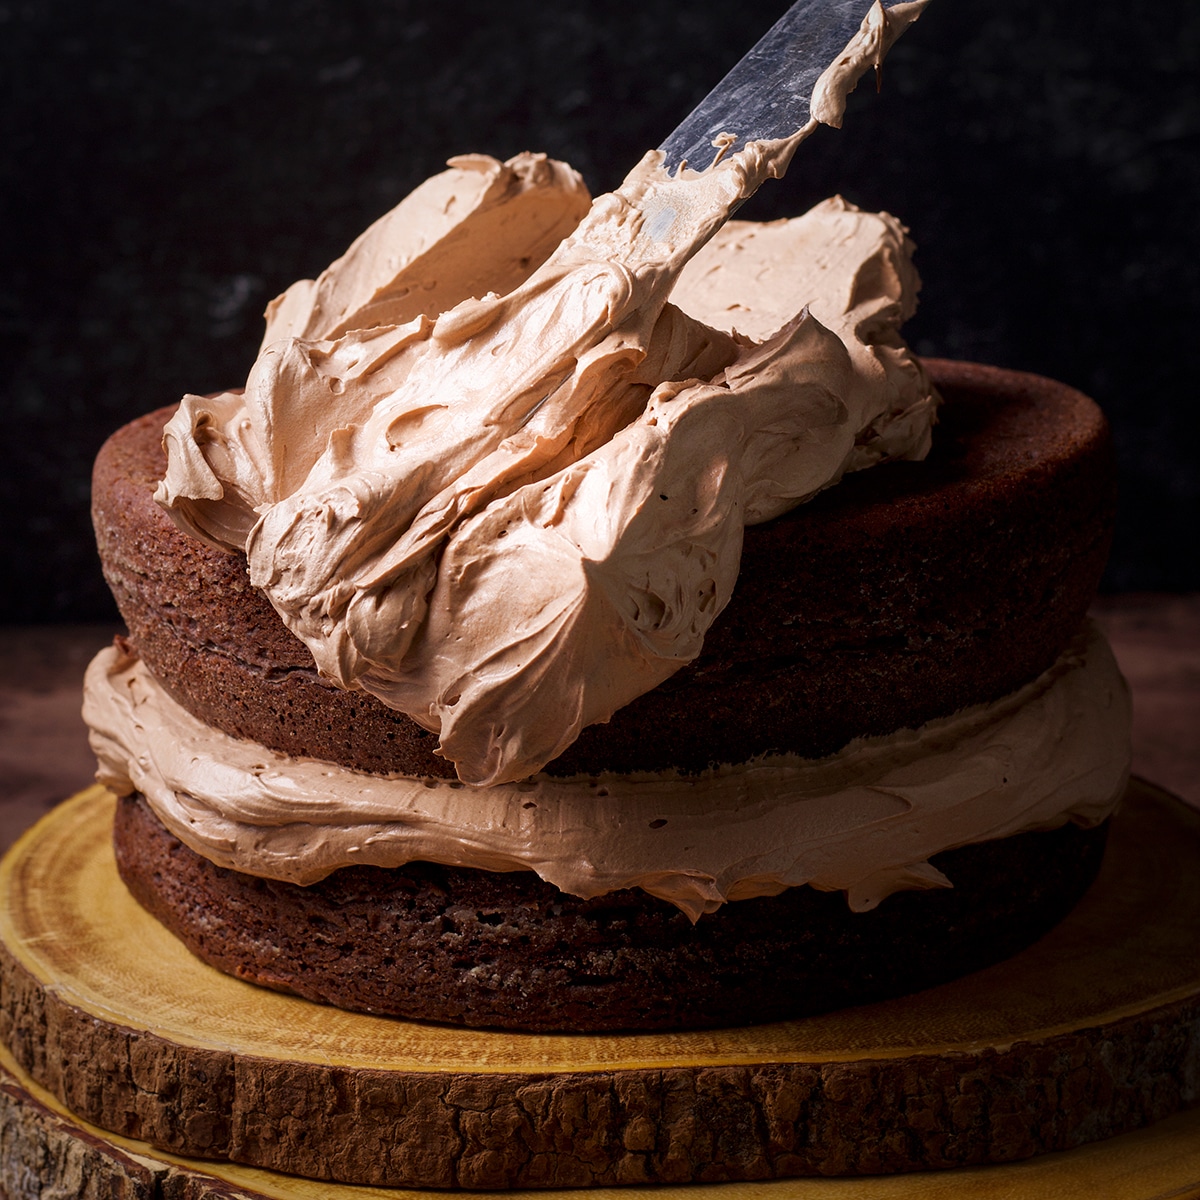
Scoop more milk chocolate buttercream onto the top of the cake and spread it across the top of the cake and over the sides. This is easiest to do with an off-set icing spatula, but you can also use a knife or rubber spatula.
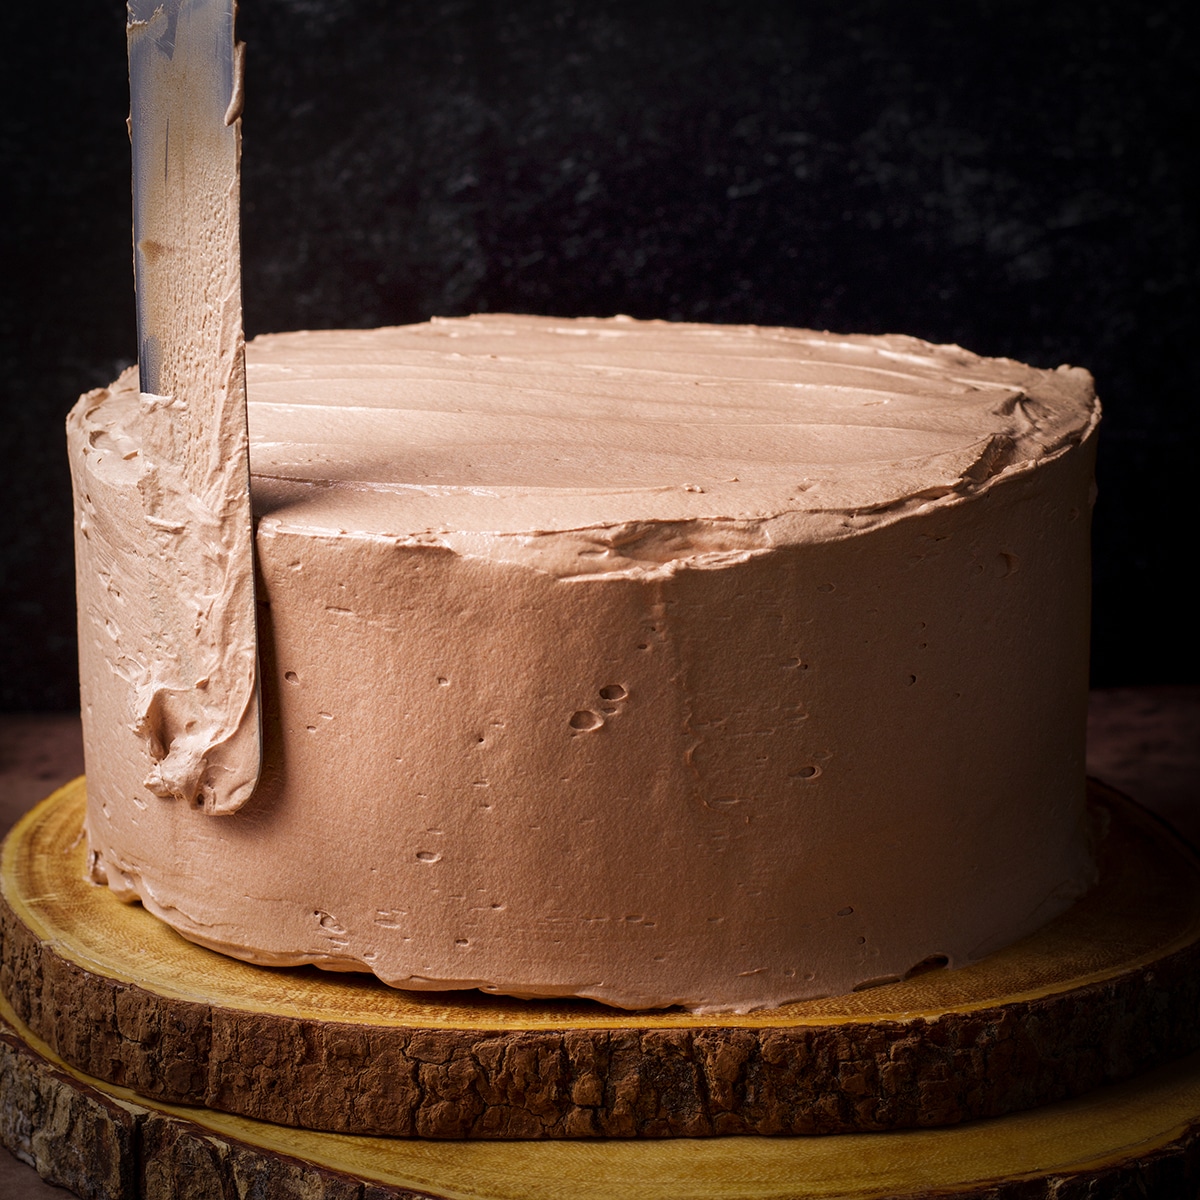
Continue to spread the buttercream over the cake, smoothing the top and sides into an even layer.

Add about ¼ cup of nuts to the bowl of a food processor and grind into crumbs. (Be careful to not grind it into nut butter!) I used roasted salted almonds, but any kind of nuts will work, roasted or raw. Or, skip this step if you want a nut-free cake.
Place the cake in the refrigerator to allow the milk chocolate buttercream to firm up while you prepare the chocolate ganache. Cold, firm buttercream will make the ganache easier to spread.
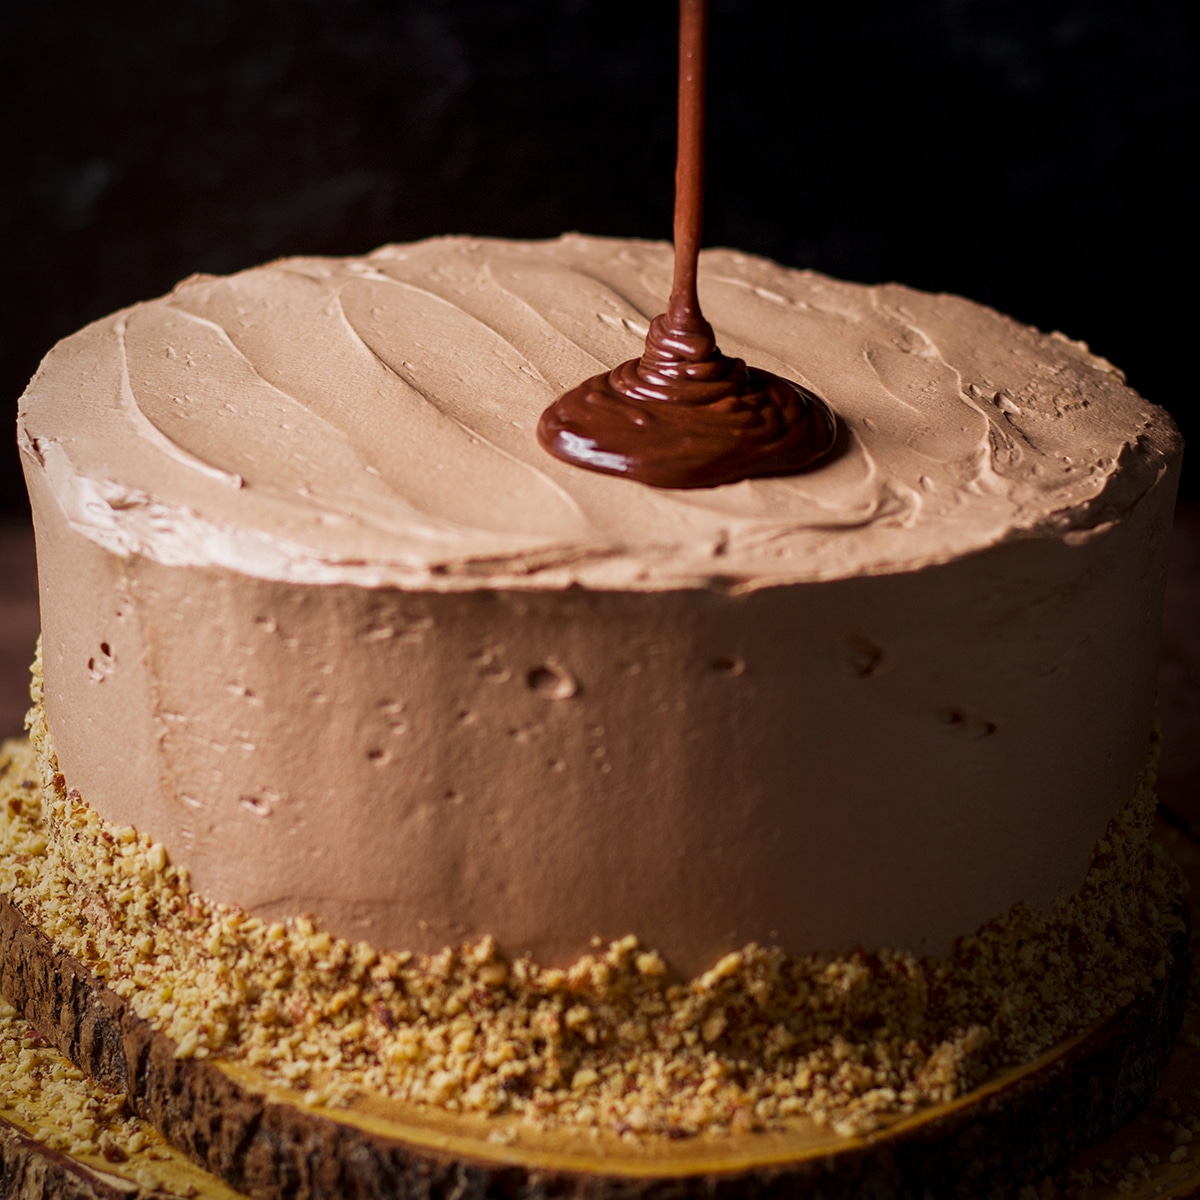
Follow these instructions to make some chocolate ganache and then pour it over the top of the cake.
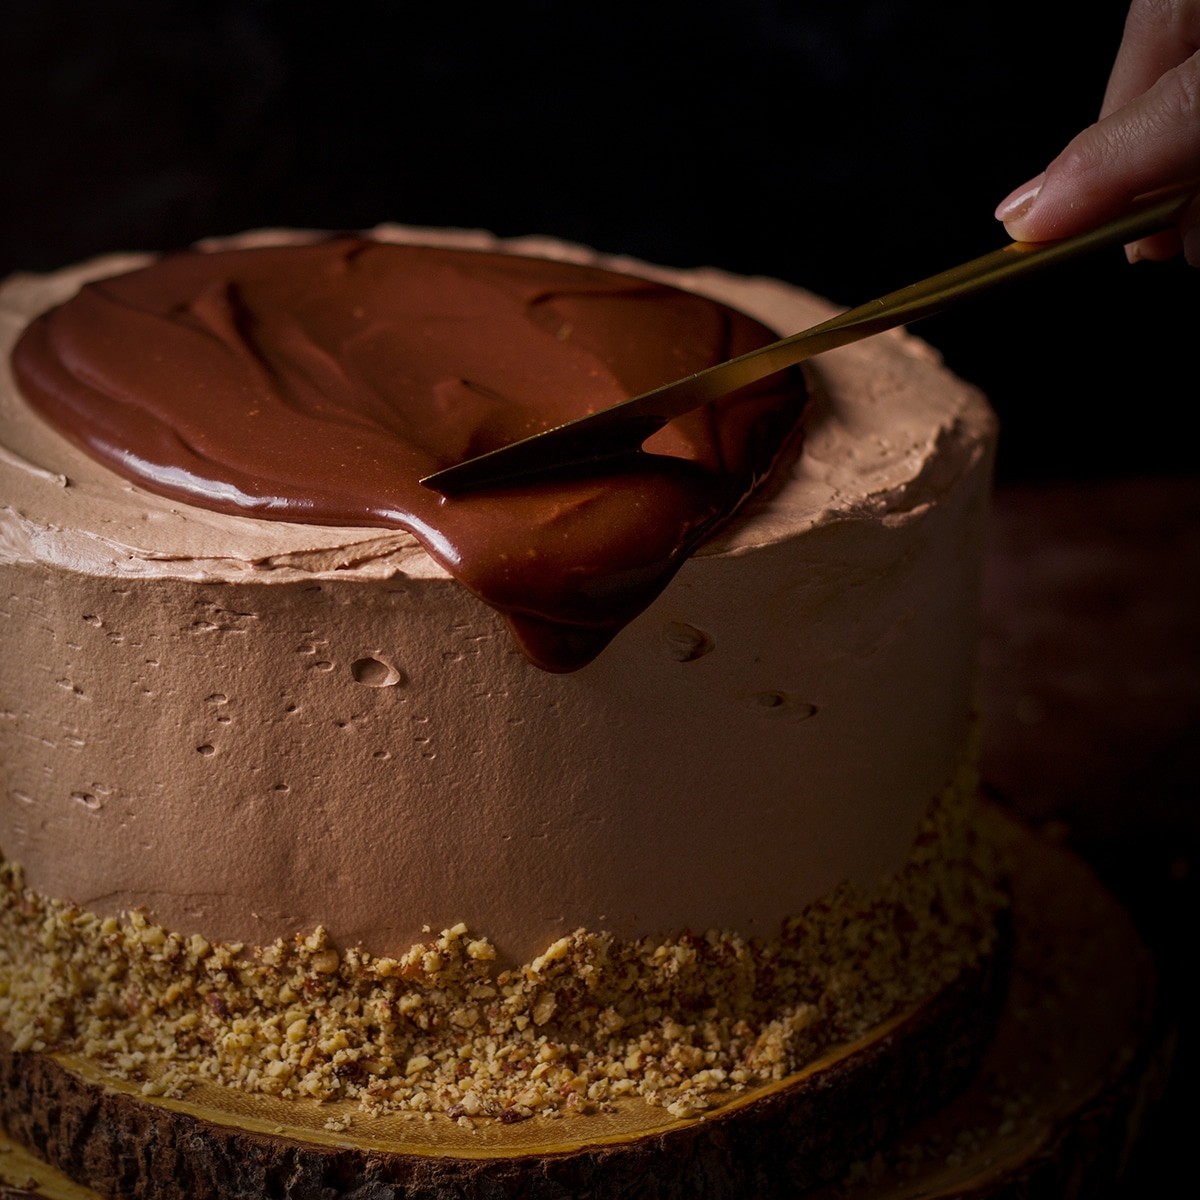
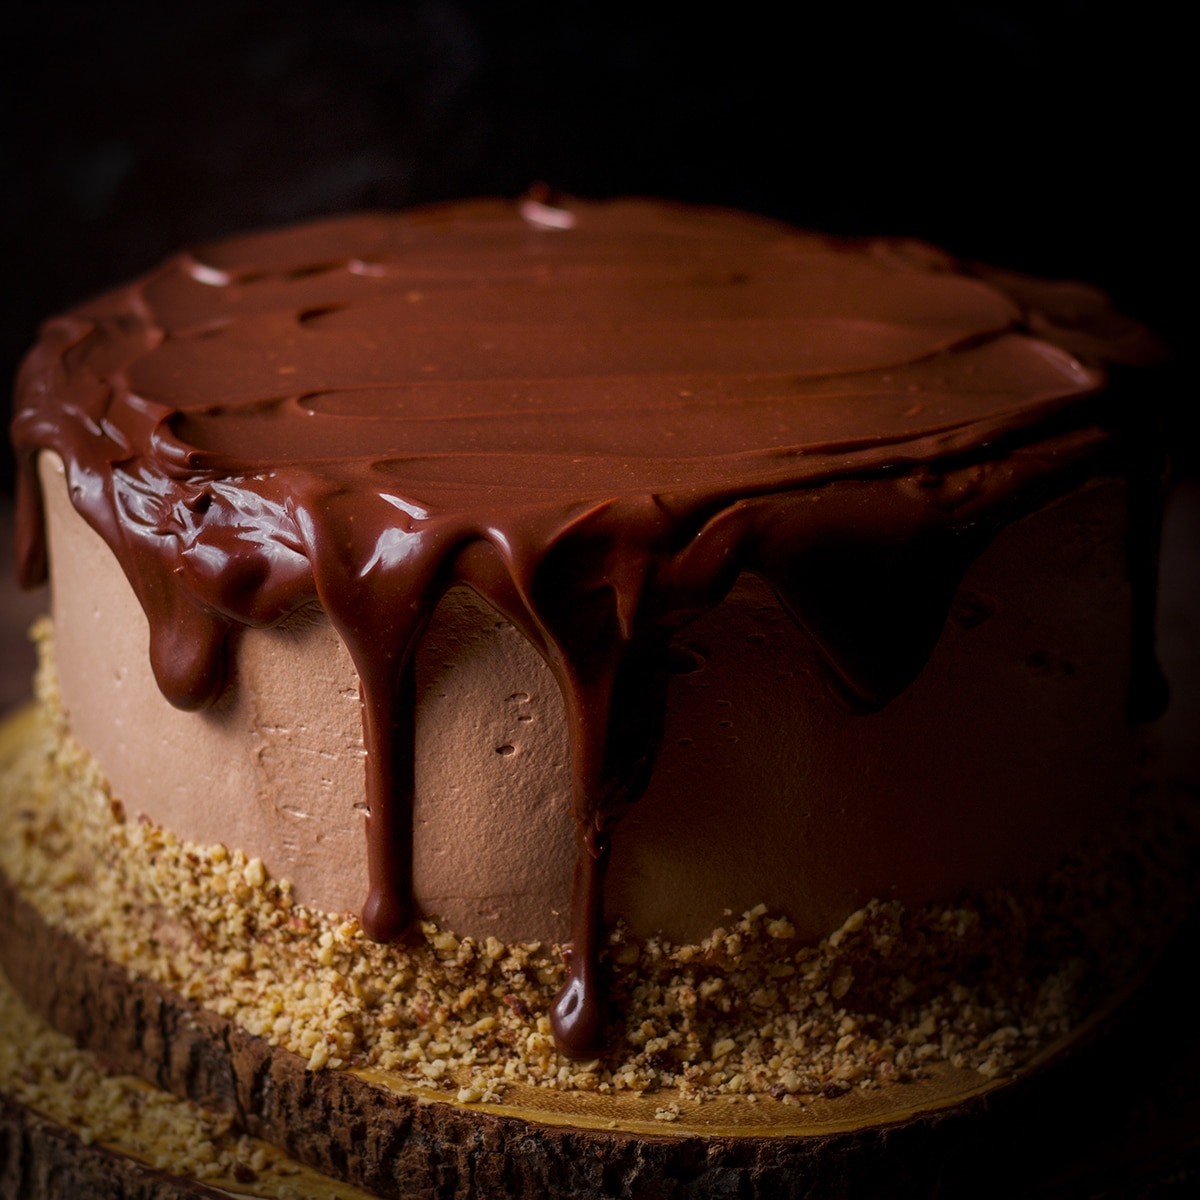
Use a knife or icing spatula to spread the ganache over the top of the cake, allowing some to drip down the sides of the cake.
Pro tip! What is the best consistency for pouring chocolate ganache over chocolate truffle cake?
It's important that the chocolate ganache is pourable but not too runny. The consistency should be similar to pancake batter. The ganache will thicken as it cools so if it's too runny, just allow it to rest at room temperature or pop it into the refrigerator for a few minutes.
If it's too thick to pour, heat it in the microwave for 5 seconds at a time, stirring after each blast. Or, place the bowl of ganache over a pan of simmering water to warm it very slowly and gently while you stir until it's the right consistency.
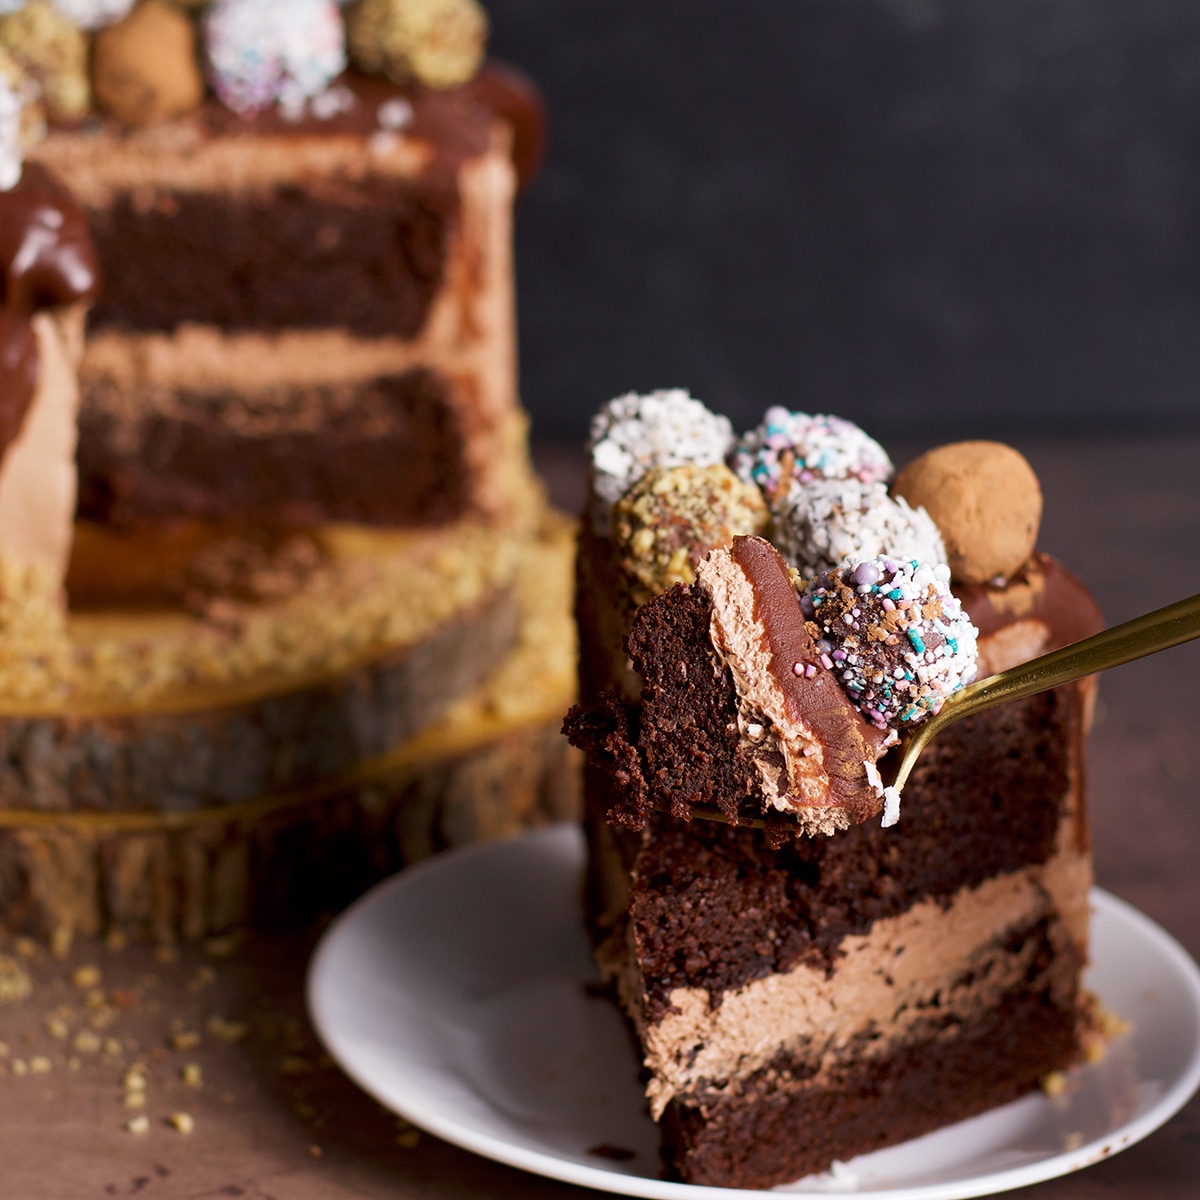
Top the cake with truffles, stand back and admire your creation, snap a few photos and share them with everyone you know, then dive right in.
Make Ahead and Storage Information
If it's the middle of July and the room in which you are storing and/or serving this cake is quite warm, keep the cake in the refrigerator until you're ready to serve it or the buttercream will melt right off.
But, if the temperature of the room is somewhere under 80 degrees, it's perfectly safe to keep a frosted, ready-to-eat cake at room temperature for up to 24 hours.
You can also store the cake in the refrigerator for 2-3 days. Cover it loosely with plastic wrap or a cake dome. The cake is perfectly edible when keep in the refrigerator for up to a week, but it will begin to stale and dry out slightly after 3 or 4 days.
All of the individual components of this cake can be prepared well in advance:
- The two layers of chocolate fudge cake can be prepared up to 2 days in advance and stored, well wrapped, at room temperature or in the refrigerator. The layers can also be frozen, well wrapped, for up to 3 months.
- The Milk Chocolate Buttercream can be stored in the refrigerator for up to 5 days or frozen for up to 3 months. If frozen, let the buttercream defrost overnight in the refrigerator then set it out on a countertop for an hour or two so it can come up to room temperature - cold buttercream will not spread. Once at room temperature, re-beat the buttercream to bring back it to a fluffy, soft, spreadable texture.
- Chocolate ganache can also be prepared up to 10 days in advance and stored in a covered container in the refrigerator. Reheat gently in a double boiler on the stovetop or in the microwave in 10-second intervals, stopping to stir the ganache after each interval. Chocolate ganache can also be frozen for up to 3 months. Thaw in the refrigerator overnight then bring to room temperature.
- Store homemade chocolate truffles in an air-tight container in the refrigerator for up to 2 weeks. It's also safe to leave truffles at room temperature for up to 2 days.

More recipes for chocolate lovers
+ Subscribe to my newsletter for new and exclusive recipes in your in-box every month! As a full time traveler, living, working, cooking, and baking from a 5th wheel RV, it's also where I share our experiences of life on the road.
If you give this recipe a try, let me know! Leave a comment, rate it, or take a picture and tag it #ofbatteranddough on Instagram.
Happy baking!
📖 Recipe
Dark Chocolate Truffle Cake with Milk Chocolate Buttercream
Two layers of dark chocolate fudge cake covered in the creamiest milk chocolate buttercream and topped with ganache and chocolate truffles.
Ingredients
- 1 cup (200 grams) granulated sugar
- 1 cup (213 grams) brown sugar
- 1 ¾ (210 grams) cups unbleached all-purpose flour
- 1 cup (84 grams) unsweetened natural cocoa powder (not dutch process)
- 1 ½ (9 grams) teaspoon salt
- 1 ½ teaspoons (6 grams) baking powder
- 1 ½ teaspoons (4.5 grams) baking soda
- 2 large eggs + 1 large egg yolk
- ½ cup (100 grams) vegetable oil
- 1 cup (230 grams) of unsweetened, plain, full-fat greek yogurt
- 2 teaspoons (9.3 grams) pure vanilla extract
- 1 cup (227 grams) of hot strong-brewed coffee
- 4 cups Milk Chocolate Buttercream
- 1 cup Dark Chocolate Ganache
- For Decoration: Chocolate truffles and ½ cup ground nuts (*See notes)
Instructions
- Heat your oven to 325 degrees F (163 degrees C). Coat the inside of two 8-inch round cake pans with a thin layer of vegetable shortening or butter. Cut two pieces of parchment paper to fit inside the bottom of the pans, press them into the pans, and coat the paper with a thin layer of vegetable shortening or butter. Sprinkle a tablespoon or two of flour inside the pans and shake it around so the entire inside of the pans is covered in flour. Shake out the excess flour and set the pans aside. (For more details: How to Prevent Cakes from Sticking to the Pan)
- Add both sugars, flour, cocoa powder, salt, baking powder, and baking soda to a large bowl and stir to combine.
- Add the eggs, egg yolk, vegetable oil, yogurt, and vanilla to the dry ingredients and beat with an electric mixer on low just to blend. Increase the speed to medium and beat for 2 minutes, stopping once or twice to scrape down the sides of the bowl.
- Reduce the speed of the mixer to low and with the mixer running, pour in the hot coffee. Continue to mix on low speed just until the coffee is blended in. Stop the mixer and use a spatula to scrape down the sides of the bowl and give it a stir just to ensure the batter is well blended.
- Distribute the batter between the two prepared cake pans. If you want to be precise, this will amount to 920 grams of batter in each pan.
- Bake the cakes in the center of the oven for 55 - 65 minutes. When the cakes are done the tops will appear set and the cake will be pulling apart from the sides of the pans. To test that the cakes are done, insert a toothpick in the center of one of them. Remove the toothpick and examine it for signs of raw batter. This is a very fudgy cake, so chocolate cake crumbs will stick to the toothpick. But, if you don't see any raw batter on the toothpick, remove the cakes from the oven and place them on wire cooling racks.
- Let the cakes cool inside their pans for 5 minutes. Then, one at a time, place the cooling racks over the top of the pans and flip them over so the cake slides out of the pan and is resting upside down on the wire cooling racks. Let the cakes cool completely before frosting and decorating. (This is usually when I start making the truffles; scroll up for step-by-step instructions.)
To frost and decorate the cake:
- Place one cake layer right side up on a cake board or serving platter. Scoop a generous amount of milk chocolate buttercream in the center of the cake and spread it out to cover the top of the cake completely. Place the other layer of cake upside down over the buttercream. Pile a generous amount of buttercream on the top of the cake and use an icing spatula to spread it out across the top of the cake and over the sides. Continue to coat the top and sides of the cake with a thick layer of buttercream. Smooth out the top so the buttercream is level.
- Use your fingers to press ground nuts around the bottom of the cake.
- Refrigerate the cake for 1 hour (and as long as 24 hours) to allow the buttercream to firm up. While the cake chills, make the ganache and finish making the truffles if you haven't already done so.
- It's important that the ganache be the right consistency before you pour it over the top of the truffle cake. It should be warm enough to pour but not so hot that it's runny. You want ganache that's the consistency of pancake batter. If it's too runny, place it in the refrigerator for a few minutes to thicken it up. If it's too thick, heat it in the microwave for 5 seconds at a time, until it warms up to a pourable consistency.
- Pour the ganache over the top of the cake, letting some of it drip over the sides.
- Decorate the top of the cake with truffles.
- Refrigerate until ready to serve. This cake will keep at room temperature for up to 4 hours and then it will need to be refrigerated. You can store it in the refrigerator for up to 5 days but it will have the best flavor and texture when eaten within 48 hours.
Notes
Decorating the bottom of the cake with ground nuts:
To add a band of ground nuts to the bottom of this cake, process about ¾ cup of any kind of nut in a food processor until ground. Be careful to not process the nuts too long or they will turn into nut butter. I prefer to use roasted and salted nuts, but raw nuts will work as well.
About homemade chocolate truffles:
Chocolate truffles are truly one of the easiest kinds of candy to make. Simply prepare some chocolate ganache (heavy cream and chocolate), let it chill until firm, roll it into balls, and then coat the little chocolate balls with anything you like. I've included step-by-step instructions in the post above for how to make the perfect number of chocolate truffles for this cake. Or, if you prefer, purchase some chocolate truffles and use those to decorate your truffle cake.
Make ahead and storage information:
Individual layers of cake can be stored in the refrigerator for up to 48 hours before assembling and frosting the cake. They can also be frozen for up to 3 months.
Chocolate buttercream can be stored in the refrigerator for up to 5 days or frozen for up to 3 months. If frozen, let the buttercream defrost overnight in the refrigerator then set it out on a countertop for an hour or two so it can come up to room temperature - cold buttercream will not spread. Once at room temperature, re-beat the buttercream to bring back it to a fluffy, soft, spreadable texture.
Chocolate ganache can also be prepared up to 10 days in advance and stored in a covered container in the refrigerator. Reheat gently in a double boiler on the stovetop or in the microwave in 10-second intervals, stopping to stir the ganache after each interval. Chocolate ganache can also be frozen for up to 3 months. Thaw in the refrigerator overnight then bring to room temperature.
Nutrition information:
Nutrition information is for a two-layer cake filled and frosted with milk chocolate buttercream and covered in chocolate ganache. It does not include chocolate truffles.
Recommended Products
As an Amazon Associate and member of other affiliate programs, I earn from qualifying purchases.
-
 365 by Whole Foods Market, Cocoa Powder Organic, 8 Ounce
 -
Greater Goods Gray Food Scale - Digital Display Shows Weight in Grams, Ounces, Milliliters, and Pounds
-
Checkered Chef Cooling Rack - Set of 2 Stainless Steel, Oven Safe Grid Wire Racks for Cooking & Baking - 8” x 11 ¾"
-
Lindt EXCELLENCE 70% Cocoa Dark Chocolate Bar, 3.5 Ounce (Pack of 12)
-
Lindt CLASSIC RECIPE Milk Chocolate Bar, Valentine's Day Candy, 4.4 oz. (12 Pack)
-
Acacia Wood Slab Serving Board, Set of 3, Assorted Sizes
-
Kitchenaid Professional Lift Bowl 600 Stand Mixer 6 quart, Black Matte (Renewed)
-
P&P CHEF 8 x 3 Inch Cake Pans Set of 2
-
Wilton Icing Spatula, 13-Inch, Angled Cake Spatula, Steel


Nutrition Information:
Yield: 16 Serving Size: 1/16th of the cakeAmount Per Serving: Calories: 779Total Fat: 60gSaturated Fat: 33gTrans Fat: 0gUnsaturated Fat: 23gCholesterol: 157mgSodium: 445mgCarbohydrates: 54gFiber: 4gSugar: 36gProtein: 9g
Abigail says
Oh my word. This looks like a fancy cake and honestly, I was a bit intimidated by the picture. I also wasn't so sure about making this with Greek yogurt, but this recipe was very, very good. The cake part was sweet and rich, and the buttercream balanced the sweetness perfectly. And the step-by-step instructions were exactly what I needed to create this with my teenage daughters. We were all thrilled with how it looked, and especially how it tasted. This recipe is a keeper!!
Rebecca Blackwell says
I am so happy to hear that you liked this recipe so much Abigail! I am so glad you and your daughters made this cake. Thank you so much for taking the time to leave a comment for me. I truly appreciate it!
Jamie says
I was skeptical of the buttercream that had no sugar in it, but it balanced the flavors AMAZINGLY! The truffles were a bit too soft for me, but DELICIOUS! Would make again!
Rebecca Blackwell says
Hi Jamie! I'm so happy to hear that you liked this recipe! Temperature is often the reason behind truffles that are too soft. So, it's possible they needed more time in the refrigerator... or if your kitchen was quite warm, that might have also caused them to be overly soft. Regardless, I am thrilled that everything tasted good - which is the most important part. 🙂 Thank you so much for taking the time to leave a comment for me! And thank you for participating in the Bake Club! xo
Helena Oliveira says
Amazing and super tempting!!! Excellent job, congratulations.
Rebecca Blackwell says
Thank you Helena! If you make this cake, please let me know what you think! xo