
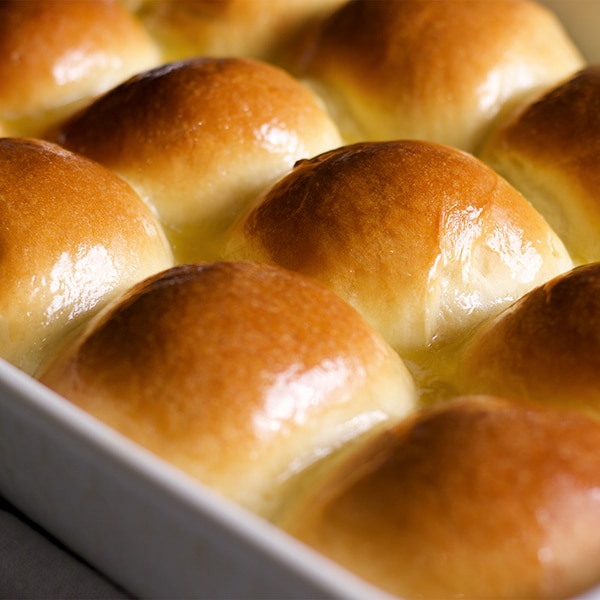
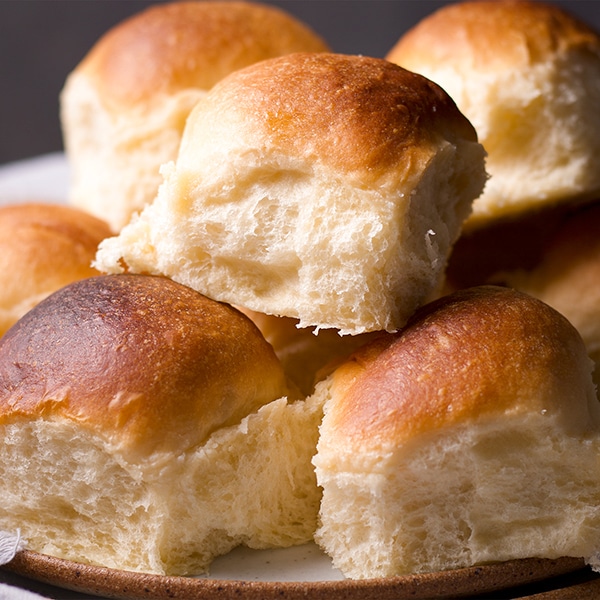
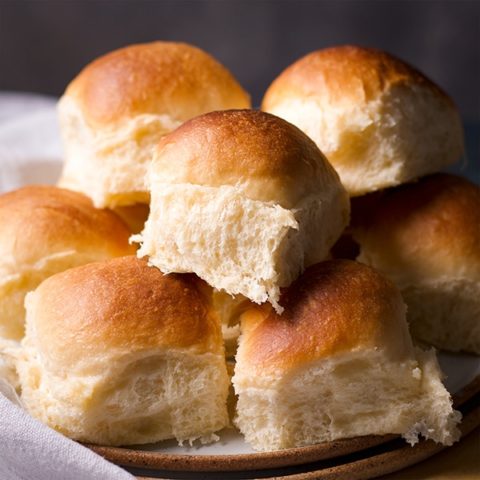
These dinner rolls have been a staple recipe in my family for decades.
They show up on holidays like Thanksgiving and Christmas, and on birthdays, and family dinner nights, and nearly every time someone in my house says, "Can we have those rolls?" Or, when someone invites us to dinner and says, "Would you please, please bring those rolls?"

That, by the way, is what we call these dinner rolls - "those rolls". And we all know what we're talking about. Here's why we love them:
- They are incredibly soft and pillowy, with the perfect amount of chew
- The enriched dough is easy to work with and full of things that make them rich and flavorful - like butter, milk, and eggs.
- They only take a few hours to make and most of that is hands-off
- The amount of rolls you make can be scaled up or scaled down, and...
- The whole process of making the dough and letting it rise can be adjusted to fit your schedule
"I was in charge of the rolls for Thanksgiving last year and used a recipe that totally failed. I made dinner for my family last night and made these rolls and completely redeemed myself! These are the BEST. They all said they were better than Texas Roadhouse rolls (if you know, you know) Thank you so much for this awesome recipe! It will stay in permanent rotation." - Stefanie
"So good! Super soft and fluffy, some of the best rolls I've ever had! And they were surprisingly easy to make! Love this recipe!" - Emily
Jump to:
Ingredients for Soft and Fluffy Dinner Rolls
The secret to making soft, billowy dinner rolls is to add plenty of butter, milk, and eggs to the dough.
Every week I make a couple loaves of sourdough bread. The loaves are chewy, with a crisp outer crust that audibly crackles when you slice it. Sourdough bread, along with most varieties of chewy, crusty bread, does not contain any fat. It's simply a blend of starter (yeast), flour, water, and salt.
To bake bread that's soft and pillowy, you've got to add fat. In the case of these dinner rolls, that means adding plenty of butter, eggs, and milk.
- Butter: Fat acts as a tenderizer in bread dough, coating the grains of flour and creating a barrier that slows down gluten development. A strong gluten network creates bread with a sturdy structure and a lot of chew, like sourdough or a French baguette. A weak gluten network creates bread that's light and tender, like these rolls.
- Eggs: Eggs add flavor, structure, and color to bread dough. In addition to creating tenderness, fat equals flavor. That's why this recipe contains an egg plus an extra egg yolk, which gives the rolls another boost of rich, buttery flavor.
- Milk: Just like butter and eggs, the fat in milk contributes both flavor and tenderness to this dinner roll dough, making them extra pillowy. In addition, yeast doesn't break down the sugar (lactose) in milk, leaving it behind to contribute a subtle sweetness to the flavor of the dough.
How to Make as Many Rolls as You Need
This recipe makes 24 rolls. If that seems like too many, you should know that they will go surprisingly fast.
Also, your family will eat some before your guests arrive. (So will you.) It won't matter if you tell them not to. It won't matter if you hide the dinner rolls or make terrifying threats. They will risk your wrath and find a way to sneak a few. Just accept it.
Regardless, if 24 rolls is MORE than you need, you can:
- Cut the recipe in half. The challenge here is in how to cut the 1 egg and 1 egg yolk in half. The solution: make the dough with 1 egg and leave the extra egg yolk out.
- Freeze the leftover rolls. Wrap each roll individually in plastic and then put them in a zip top bag or wrap them again in foil. If they are well wrapped, they'll keep in the freezer for about 3 months. Since they are individually wrapped, you can pull out as many or as few as you want.
If 24 rolls is LESS than you need, you can:
- Make successive batches. Unless you have a commercial size stand mixer, I would not suggest doubling the recipe. For standard 4.5, 5, or 6 quart stand mixers, just give your mixer about a 10 minute rest between batches of dough.
- Make one batch in the evening and another the next morning. This is almost always what I do when I need to make a LOT of rolls. Make one batch of dough in the evening, shape the rolls, place them in a baking dish, brush them with melted butter, and cover them with a sheet of plastic wrap. Place the rolls in the refrigerator so that they complete their second rise overnight. Because cold temperatures slows down yeast development, the rolls will rise much slower than at room temperature. The next morning, pull them out of the refrigerator and bake the first batch while you get going on a second batch.

How to Adjust Bread Baking to Your Schedule
As mentioned earlier, you can adjust the timing of this recipe by simply putting the dough in the refrigerator at any stage. Cold temperatures will not kill yeast - it will just slow down its activity.
If you want dough to rise quickly, put it in a warm environment.
The ideal temperature for dough to rise relatively quickly is between 80 and 85 degrees. Dough will rise just fine in rooms as low as 70 degrees, it will just take longer. If your kitchen is on the cool side, and you want your dough to rise quickly, here are a few good options:
- Use a bread proofer. I have been baking bread for decades under the assumption that bread proofers were relegated to the realm of commercial bakeries and kitchens with waaaaaaay fancier ovens that what you’ll find in my home. I was wrong. I've been using this Brod and Taylor Bread Proofer for the last few months and I LOVE IT. It gives me total control of the temperature of rising dough and folds up into a flat little box for easy storage.
- Let the dough rise inside your oven. For an electric oven or a gas oven with the electronic ignition, heat the oven at the lowest setting for one or two minutes, then TURN IT OFF. In other gas ovens, the pilot light will provide enough warmth, so you don’t need to turn it on at all. You can also place a pan of boiling water inside the oven along with your dough, which will raise the temperature. If you have an oven thermometer, now is a great time to use it. Do your best to keep the temperature inside your oven to between 80 and 85 degrees, and it's very important that it not get any higher than 90 degrees.
- Let the dough rise inside your microwave. If the inside of your microwave is large enough, it can also be used to create a warm environment for the dough to rise. Fill a small dish with boiling water and place it inside the microwave along with your dough. The water will raise the temperature inside the microwave.
If you want the dough to rise slowly, put it in the refrigerator.
Slowing down the rise of bread dough by putting the dough in the refrigerator is a super handy trick that I employ all the time to adjust bread baking to my schedule. Here are a couple examples of how this might work for these dinner rolls...
Scenario #1: Mix the dough in the evening, put it in a buttered bowl, brush some melted butter over the top, cover with plastic wrap and let the dough rise slowly in the refrigerator overnight.
In the morning, let the dough come to room temperature (this will take about an hour), shape the rolls, put them in a buttered baking dish, brush them with some more melted butter, cover with plastic wrap, and put them back in the refrigerator to slowly rise during the day. In the evening, let the rolls sit out at room temperature for 30-60 minutes, then bake.
Scenario #2: Make the dough in the evening, allowing the first rise to happen at room temperature. Shape the rolls, put them in a buttered baking dish, brush the tops with some melted butter, cover them with plastic wrap, and put them in the refrigerator, leaving them there overnight.
In the morning, take the rolls from the refrigerator, let them sit out at room temperature for 30-60 minutes, then bake.
How to Tell When the Dough is Done Rising
In baking the word "proofing" is used interchangeably with "rising". Allowing the dough to proof is the same thing as allowing the dough to rise. In other words, it's allowing the dough to sit for a while so that the yeast has time to eat up the sugars in the dough and expel the carbon dioxide gas that causes the dough to rise.
The trick is to know the difference between dough that is under-proofed, perfectly proofed, and over-proofed
The simplest way to tell if your dough is well-proofed is to press a finger, or knuckle, gently into the top of the dough.
- If it springs back immediately, it's under-proofed and needs to be allowed to rise for a bit longer.
- If it springs back slowly, leaving a slight indentation in the surface of the dough, it's ready to bake.
- If it doesn't spring back at all, it's over-proofed.
When carbon dioxide exerts more pressure than a fully proofed dough can withstand, the cell membranes tear, releasing the gas and deflating the dough. This is over-proofed dough. The problem with an over proofed dough is that it won't expand much during baking, and in some cases, the dough will deflate entirely in the oven.
To avoid this, be sure to let the shaped rolls rise only until they are "nearly" doubled in size. Allowing them to rise for too long will cause over proofing.
You can often rescue over proofed dough by simply deflating it, reshaping it, and allowing it to rise again. In the case of these rolls, because they are brushed with butter, this means incorporating more butter into the dough, which will make them a bit heavier. But, I do think it would still work.
FAQs
Definitely not. Even though the directions for these dinner rolls call for mixing and kneading the dough using a standing mixer, you can most certainly knead the dough by hand.
Just mix the ingredients with a wooden spoon until a dough begins to form and then knead by hand on a floured surface, adding only as much flour as is necessary to keep the dough from sticking to your hands and the counter.
The important thing to remember when hand kneading dough is to work the dough long enough to achieve a high level of gluten development. For these rolls, that means hand kneading for at least 12 minutes. 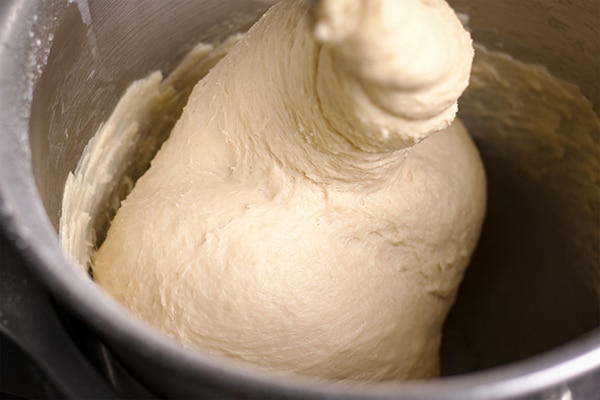
Absolutely! This dinner roll recipe is an excellent place for beginning bread bakers to start because it's fairly quick and easy. Not as quick and easy as pulling some pre-packaged frozen dinner rolls from the freezer, but quick and easy as far as homemade bread goes. And once you try them, you will never be tempted to purchase dinner rolls ever again.
Use This Dough to Make
- Overnight Homemade Cinnamon Rolls
- Overnight Caramel Rolls (Sticky Buns)
- Cinnamon Swirl Bread
- Apple Fritters with Maple Glaze
- Homemade Yeast Raised Doughnuts
- Salted Caramel Doughnut Holes
What to Serve with Dinner Rolls
Homemade dinner rolls are the perfect thing to serve with saucy main dishes like Tri-Tip steak with coriander gravy, creamy garlic chicken, and Asian short ribs.
Hearty soups, of course, practically beg to be eaten with a buttery dinner roll to sop up all that extra goodness. Beef and barley soup, creamy chicken noodle, Latvien stew, and venison stew are a few of my favorites.
And of course, dinner rolls are the perfect thing to serve with hearty roast meats like this perfect roast chicken, roast pork tenderloin with red wine cherry sauce, and classic slow cooker pot roast.
This is a Building Block Recipe
Building block recipes are tried-and-true recipes that I consider foundational to great home baking. They are the kind of recipes I come back to over and over again, sometimes baking them as is, but often using them as a jumping off point to create something new. > Scroll through all Building Block recipes.
If you give this recipe a try, let me know! Scroll down to rate the recipe, leave me a comment, rate it, or take a picture and tag it #ofbatteranddough on Instagram.
Happy baking!
📖 Recipe
Homemade Dinner Rolls
The best homemade dinner roll recipe. These dinner rolls are one of our family's favorite foods and a staple at Thanksgiving, birthday dinners and pretty much every other celebration. I hope you enjoy these dinner rolls as much as we do!
If you give this recipe a try, let me know! Scroll down to rate this recipe and leave a comment for me!
Ingredients
- 2 cups (500ml) whole milk, at room temperature, between 75 and 85 degrees
- ½ cup (100g) granulated sugar
- 3 ½ teaspoon (10.75g) active dry yeast
- 1 large egg + 1 large egg yolk, slightly beaten
- 6 tablespoon (85.2g) unsalted butter, melted and cooled to room temperature
- 6 cups (900g) all-purpose flour
- 2 tsp( 12g) table salt - OR 3 teaspoon (18g) kosher salt
- ½ cup (113g) salted butter, melted (for brushing on the pan and over the tops of the rolls)
Instructions
- Pour the milk into the bowl of a standing mixer, and add the sugar and yeast. Stir to combine and then let sit for about 5 minutes to let the yeast begin to come alive. (*See note) Whisk in the egg, egg yolk and 6 tablespoons melted butter.
- Fit your mixer with the dough hook, add 5 cups of the flour and mix on low speed until the dough begins to come together. Slowly add enough of the remaining cup of flour so that the dough forms a soft, slightly sticky ball. This might take the entire remaining cup or only a bit of it. What you're looking for is a soft, smooth ball of dough that clings to the dough hook, does not stick to the sides of the bowl, but does stick slightly to the bottom of the bowl.
- Once the dough has come together, sprinkle in the salt. Continue to knead the dough for about 8-10 minutes. At this point, the dough should be very soft and smooth.
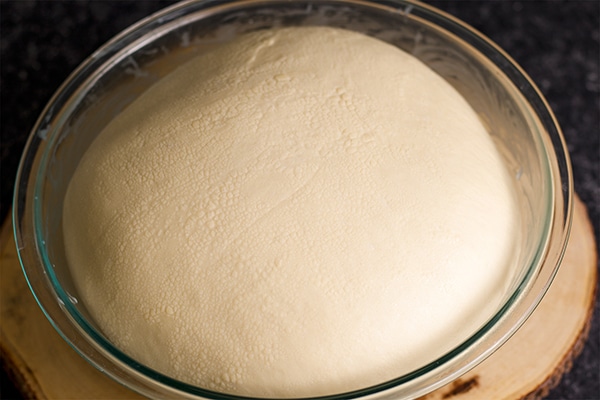
- Brush the inside of a large bowl with a thin layer of the melted salted butter and dump the dough into the bowl. Brush the top of the dough with a bit of the melted salted butter and cover with plastic wrap. Let the dough rise at room temperature for 1-2 hours, until it's doubled in size. The warmer the room, the faster the dough will rise. (*See the tips earlier in the post about speeding up and slowing down the dough's rise time.)
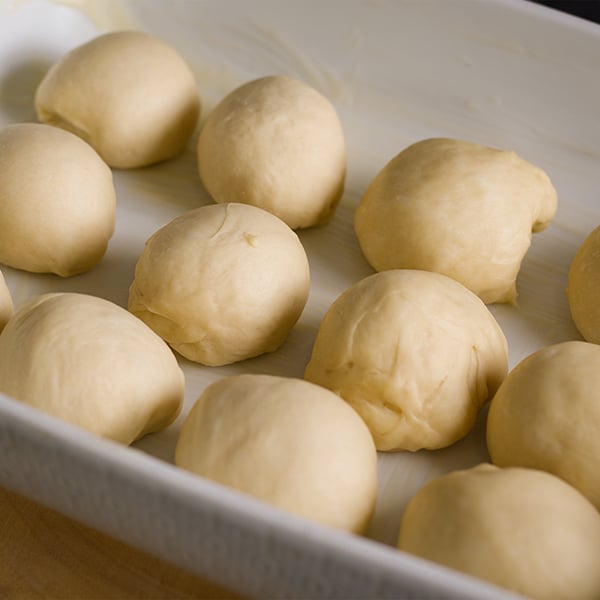
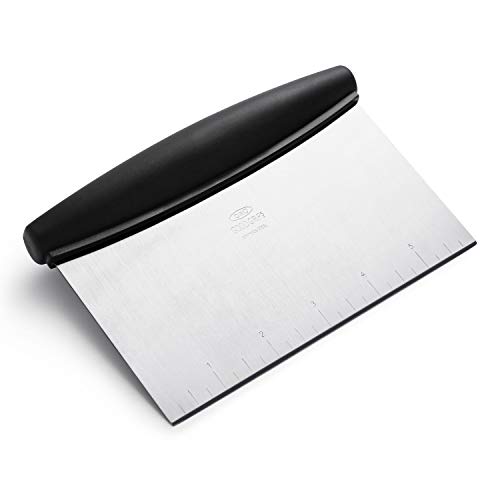
- After the dough has risen, dump it out of the bowl onto a clean work surface. Using a dough knife or large butcher knife, cut the dough in half. Then cut each half into 12 equal pieces.
- Brush the inside of two 9x13 baking dishes with some of the melted salted butter.
- Shape each piece of dough into a ball by gently stretching the outside of each piece into an oblong, pinching the sides together at the bottom. Bring the opposite sides together and pinch together at the bottom. (*See the video earlier in this post for photos of shaping the dough into rolls.) Repeat with each piece of dough, placing 12 rolls in each pan.
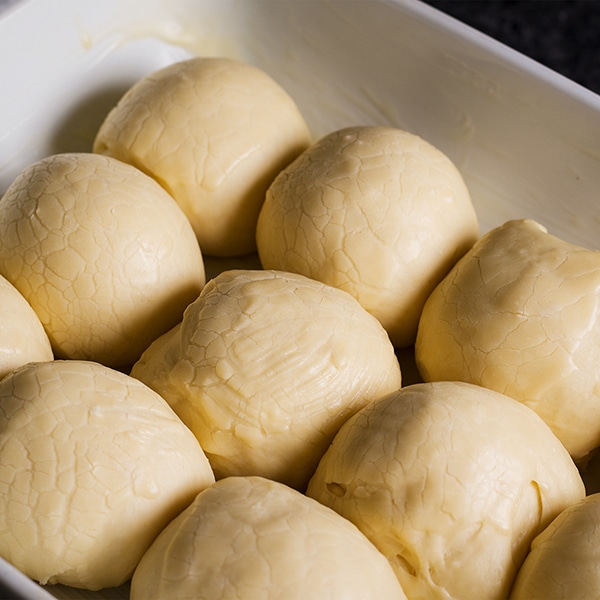
- Brush the tops of the rolls with some of the melted salted butter and cover with plastic wrap. Let rise for about 1 hour, until the rolls have nearly doubled in size.
- Preheat the oven to 375 degrees F (190.5 degrees C). Remove the plastic wrap, and bake for 30 - 35 minutes, until they are a rich golden brown. To test for doneness, remove one pan from the oven and insert a knife in-between a couple of the rolls in the center of the pan. Pull the sides of the rolls apart slightly. If they still look doughy, put them back in the oven for another 5 minutes and then check again.
- Remove the pans from the oven and brush the tops of the rolls with more melted butter. Let cool on a wire rack for 10 minutes before serving. These are best served fresh and warm, but can be stored in an air tight container for up to 2 days.
Notes
- If the yeast doesn’t get foamy after sitting in the milk for about 5 minutes, it’s probably inactive. The only solution is to start over with new yeast. If you suspect that your yeast might not be active (perhaps it’s old or was exposed to high heat), stir it into just a half cup of room-temperature milk to test it. If it gets foamy, then it’s fine to add the rest of the milk and proceed with the recipe.
- If you want to cut the recipe in half, so that you have 12 rolls instead of 24, use one whole egg and leave out the additional egg yolk.
- If you want to make 24 rolls, but need to mix the dough in two separate batches, crack the egg and egg yolk into a measuring cup and whisk with a fork. Then use half for one batch and half for the other.
- I've heard from a couple of bakers that the tops of their rolls get too brown and overcooked during baking. I think this is because some ovens radiate too much heat from the top of the oven, overcooking the tops of the rolls before the middles are done. If after about 20 minutes of baking, you notice the tops of the rolls getting too brown, loosely cover them with a piece of aluminum foil. Be careful to not put any pressure on the rolls themselves as you cover them – just lay the foil over the top of the rolls, which should protect them from the heat and help keep the tops nice and soft.
Recommended Products
As an Amazon Associate and member of other affiliate programs, I earn from qualifying purchases.
-
 Wheat Montana All Purpose White Flour (Pack of Two – 10 Lb. Bags)
 -
OXO Stainless Steel Good Grips Multi-Purpose Scraper & Chopper
-
Product Review: Brod and Taylor Bread Proofer
-
STAUB Ceramics Rectangular Baking Dish, 13x9-inch, White
-
KitchenAid KP26M1XNP 6 Qt. Professional 600 Series Bowl-Lift Stand Mixer


Nutrition Information:
Yield: 24 Serving Size: 1 rollAmount Per Serving: Calories: 212Total Fat: 8gSaturated Fat: 5gTrans Fat: 0gUnsaturated Fat: 3gCholesterol: 43mgSodium: 263mgCarbohydrates: 29gFiber: 1gSugar: 5gProtein: 5g

Stefanie D. says
I was in charge of the rolls for Thanksgiving last year and used a recipe that totally failed. I made dinner for my family last night and made these rolls and completely redeemed myself! These are the BEST. They all said they were better than Texas Roadhouse rolls (if you know, you know) Thank you so much for this awesome recipe! It will stay in permanent rotation 🙂
Suzie says
Can I freeze the dough after my first proof? I am hoping to freeze it as a ball and take it out in a week, let it thaw out then form the dough into balls and let it rise. Do you think this would be ok?
Rebecca Blackwell says
Hi Suzie! Yes! You can do that. Freezing the dough then thawing, shaping and baking should work out great. Please let me know if you have any other questions! And I'd love to know how these rolls come out for you! xo
Liz T. says
Dinner rolls turned out great, just as the recipe stated! Could 2% Reduced Milk Fat be replaced with the Whole Milk? Also can more sugar be added for a sweeter tasting rolls?
Rebecca Blackwell says
Hi Liz! I'm so happy to hear that you liked this recipe! Yes to both of your questions. Using 2% milk is perfectly fine. I generally like to use whole milk because that little bit of extra fat contributes to their richness. But, if 2% is what you have on hand, go ahead and use it. You'll barely notice a difference and can always add in an extra tablespoon of butter if you want to make up for the lower fat content of the milk.
And you can add more sugar to the dough... but, you might also want to increase the amount of yeast slightly if you do. Sugar provides "food" for yeast but too much an actually hamper its growth and slow down gluten development. So, if you increase the sugar, I'd also increase the amount of yeast by about 1/2 tsp.
Another, possibly better, option is to add more sugar in other ways - like brushing the rolls with honey butter right after baking. Right before the recipe, I've listed a handful of other recipes that use this same dough to make things like cinnamon rolls, apple fritters, doughnuts, and caramel rolls. In each recipe, rather than increase the amount of sugar in the dough, I've added sweetness "on top of" the dough - a glaze for the doughnuts, cinnamon sugar in the cinnamon rolls, etc.
I hope that helps! Please let me know if you ever have any other questions! And thank you for taking the time to leave a comment for me! xo
Diane Gandy says
Hi Rebecca,
Just following up.
I made your roll recipe for Easter and the rolls were absolutely delish using bread flour.
My only issue I had was that my yeast both rapid & instant did not activate within 5mins. Even though both were not old.
I left them to activate longer but no use.
I then bought the jarred yeast & after 20mins, it finally foamed. Go figure!
Anyway, thank you again for a great recipe.
I will definitely make again.
Rebecca Blackwell says
Hi Diane! First of all, I'm so happy to hear that the rolls turned out well for you! Thanks so much for taking the time to follow up with me! I'm stumped about why the different kinds of yeast you used took so long to activate... Was your milk room temperature or refrigerator-cold? I'm so happy that you persisted and waited for the yeast to activate instead of just giving up!
Diane Gandy says
Yeah I used my instant read thermometer for the correct milk temp... but no luck. Strange!
But what a treat the finished product was.
Many thanks again!
Diane says
Hi,
I have a suppiy of bread flour I need to use.
Is it possible to use bread flour for your roll recipe. If so, are there adjustments I would need to make to ensure a soft fluffy dough?
Rebecca Blackwell says
Hi Diane! Yes - you can use bread flour in this recipe. You might need a bit less flour than if you were using all-purpose. Just start by adding 5 cups of flour and add more, bit by bit, only as necessary. Other than that, you should be able to swap one for the other with no issues. Please let me know if you have any other questions! xo
Diane says
Thank you so very much for your response.
I will be making them for Easter.
I will let you know how they turn out.
Loved your in-depth recipe and tips.
Many thanks........
I wasn't sure if you'd respond to this older site.
You've made my day!
Danielle Carter says
Oh, thank you so much for all the information in this recipe. I've been trying to make homemade rolls for about three weeks now(I've never been much of a baker). It took your recipe for me to figure out how much flour to add. I halved the recipe, so I only used 3 cups of flour. I put two in and put the third in a tablespoon at a time, until I liked the look of the dough! They were perfect! So, then I made your chocolate chip cookies and they were absolutely awesome too!!! Thank you again for all the information!
Rebecca Blackwell says
I am SO happy to hear that these rolls (and the cookies!) came out well for you! These rolls have been a staple in my home for years and years, and it brings me great pleasure to know that other people love them as much as we do. 🙂 Thank you so much for taking the time to leave a comment. I truly appreciate it!
xo
P.S. You probably saw this in the recipe, but I've used this same dough to make all sorts of other things, from cinnamon rolls to doughnuts. It's a very versatile dough that works great in all sorts of delicious treats. 🙂
Debbie says
I made these last night. They were delicious! I'm having one right now for breakfast, and still delicious. I put some baked, leftover rolls in the freezer. I hope they'll be good when I'm ready to use. Your oven idea for proofing the dough was spot-on. I used my proofer for the first step (83 degrees), but used your oven method for the second proofing as two pans would not fit in the proofer. Thank you!
Rebecca Blackwell says
I'm so happy to hear that you liked this recipe Debbie and that proofing the dough in the oven worked out well for you! The only danger in allowing the dough to rise in the oven is in forgetting it's in there when you go to preheat the oven - which I've done more than once. 🙂 Other than that, it works great for me too. Thank you so much for taking the time to leave a comment for me. I truly appreciate it! xo
Vineeta Vogel says
Made these for Thanksgiving and they were a hit! Want to add them to our Christmas menu, but was wondering if I can form them as a knot or braid so that it has a little more of a festive air....
Rebecca Blackwell says
Hi there! I've used this same dough to make cinnamon rolls, caramel rolls, doughnuts, apple fritters, cinnamon bread... you get the picture. 🙂 It's pretty versatile. I think you could shape it into pretty much anything and it would work great. I love the idea of braiding it. You could even shape the braid into a wreath. Please let me know if you have any other questions! And, I'd love to hear what shape you decide to make and how it works out! xo
Rose Wilson says
I made these for the second time this month, by popular demand! For my Thanksgiving bake, I needed to pretty drastically adjust the timing of things. I ended up doing a cold first proof to try to slow it down enough to not need to freeze the dough. It still rose quite quickly in the fridge so I just took the dough out, shaped it in a buttered dish, and then froze them in the dish for a day. I took them out and let them come to room temp and complete the second rise and baked them the morning of Thanksgiving. It worked perfectly! Love that this is a forgiving and versatile dough. Highly recommend!
Rebecca Blackwell says
I am so happy to hear that you liked this recipe so much Rose! I LOVE that you paid attention to what the dough was doing and adjusted your technique to fit the dough to YOUR timing. It is a forgiving dough, but it also requires the baker to be flexible in their approach to getting the rolls to rise and bake on their schedule. I appreciate it and hope it will be useful for other bakers as well! xo (PS- I'm not totally sure if you made these as a part of the November Bake Club challenge, but am being presumptuous and adding your name to the drawing regardless. xo)
Rose Wilson says
I did! I’m just so bad about taking pictures before scarfing them all down. So I didn’t have anything to post! Thank you!!
Rebecca Blackwell says
No worries! I just counted your comment as your entry. 🙂 Thank you for participating in the bake club!
Diane says
didn't have good luck with recipe, dough rose beautifully at both rises both when I baked the rolls they became pancakes. What did I do wrong
Rebecca Blackwell says
Oh dear. What a bummer, Diane. It sounds like the rolls over proofed. When carbon dioxide exerts more pressure than a fully proofed dough can withstand, the cell membranes tear, releasing the gas and deflating the dough. An over proofed dough won't expand much during baking, and in some cases, like your rolls, the dough can deflate entirely. To avoid this, be sure to let the shaped rolls rise only until they are "nearly" doubled in size. Allowing them to rise for too long will cause over proofing.
You can tell if dough is over proofed by pressing a finger gently into the top of the dough. If it springs back immediately, it needs to rise longer. If it springs back slowly, it's ready to bake. If it doesn't spring back at all, it's over proofed.
You can rescue over proofed dough by simply deflating it, reshaping it, and allowing it to rise again. In the case of these rolls, because they are brushed with butter, this means incorporating more butter into the dough, which might make them a bit heavier. But, I do think it would still work. I know that doesn't do anything to save your last batch. 😥 But, I hope it helps with the next one!
I do hope you try these again! Please let me know if you have any other questions! xo
Emily Leishman says
So good! Super soft and fluffy, some of the best rolls I've ever had! And they were surprisingly easy to make! I substituted the egg for a vegan substitute and it worked beautifully! Love this recipe!
Rebecca Blackwell says
Hi Emily! I am so happy to hear that you liked this recipe! These rolls are a favorite in our house, for sure. It's wonderful to hear from other bakers who love them as well. Thank you so much for taking the time to leave a comment! xo
LindaW says
Our chickens lay medium eggs, so I used 2 of those instead of the 1 large egg and 1 egg yolk. That part worked well. Real problem for me was timing - I tried to rush the rise and they weren't as light as I'd like. But I don't think the recipe is at fault at all. Making again, I'll turn the heat down a bit and cook them a little longer.
Rebecca Blackwell says
Hi Linda! First of all, I'm super envious about the fact that you have fresh eggs at your disposal! 🙂 And, I'm so happy to hear that you're making these again. Please let me know if you have any questions along the way, and I'd love to hear what you think of the second batch! xo
Jo says
Homemade dinner rolls are the absolute best! And these are soft and perfect! All I need is a bowl of soup! Thanks for a great recipe. I will be making these again and again and again.
Rebecca Blackwell says
I am so happy to hear that you liked this recipe Jo! Thank you so much for taking the time to leave a comment for me! I truly appreciate it! xo
Moop Brown says
These are amazing! The texture is perfect - super soft and buttery and slightly sweet. They are going to make a great addition to Thanksgiving this year!
Rebecca Blackwell says
I'm so happy to hear that you liked these rolls! They are a staple at our house on Thanksgiving, that's for sure. Thanks so much for taking the time to leave a comment for me! I truly appreciate it! xo
Jacqueline Debono says
I have never made my own dinner rolls but it's been on my to-do list for ages. Your recipe looked and sounded easy enough, so I went ahead and gave it a try. The rolls SO light and fluffy. We devoured them. I will be making these again! Thank you!
Mama Maggie's Kitchen says
Mmm... I think I just heard my tummy growl. lol. Thank you for making me hungry! I make your recipe for homemade white bread all the time. My family loves it. Can't wait to try these too!
Jenny says
Your recipe is exactly what I needed. I am determined to make dinner rolls this year for thanksgiving since it will be just my husband and I, want to make it extra special. Your recipe is the best I have come across and I am making it! Thanks so much!
Rebecca Blackwell says
I'm so happy to hear that you like this recipe, Jenny! These rolls are a staple at our Thanksgiving table - they are more important to us than the turkey! 🙂 Thank you so much for taking the time to leave a comment for me! I appreciate it! xo
Farrukh Aziz says
Hey Rebecca,
The Dinner rolls were so delicious and fluffy! It paired perfect with the spicy lamb vindaloo curry we made last night! Thank you for sharing this lovely recipe. 🙂
Rebecca Blackwell says
I am so happy to hear that you liked this recipe Farrukh! My stomach literally growled at the thought of bowls of spicy lamb vindaloo and homemade rolls. Sounds sooooooo good! 😋 Thank you so much for taking the time to leave a comment for me! I truly appreciate it! xo
Marta says
I could survive on these rolls if I had to! Perfectly fluffy and easy to make. They were delicious.
Rebecca Blackwell says
I'm so happy to hear that you liked this recipe, Marta! Thank you so much for taking the time to let me know! xo
Chef Dennis says
Your dinner rolls were so easy to make and everyone in the family loved them! thanks for a great recipe!
Rebecca Blackwell says
I am so happy to hear that you and your family liked these rolls Dennis! Thank you so much for taking the time to let me know! xo
Heidy Linn says
My husband absolutely LOVES dinner rolls. I made your homemade dinner rolls the other night and I will be darned if between him and the children I only got one roll! I am going to make them again because these guys went nuts over them! I think I will make a triple batch and maybe freeze them? What do you think? They should freeze well--Let me know.
Have an awesome day
Heidy
Rebecca Blackwell says
Hi Heidy! I am so happy to hear that your husband and kids liked these rolls so much! 😂 These rolls will certainly freeze well, although I'd suggest making the dough and baking them in batches. Doubling or tripling the recipe at once will result in more dough than most mixers can handle and more rolls than one oven can bake at once. But, if you make them in successive batches, you should be fine. Make sure the rolls are wrapped well before freezing to prevent freezer burn. You can even wrap individual rolls in plastic wrap, then put them in a zip top bag or other container so that you can remove as many or as few rolls as you want from the freezer as you want them. Hope that helps! Thanks so much for taking the time to leave a comment for me! I truly appreciate it! xo
Gloria says
These rolls seriously deserve their own category. 🙂 I am such a bread lover, but these are just about the best thing I've ever eaten in my whole life. Thank you for such a great recipe!
Lisa says
Hi there, are you able to use quick rise yeast in this recipe? Would it still be the same amount or recipe instructions?
Rebecca Blackwell says
Hi Lisa! Yes! You can use quick rise yeast in this recipe. In general, the two kinds of yeast can be used interchangeably. However, there's no need to dissolve instant yeast in liquid before adding it to the dough - you can just mix it right in! Please let me know if you have any other questions! xo
Heather says
Is the oven temperature for fan or no fan pls?
Rebecca Blackwell says
Hi Heather! The oven temperature - 375 F - is for non convection baking. Please let me know if you have any other questions! And, I'd love to know what you think of these rolls after you make them! xo
Josephine says
This is a perfect recipe. My buns turn out soft and fluffy. Thank you so much for sharing it with us.
Rebecca Blackwell says
I am so happy to hear this Josephine. Thank you so much for taking the time to let me know! xo
Donnalene says
Thank you so much for recommending this recipe. I made them for Easter Sunday dinner and dropped 6 at my neighbors door for their dinner. Her husband told her to tell my husband that my buns are good. Haha thank you again.
Rebecca Blackwell says
Hahaha! LOVE this! Thank you so much for taking the time to leave a comment for me! xo
Joy says
These were amazing! I followed the recipe exactly and they turned out just like the photo. I have a relative that’s gluten free and she wants to know if these would work with GF flour. Is that something you’ve ever tried with this recipe?
Rebecca Blackwell says
I am so happy to hear that these came out well for you, Joy! Baking gluten free bread is, unfortunately, super tricky. I wish it was simply a matter of swapping out gluten free flour for all-purpose, but the lack of gluten in gluten free flour poses a real problem for bread bakers. Gluten is what gives bread it's chewy structure and, even though I've made a few attempts at gluten free bread, I've yet to find a method that produces a gluten free loaf (or rolls) similar to what you get with regular bread. Not saying the answer isn't out there, it's just that I don't have it. Yet. 🙂
In the meantime, even though it's not the same thing at all, I am super happy with this recipe for Gluten Free Vanilla Cake. I can't even tell you how many versions I went through before publishing the recipe. But, I've served it many times and no one ever guesses that it's gluten free. It's not dinner rolls. But, maybe it's something.
Thank you so very much for taking the time to leave a comment for me. I appreciate it more than I can say. xo
EllieB says
Everyone loved them at Easter!! Thank you!!!
Rebecca Blackwell says
I am so happy to hear this! Thank you so much for taking the time to let me know! xo
Gregory Rose says
Hello
The list of ingredients has butter twice ?
How much goes into the dough ? (vs coating the pans, bowl, top, etc)
Thanks
Rebecca Blackwell says
Hi there! I guess that's not super clear, is it? I just modified the recipe to (hopefully) make it a bit more clear, but you want to add 6 tablespoons butter to the dough itself. The 8 tablespoons of butter is for brushing inside the pan and over the tops of the rolls. Sorry about the confusion! Please let me know if you have any other questions! And, I'd love to know what you think of these rolls after you make them. xo
Juanita says
Thank you for suggesting this recipe, they are really good. The only problem I had was the tops dried out some and became crusty, any suggestions for that?
Rebecca Blackwell says
Hi there! I think this might be a result of just how different ovens conduct heat. In some, more heat radiates from the top of the oven, which could dry out the top of the rolls and over cook them. Here's what I think will fix the problem: After about 20 minutes of baking, loosely cover the top of the rolls with a piece of aluminum foil. Be careful to not put any pressure on the rolls themselves as you cover them - just lay the foil over the top of the rolls, which should protect them from the heat and help keep the tops nice and soft.
I'm glad you brought this up - if it's an issue for you, it's bound to be an issue for someone else. I'm going to add a note in the recipe for other bakers. Thanks so much for reaching out! xo
Tammy S says
Just found your site...very informative! Regarding these rolls, have you tried to make them Whole Wheat rolls with by some whole wheat flour? What percentage of WW flour would you recommend replacing the all-purpose flour?
Rebecca Blackwell says
Hi Tammy! I've never tried making these with whole wheat flour and think it would be difficult to get that super soft and pillowy texture if you added any. Still, it might be worth trying! I'd suggest starting with no more than 3/4 of a cup. Will you let me know if you try it? Happy Baking! xo
David says
It's always a great sign when a recipe gets requested for a birthday meal! I can see why these rolls get asked for - they are perfect. I love all the helpful detailed instructions for someone like me that doesn't bake much. This is my favorite dinner roll recipe.
SHANIKA says
OMG! These rolls look so soft! They are better than store-bought dinner rolls! I'm so making these and I love your tips on getting the dough to rise according to your schedule! So helpful!
Name* says
Recipe sounds delish. Wanting to try but 24 rolls are way too much for our family of 2. Can dough be frozen for shaping and baking after first rise? Or is it better to bske the bstch then freeze?
Rebecca Blackwell says
Hi there! I've actually never frozen the dough, but I'm sure it would work well. Just shape the rolls, place in a buttered pan, brush the tops with melted butter, cover with plastic wrap and then two layers of aluminum foil and place in the freezer. When you want to bake them, allow dough to thaw overnight in the refrigerator. Allow the rolls to rise in the refrigerator for a few more hours, or at room temperature for about an hour. Bake as directed in the recipe. I have also frozen these rolls after they were baked with great success. Wrap the rolls individually in plastic wrap, place in a ziplock freezer bag and freeze for up to 2 months. Good luck! Please let me know if you have any other questions, and let me know how they turn out!
Michelle says
You mention cutting the recipe in half as well. The only thing I am not sure how to cut in half is the egg. I was thinking after you wisk it, you could do it then?
Rebecca Blackwell says
Hi Michelle! Thanks for the question. In the past, when I've cut this recipe in half, I just used the whole egg and left out the additional egg yolk - information that would be helpful to include in the recipe. 🙂 Thanks to your question, I've updated the recipe with that instruction, so thank you! Please let me know if you have any other questions and I'd love to hear what you think about these rolls after you make them! Happy baking! xo