

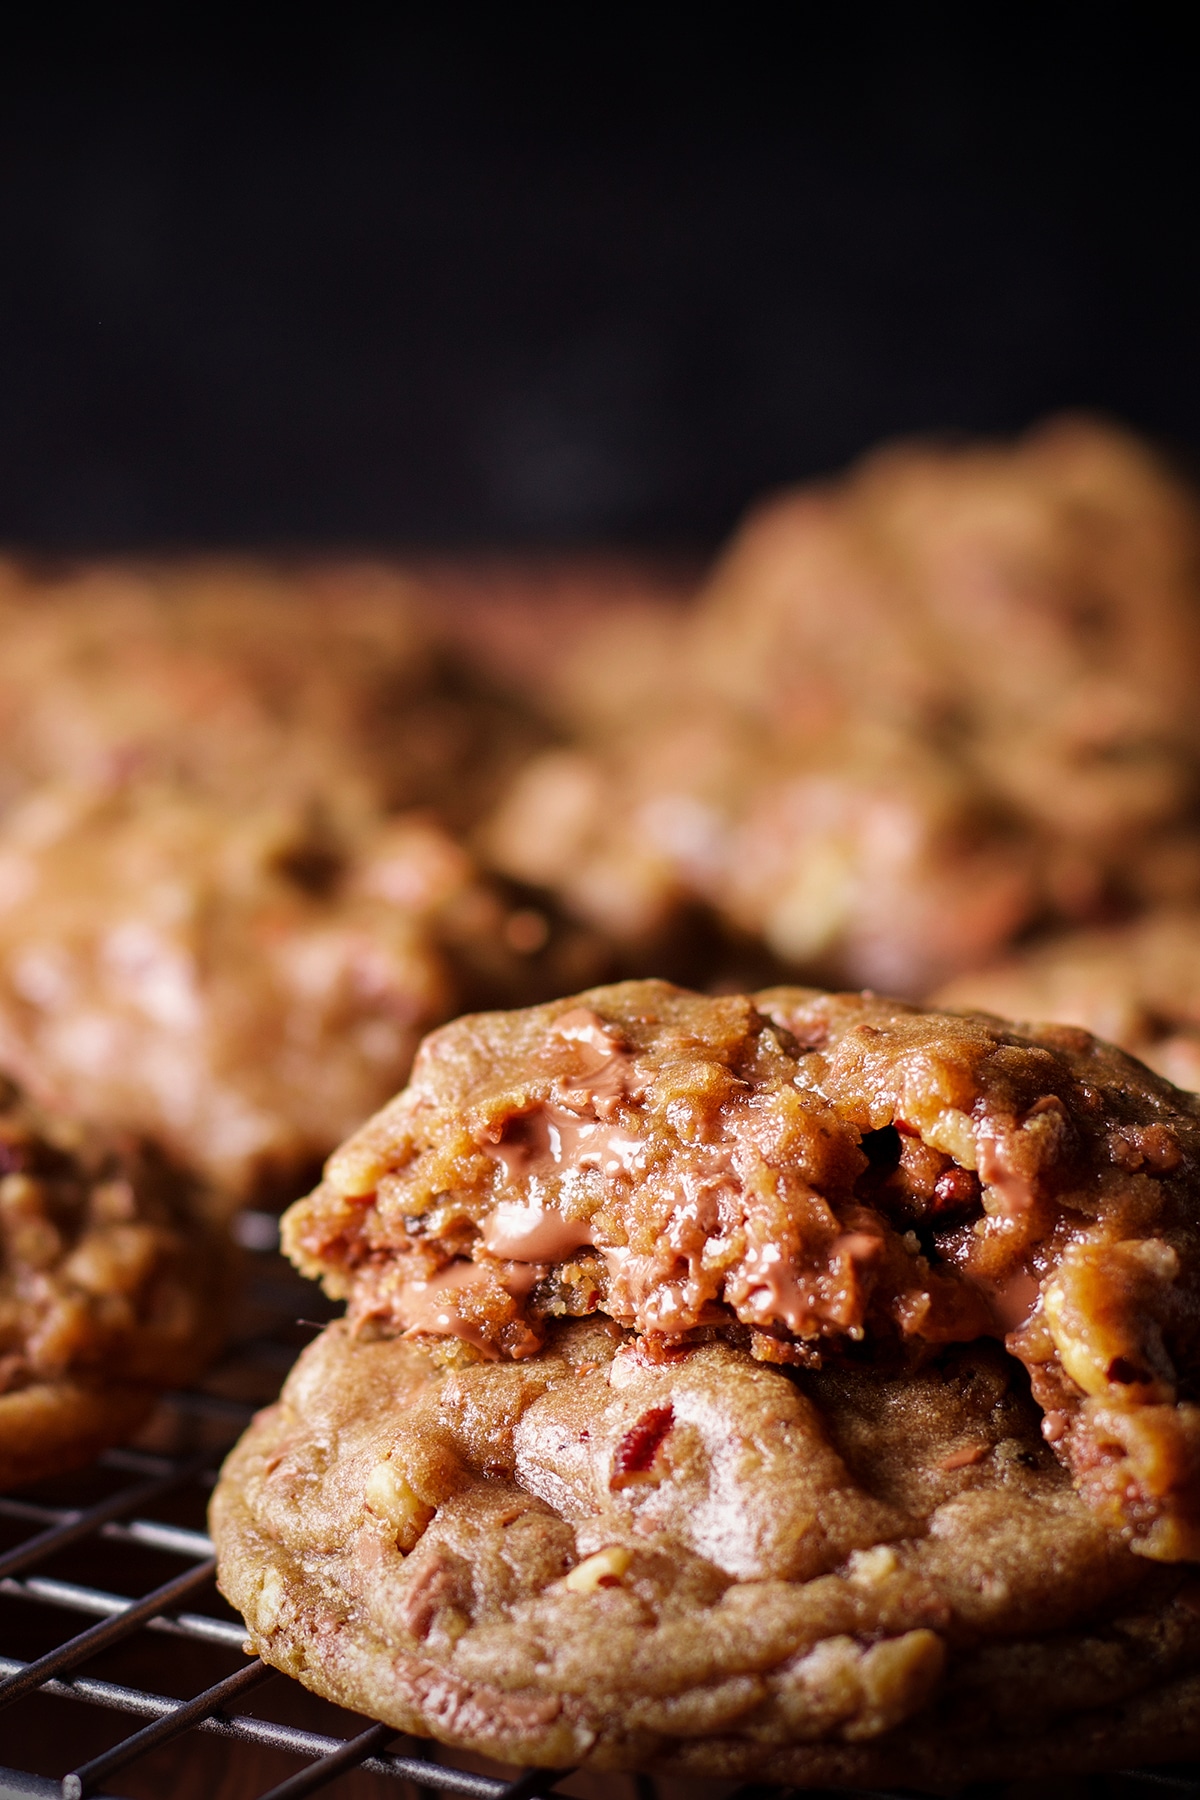
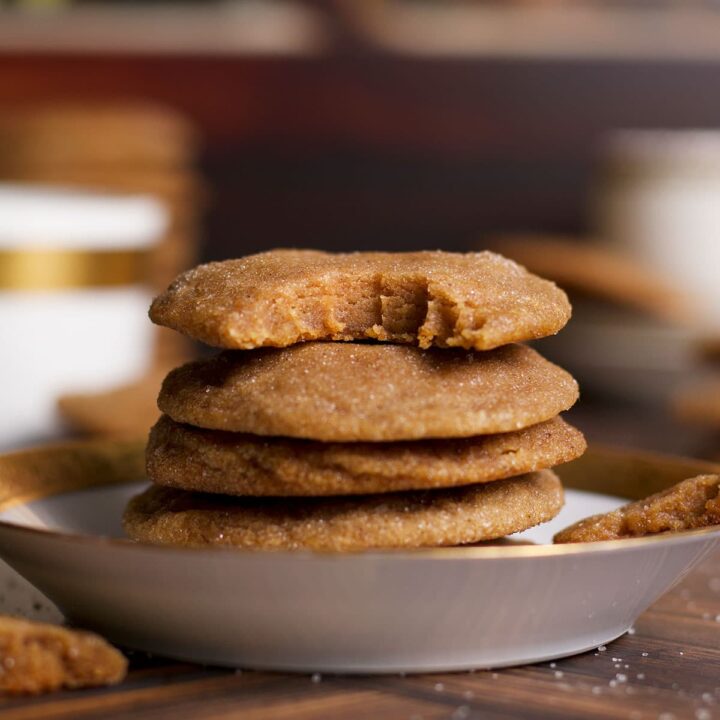
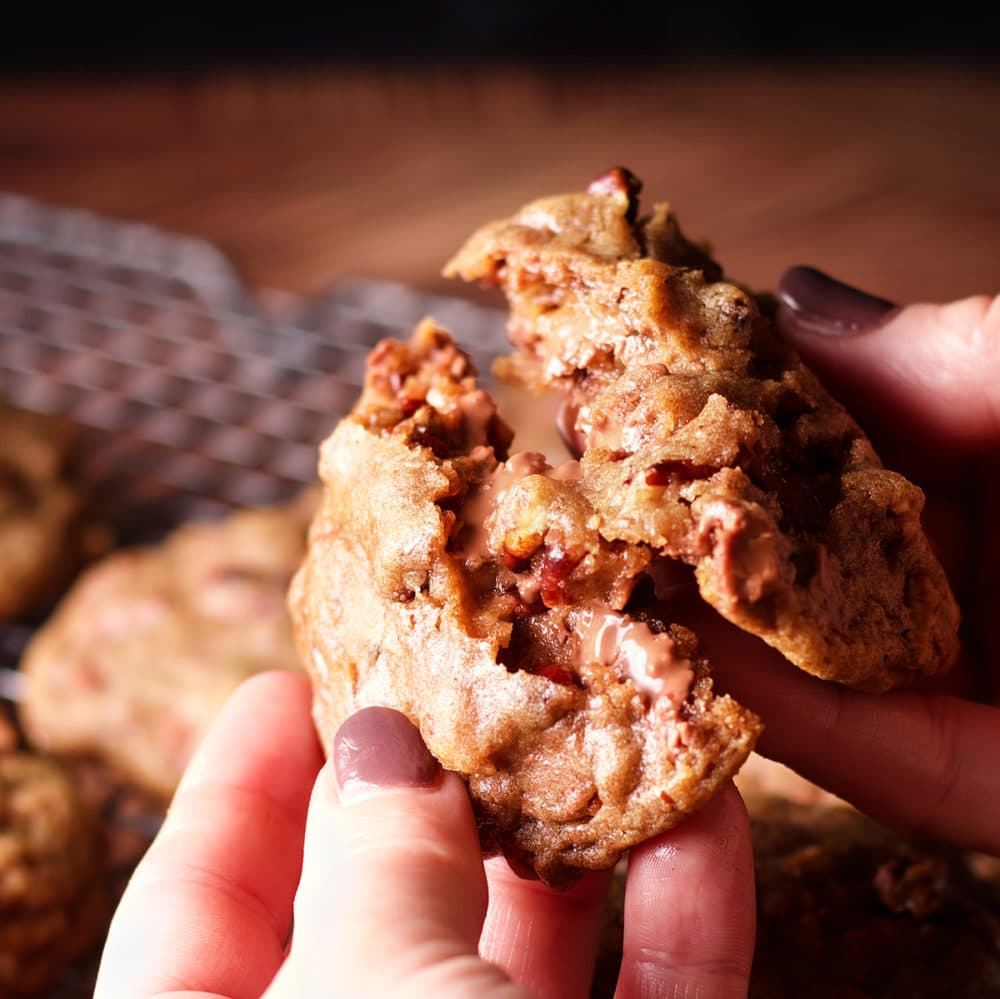
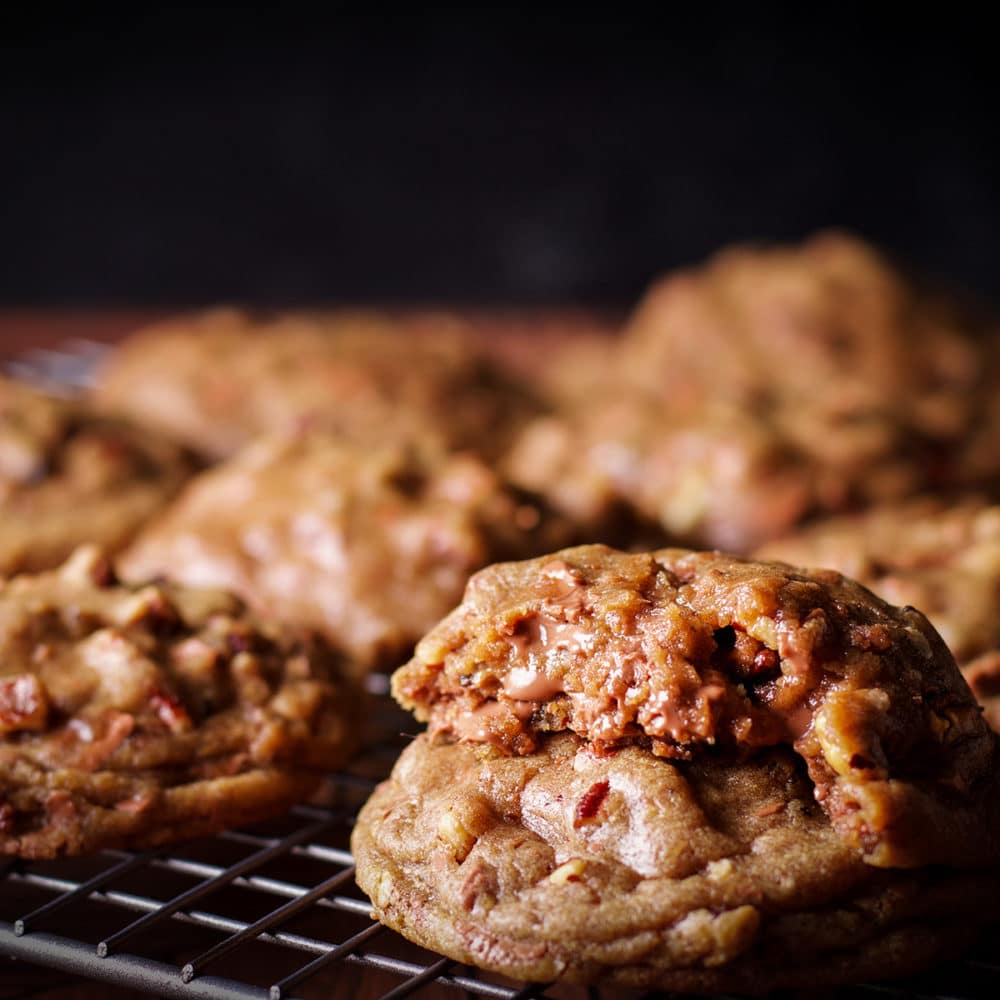
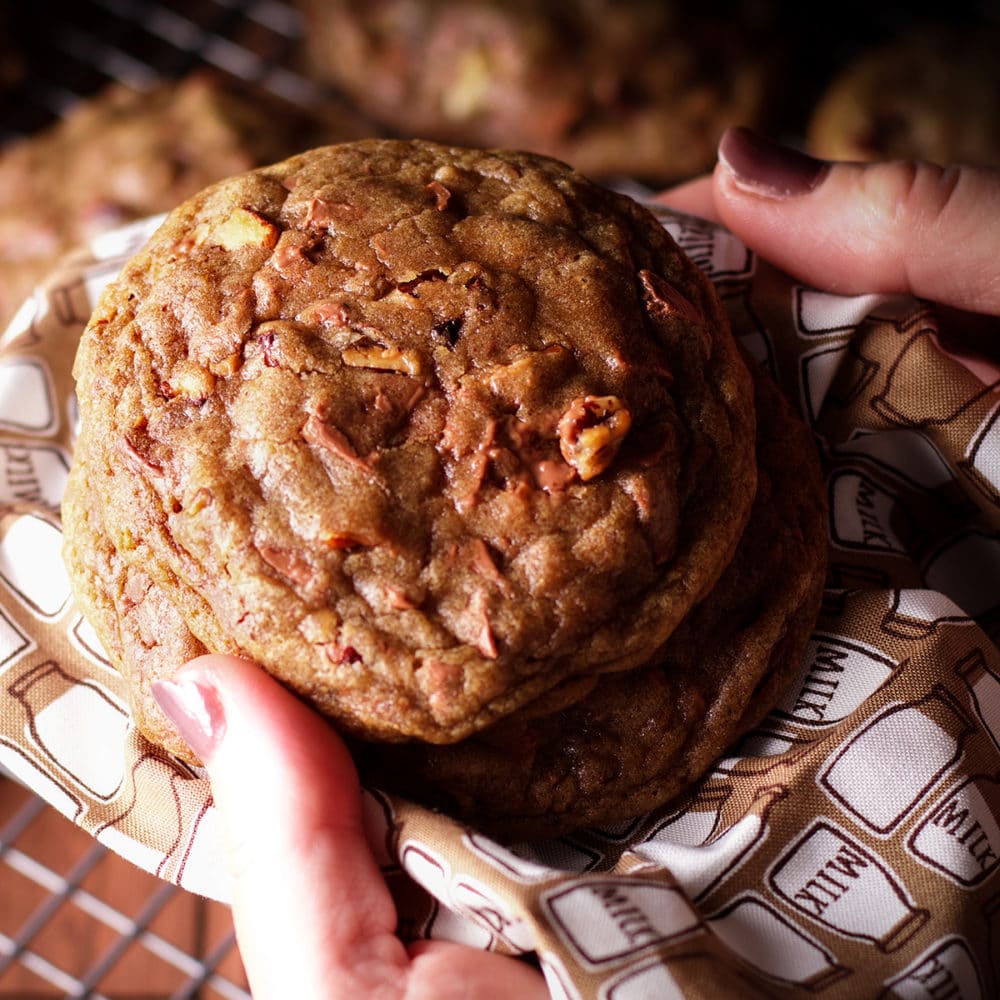
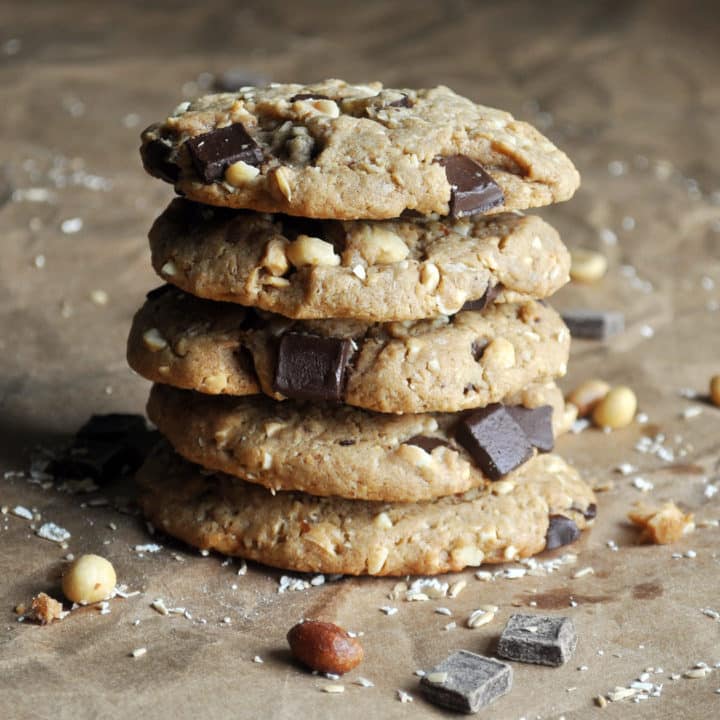
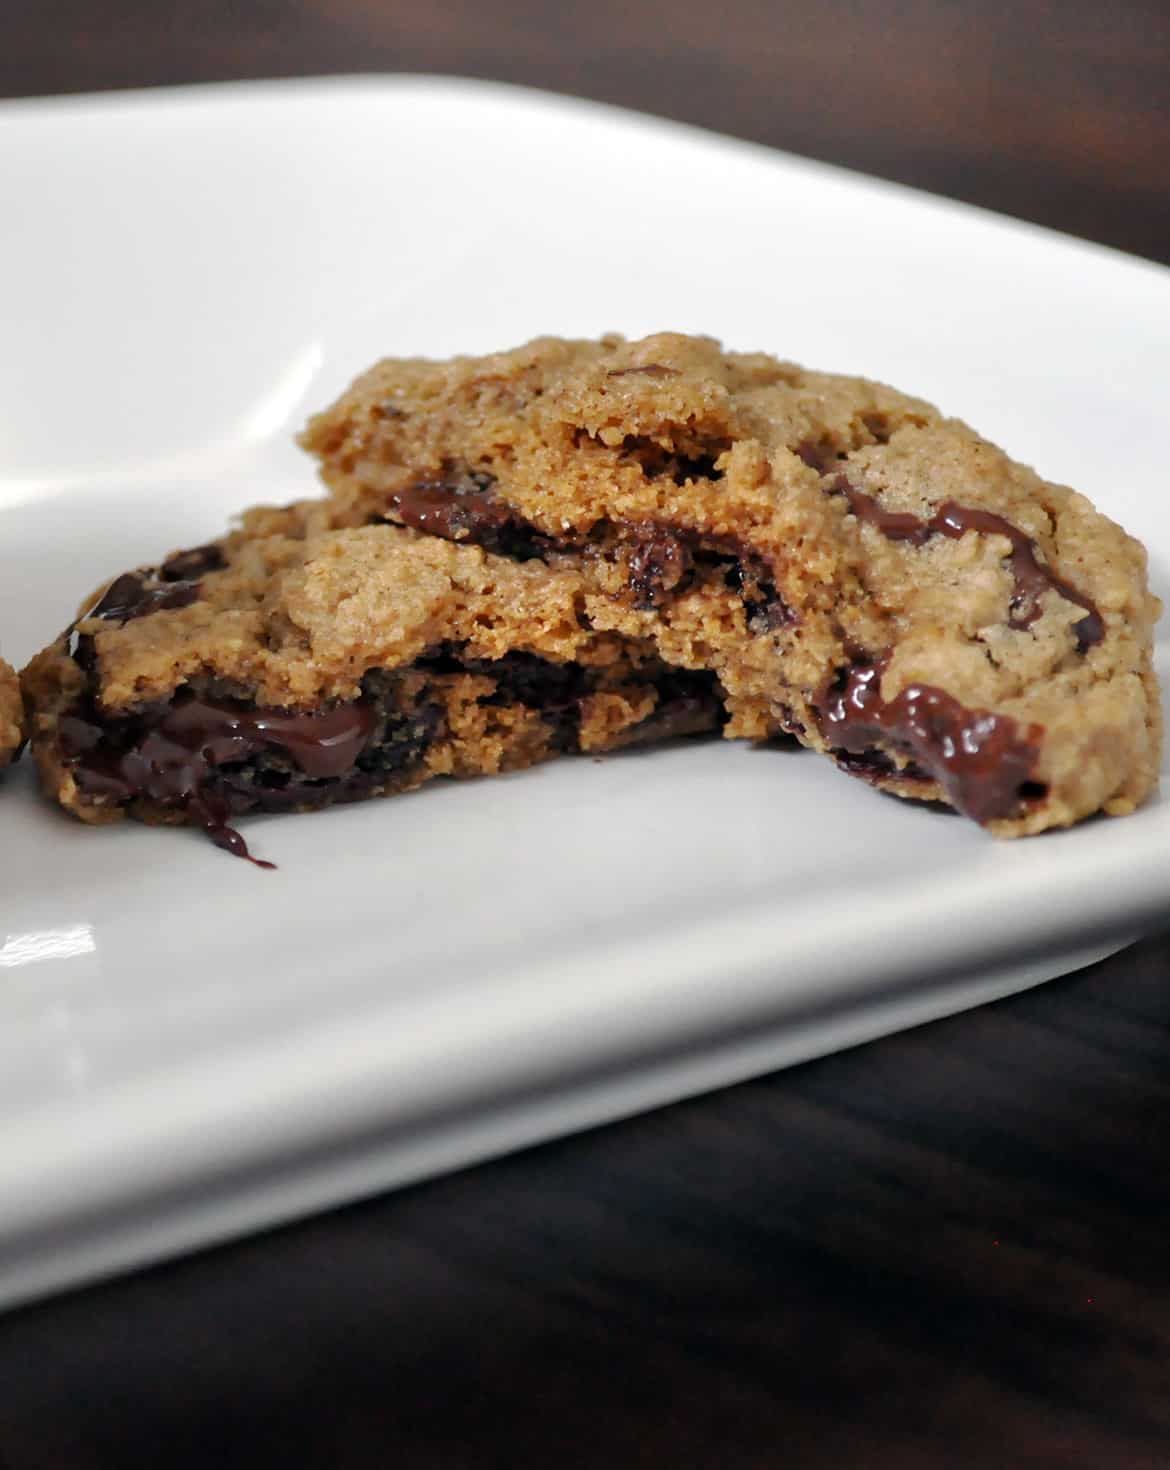
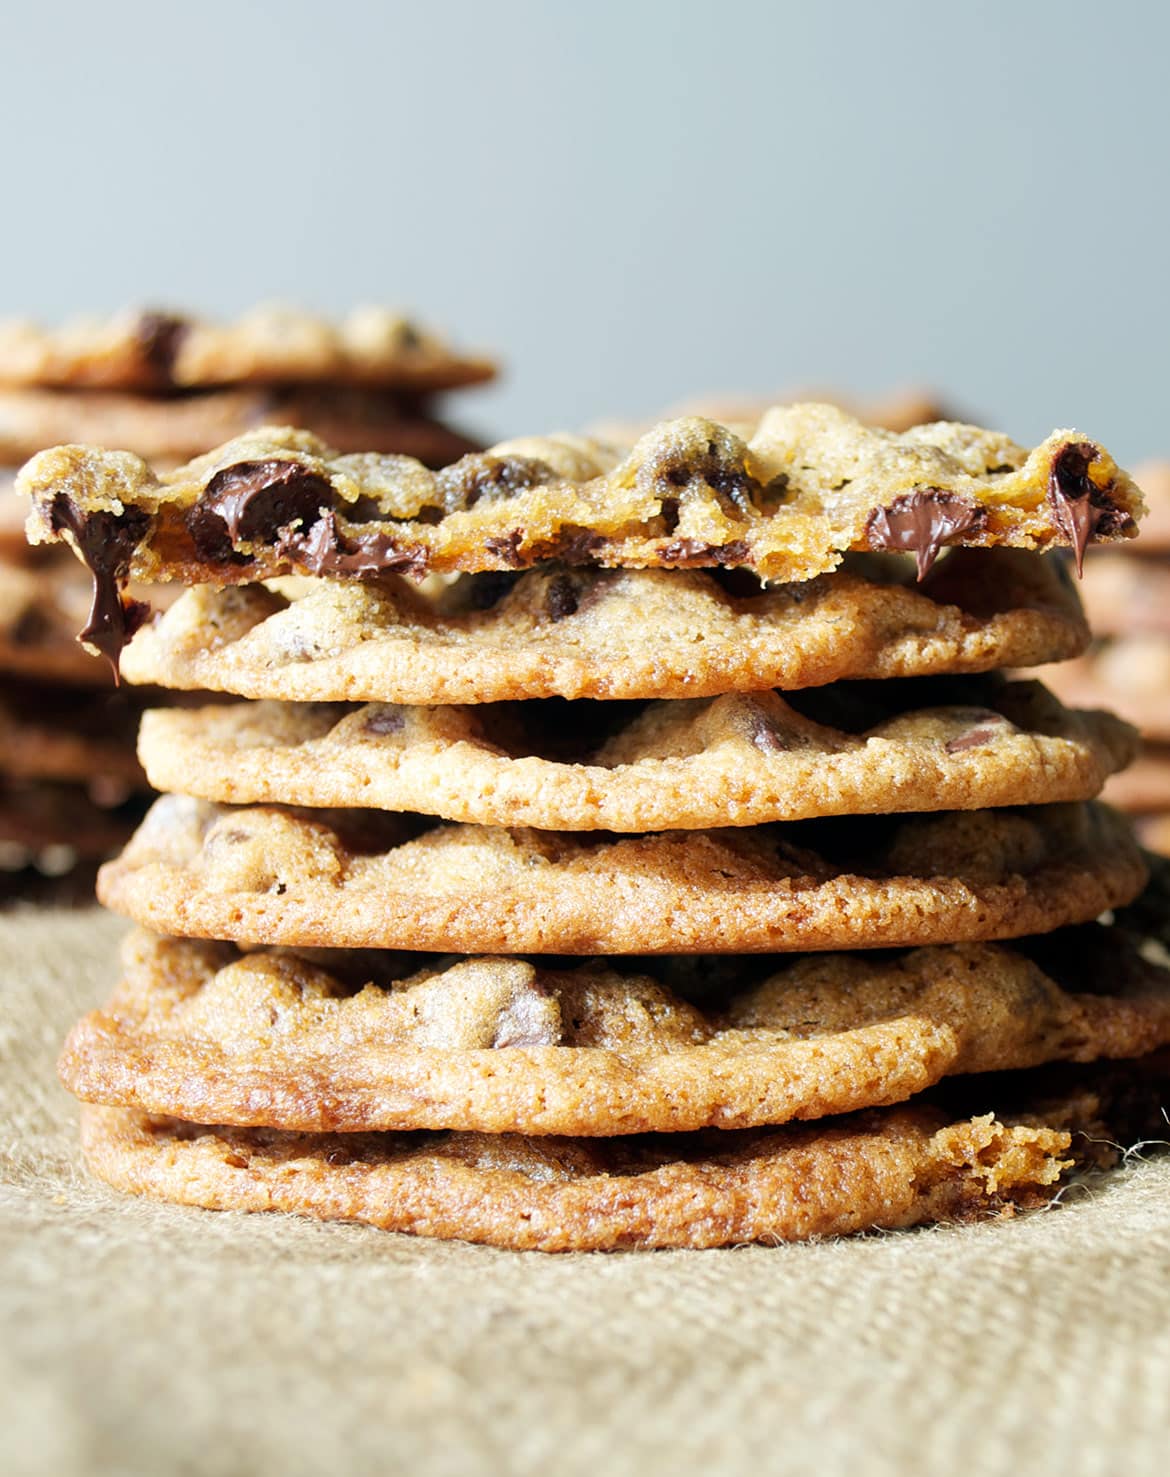
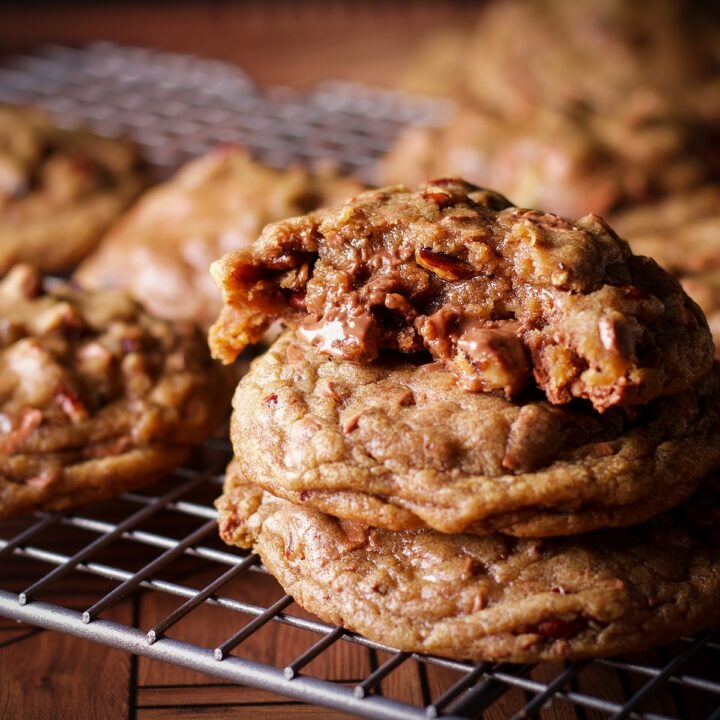
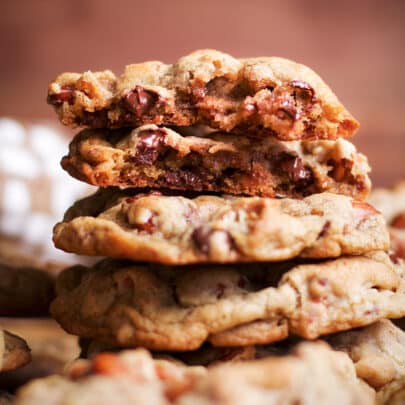
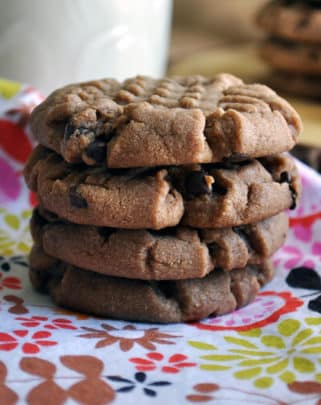
These massive brown butter Chocolate Chip Pecan Cookies are extra thick with a soft, gooey center loaded with milk chocolate chips and crunchy toasted pecans.
Want a dainty little bite of something? These are not for you.
These cookies are for those of us who are serious about wanting a cookie we can wrap both hands around and dig into with abandon.
"These were really good and gooey in the best way possible. I couldn't stop eating these!" - Elizabeth
This is the best chocolate chip pecan cookie recipe! They are the kind of colossal cookies you make when...
- You have a no-messing-around kind of craving for something that includes a gooey center and lots of melty chocolate
- You've had a really great, or a really terrible, day.
- Someone in your house has had a really great, or really terrible, day.
- Someone you know had a baby or graduated from something.
- It's the first day of school or the last day of school.
- It's Wednesday (or Sunday, Monday, Tuesday, Thursday, Friday or Saturday) and you just really want a cookie.
Jump to:
- Ingredients Needed to Make These Bakery Style Cookies
- Additions and Substitutions
- Step-by-Step Photos and Instructions
- How to Make Brown Butter
- 5 Secrets to Thick and Gooey Cookies
- Why It's Important to Let Cookie Dough Rest
- How to Store and Freeze these Cookies
- Recipe FAQs
- More Popular Chocolate Chip Recipes
- 📖 Recipe
- 💬 Comments

+ Subscribe to my newsletter for new and exclusive recipes in your in-box every month! As a full time traveler, living, working, cooking, and baking from a 5th wheel RV, it's also where I share our experiences of life on the road.
Ingredients Needed to Make These Bakery Style Cookies
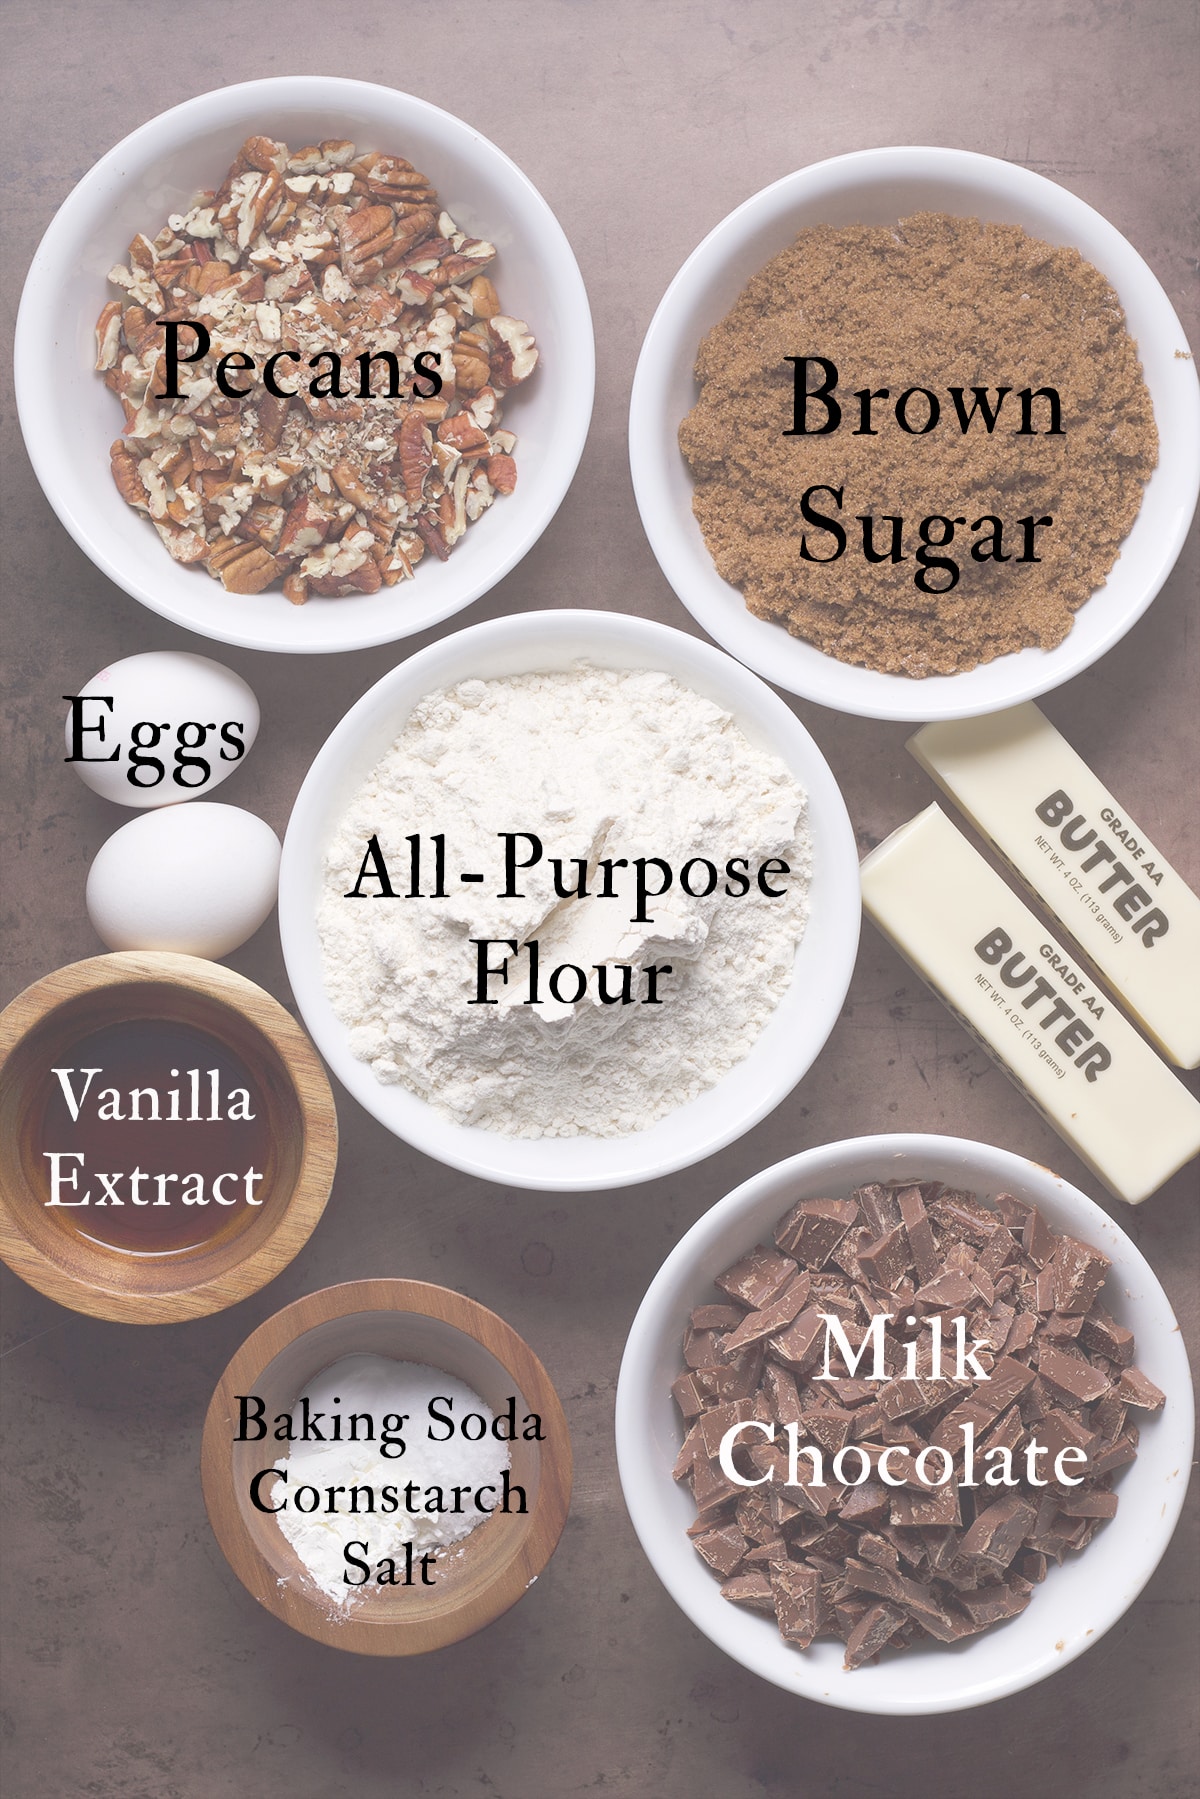
- Unsalted butter
- Chopped pecans
- All-purpose flour
- Baking soda
- Cornstarch
- Kosher salt
- Light or dark brown sugar
- Eggs
- Pure vanilla extract
- Almond extract (optional)
- Good quality milk chocolate
Additions and Substitutions
If you're looking for an easy basic cookie recipe that can be altered in an endless number of ways, try these Anything Cookies. But, as with most cookie recipes, there are a lot of ways to alter this milk chocolate chip pecan cookie recipe to suit your personal tastes. Here are a few suggestions:
- Use any other kind of nut instead of pecans. Walnuts, almonds, cashews, pistachios, even pine nuts are all delicious in these cookies.
- Use dark chocolate instead of milk chocolate.
- Make caramel pecan chocolate chip cookies by adding a cup of chopped hard caramels like these Kraft Caramels.
- Leave out the almond extract and increase the amount of vanilla extract.
- Add dried fruit for chocolate, fruit, and nut cookies. Tart dried cherries or cranberries are particularly delicious in these cookies but also try diced dried apricots, dates, and mango.
- Make white chocolate pecan cookies by substituting chopped white chocolate for the milk chocolate in this recipe.
- Replace the chopped chocolate with chopped candy bars. Heath bars, Andes mints, snickers bars, butterfingers, twix, almond joy... pretty much any candy bar is delicious in these cookies.
- Make these cookies gluten-free by swapping out the all-purpose flour with gluten-free flour mix. I like Bob's Red Mill 1-to-1 Gluten Free Flour and King Arthur Measure to Measure Gluten Free Flour.
"Thank you so much for sharing this amazing recipe! We are going to make these again and again! They were super easy to make and so delicious! Highly recommended!" - Alyssa
Step-by-Step Photos and Instructions
The first step to making these chocolate and pecan cookies is to make brown butter. Making brown butter is really easy, but if you've never done it before, see the step-by-step instructions below.
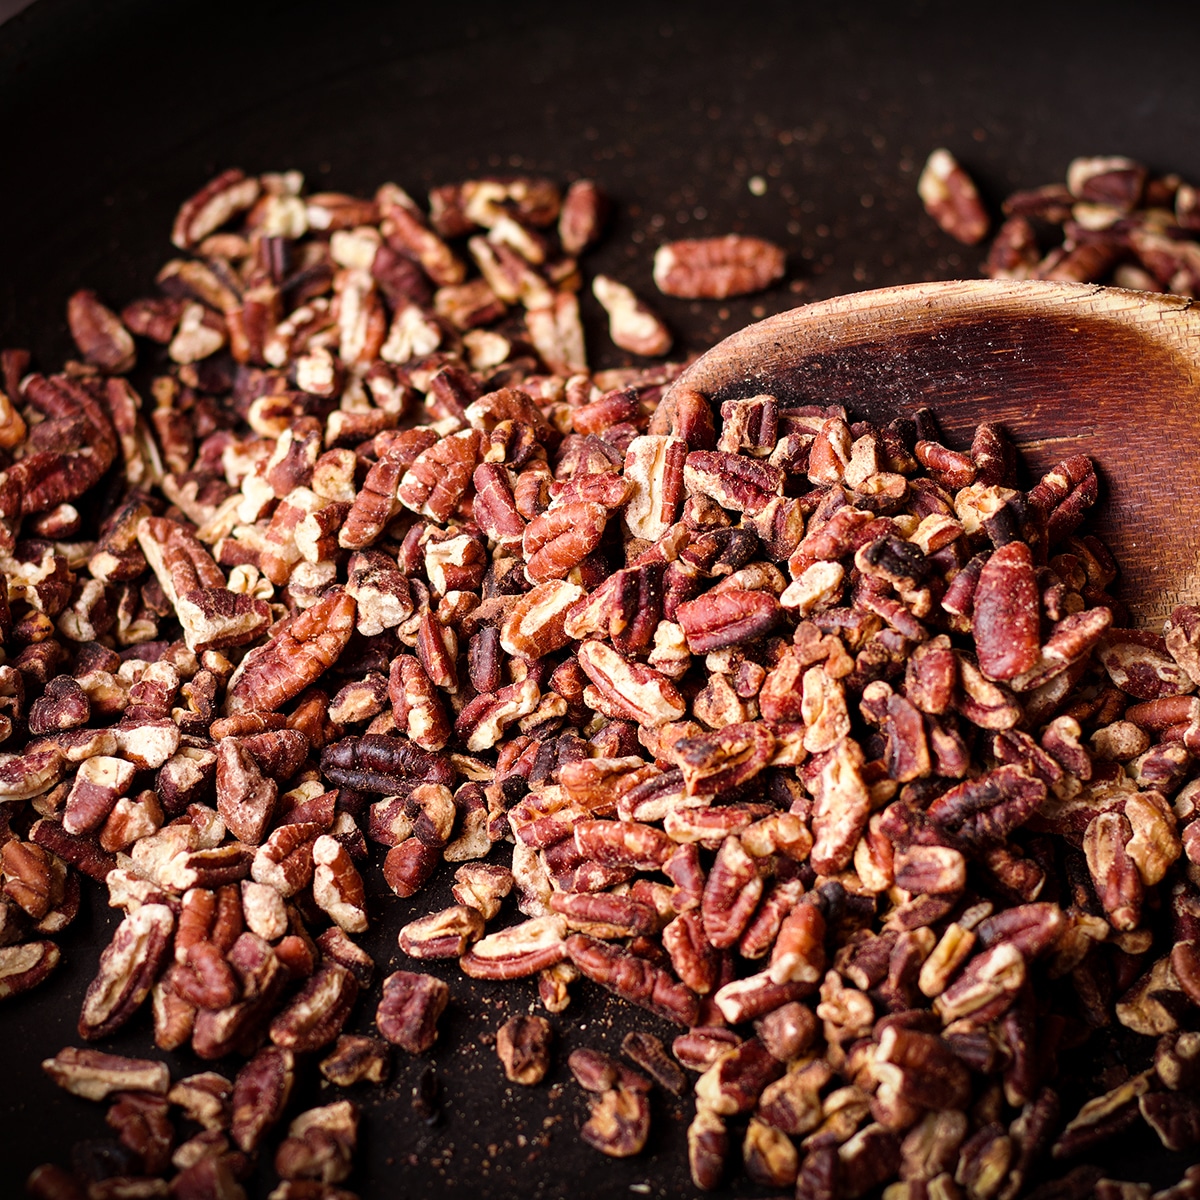
Toasting the pecans intensifies their flavor. Simply add chopped pecans to a skillet and cook them over medium heat until they are golden brown and smell toasted. Allow them to cool before adding them to the cookie dough. To speed up the process, place them in the refrigerator.
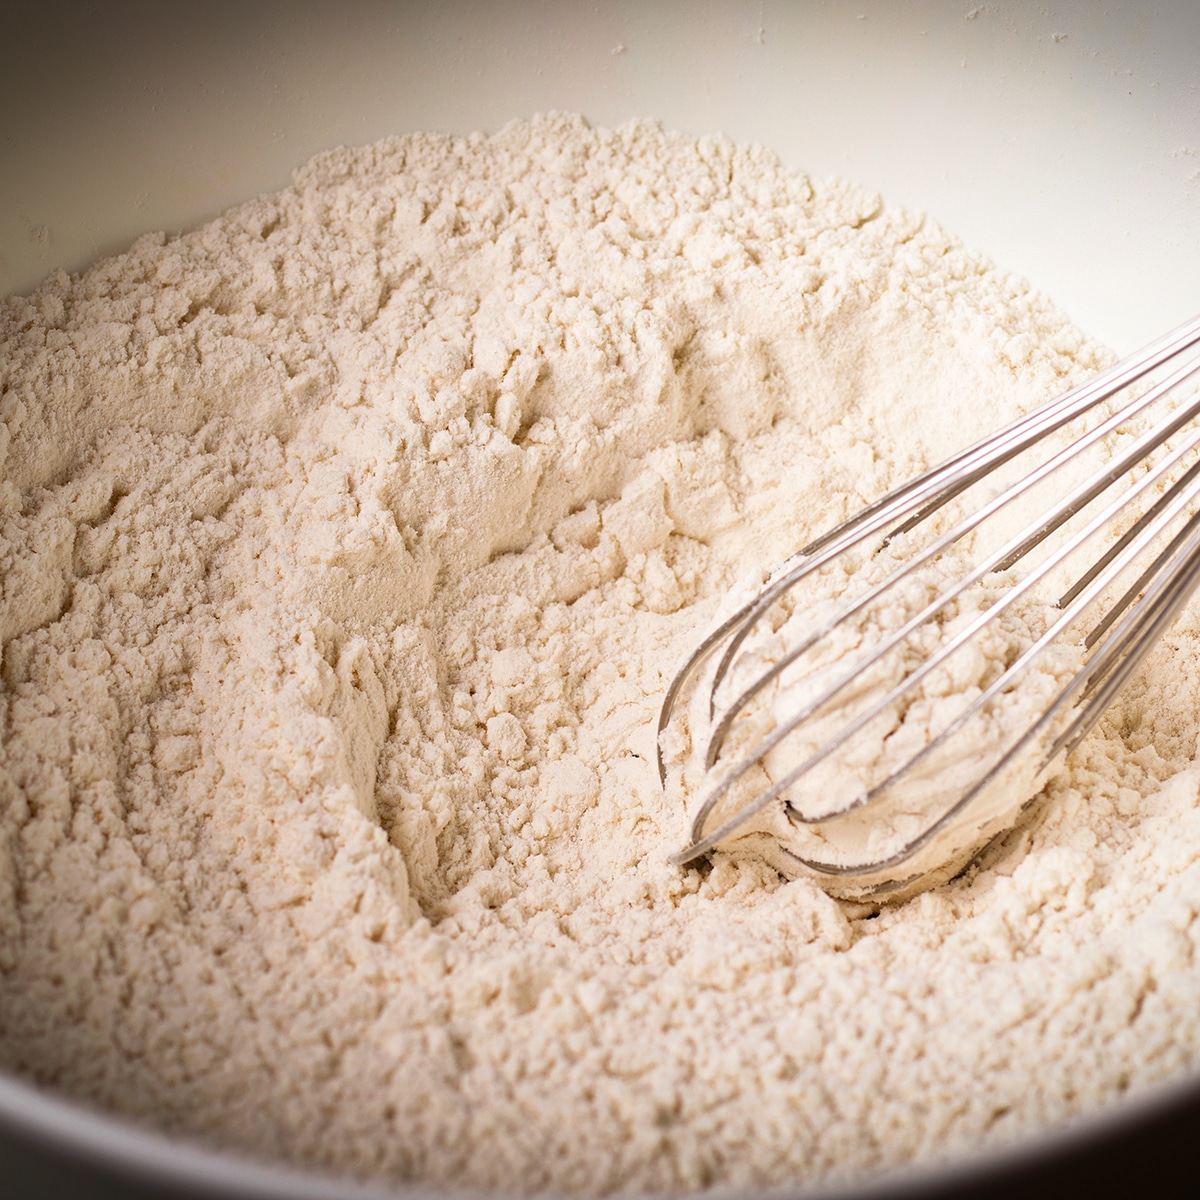
Add the flour, baking soda, cornstarch, and salt to a bowl and stir with a wire whisk to combine.

Use an electric mixer to beat the brown butter, brown sugar, eggs, vanilla extract, and almond extract until the mixture is creamy, light in color and looks aerated and fluffy.
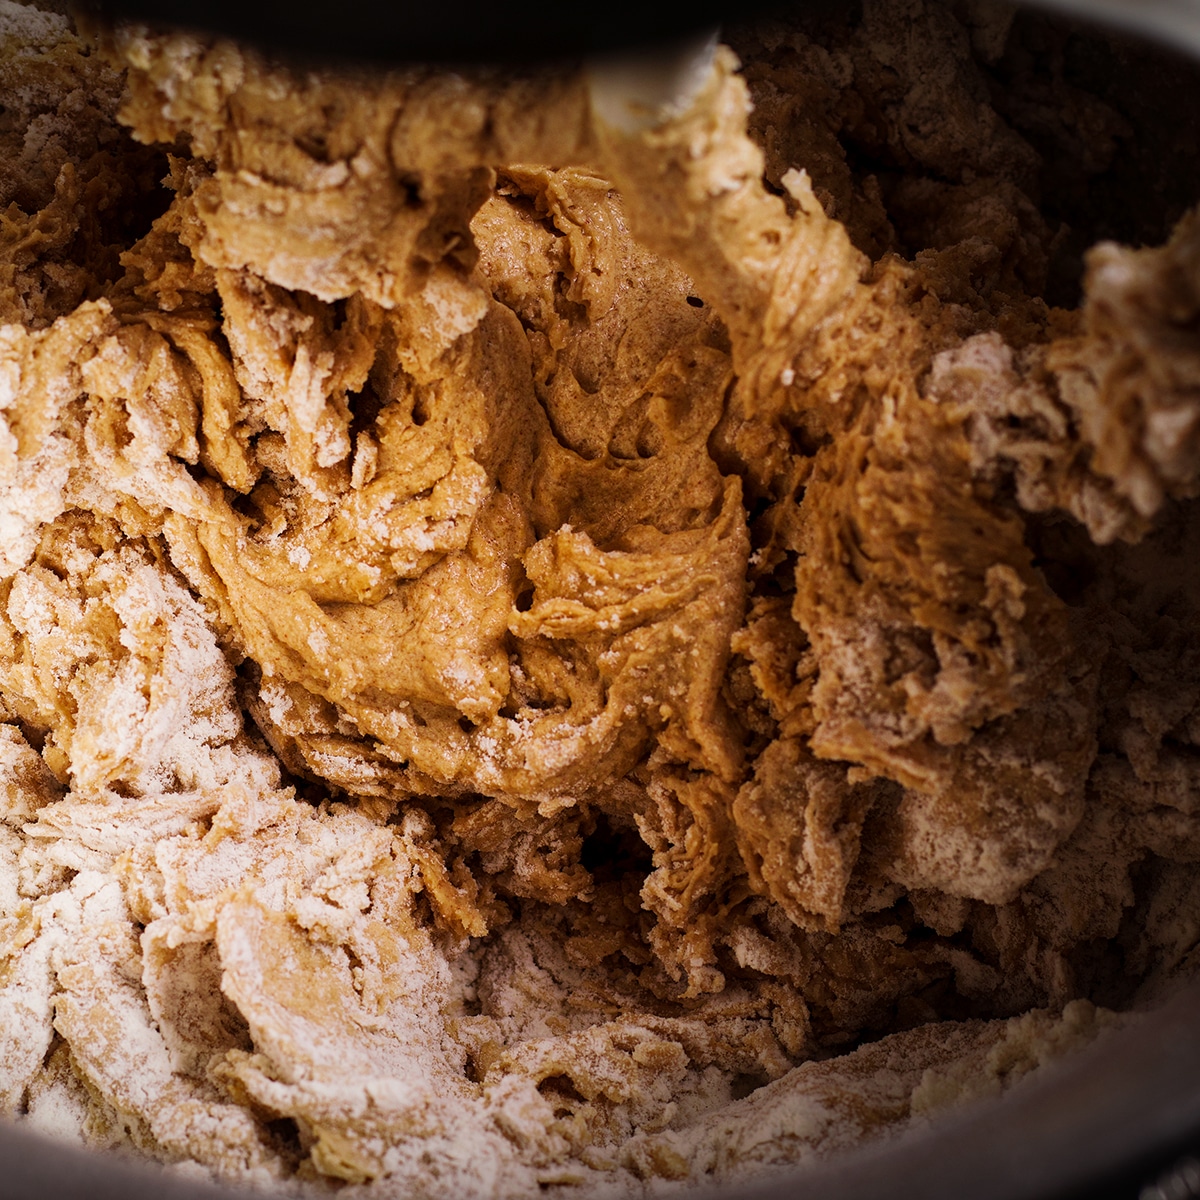
Add the flour mixture and mix on low speed until it's about 50% combined.
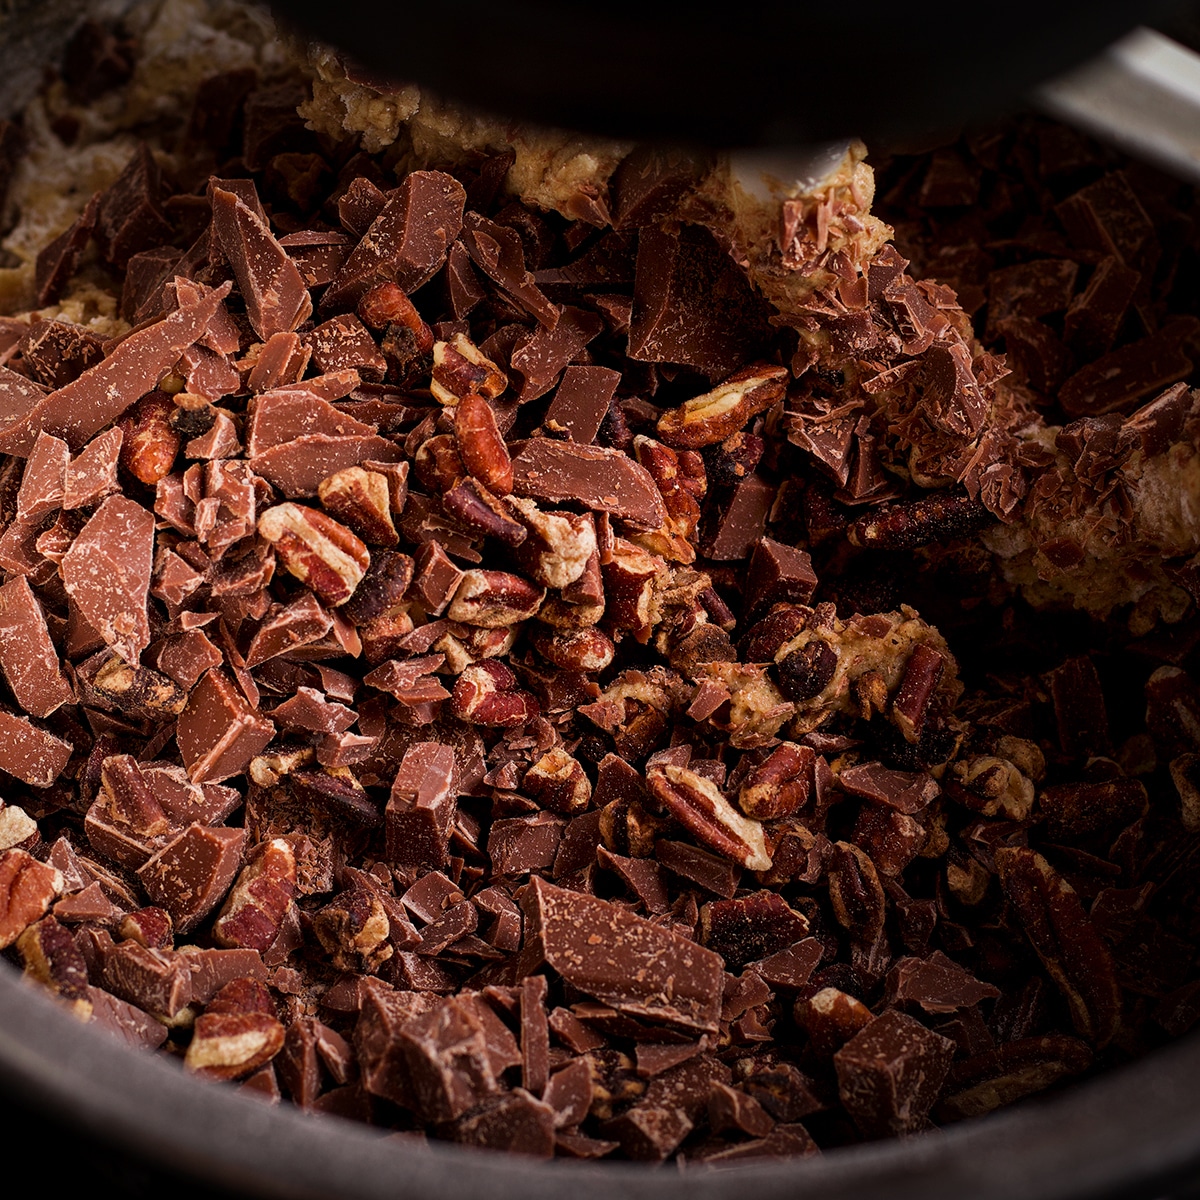
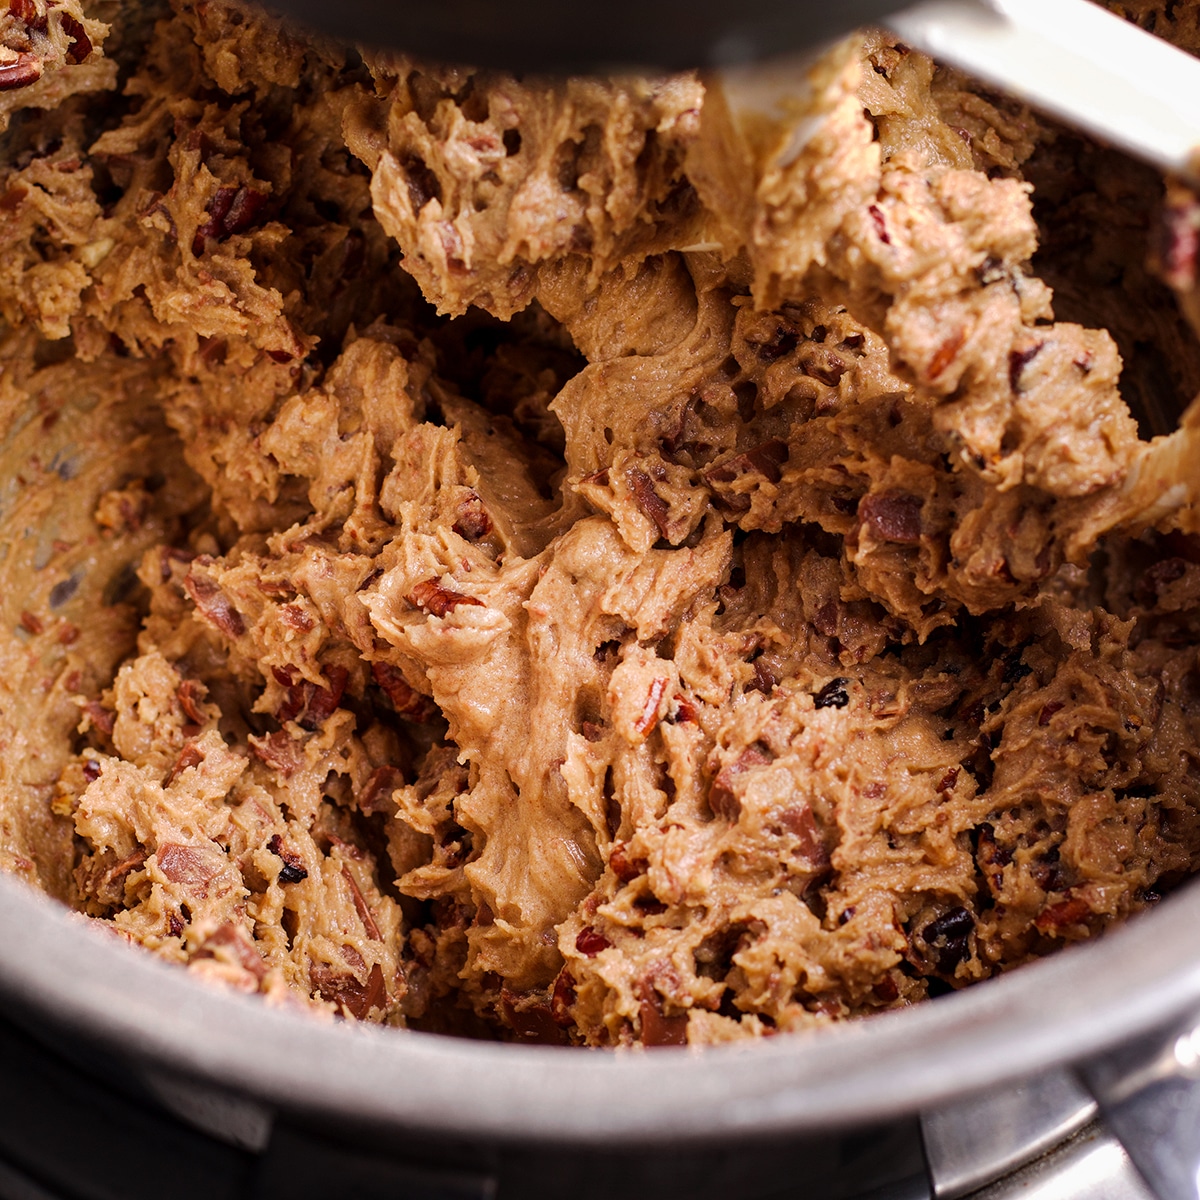
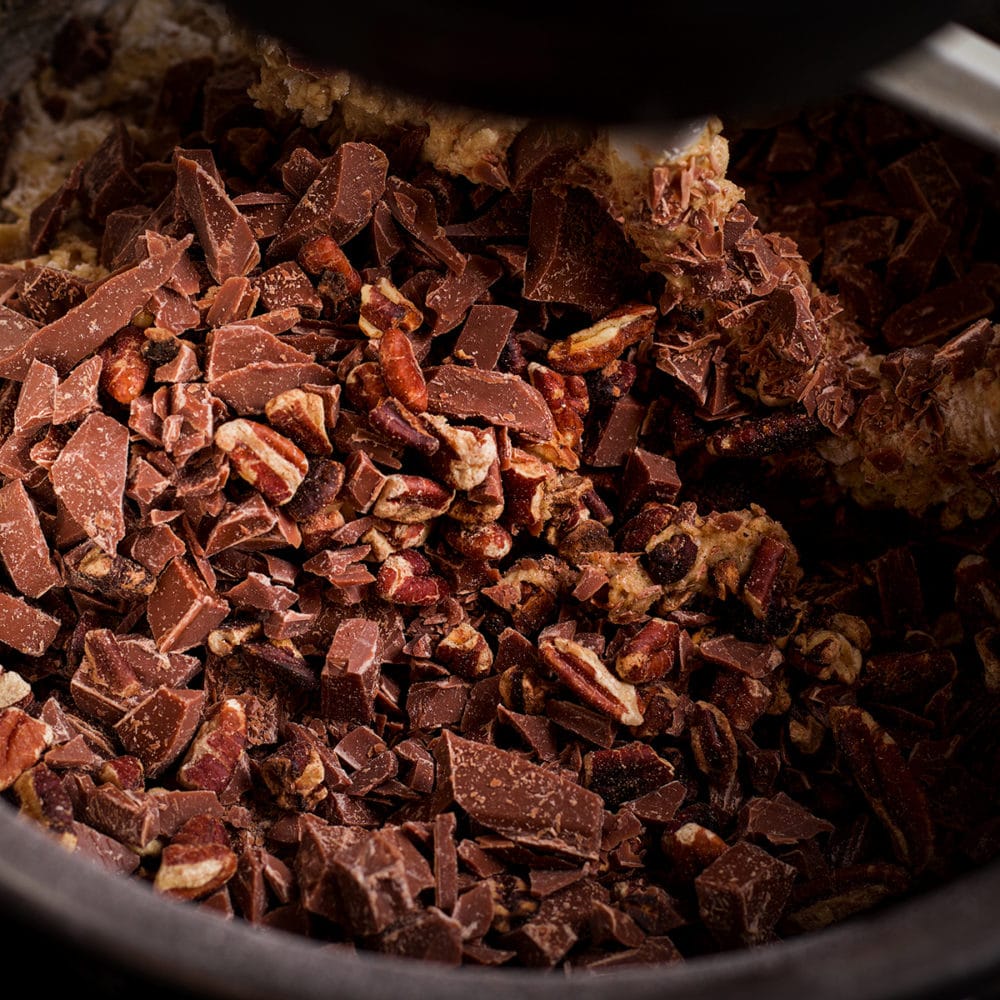
Add the pieces of chopped chocolate and toasted pecan pieces and stir just until everything is incorporated.
Scoop the cookie dough into a bowl, cover, and refrigerate for at least 12 hours and up to 2 days. The longer the better! See information below about why.
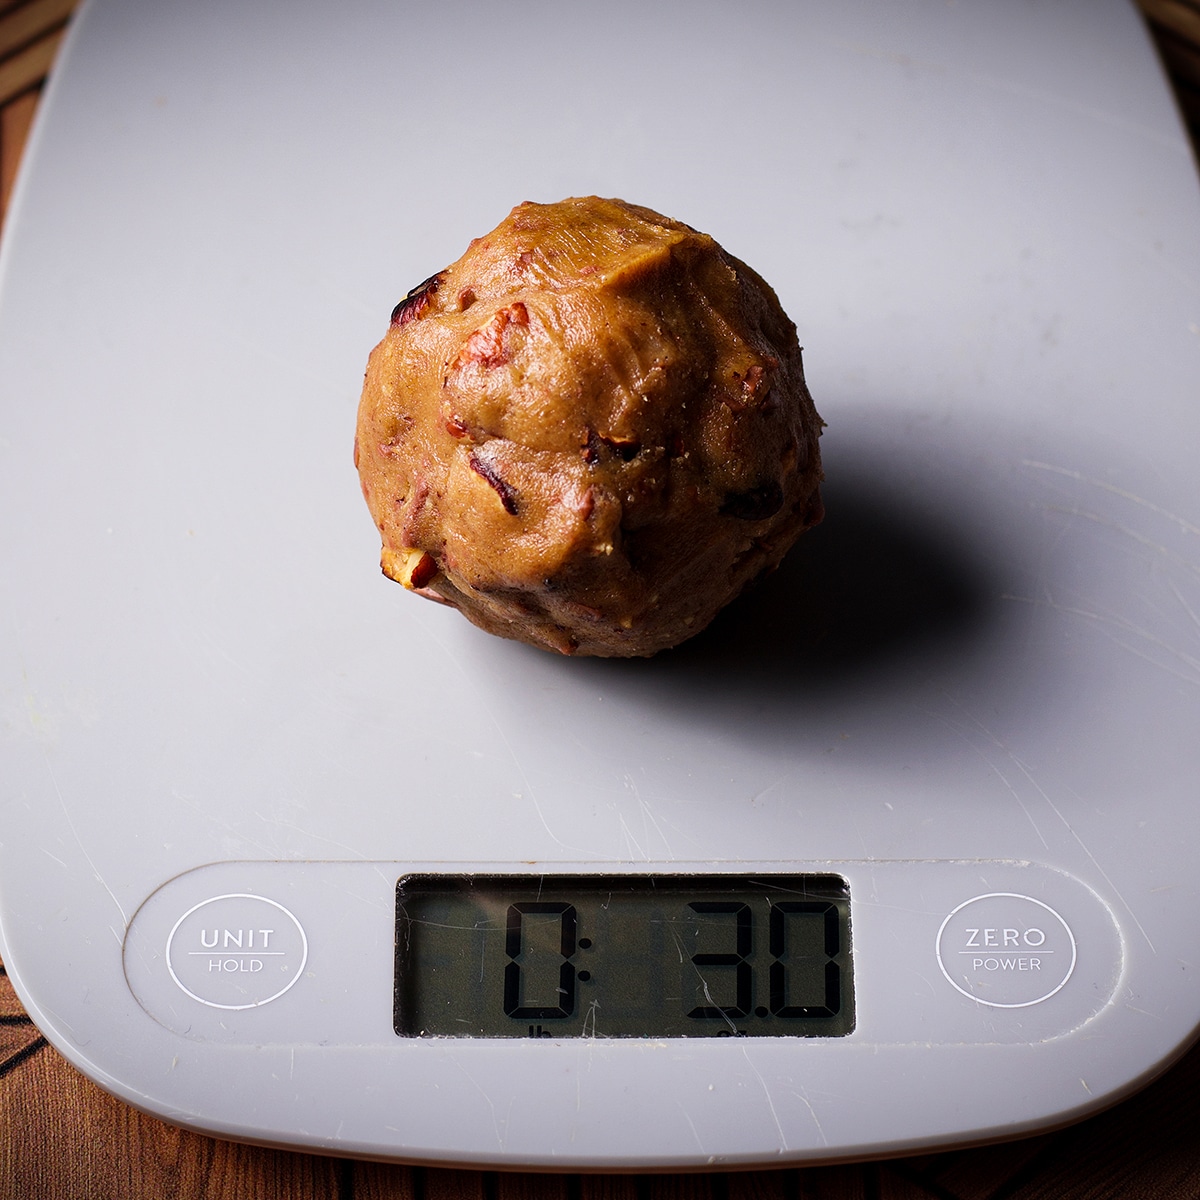
Form the dough into balls that weigh about 3 ounces each. This recipe will make 16 cookies so in lieu of weighing the balls of cookie dough, you can just divide the cookie dough into 16 pieces.

Set the balls of dough on a cookie sheet, spacing them at least 3 inches apart, and bake!
How to Make Brown Butter
Using brown butter in these cookies gives them a serious flavor boost.
Making brown butter requires nothing more than cooking butter until it melts, boils, and then turns a rich golden color. As the butter browns, it acquires a rich nutty flavor and toasted aroma that is SO GOOD in these cookies.
Here's how to make brown butter:
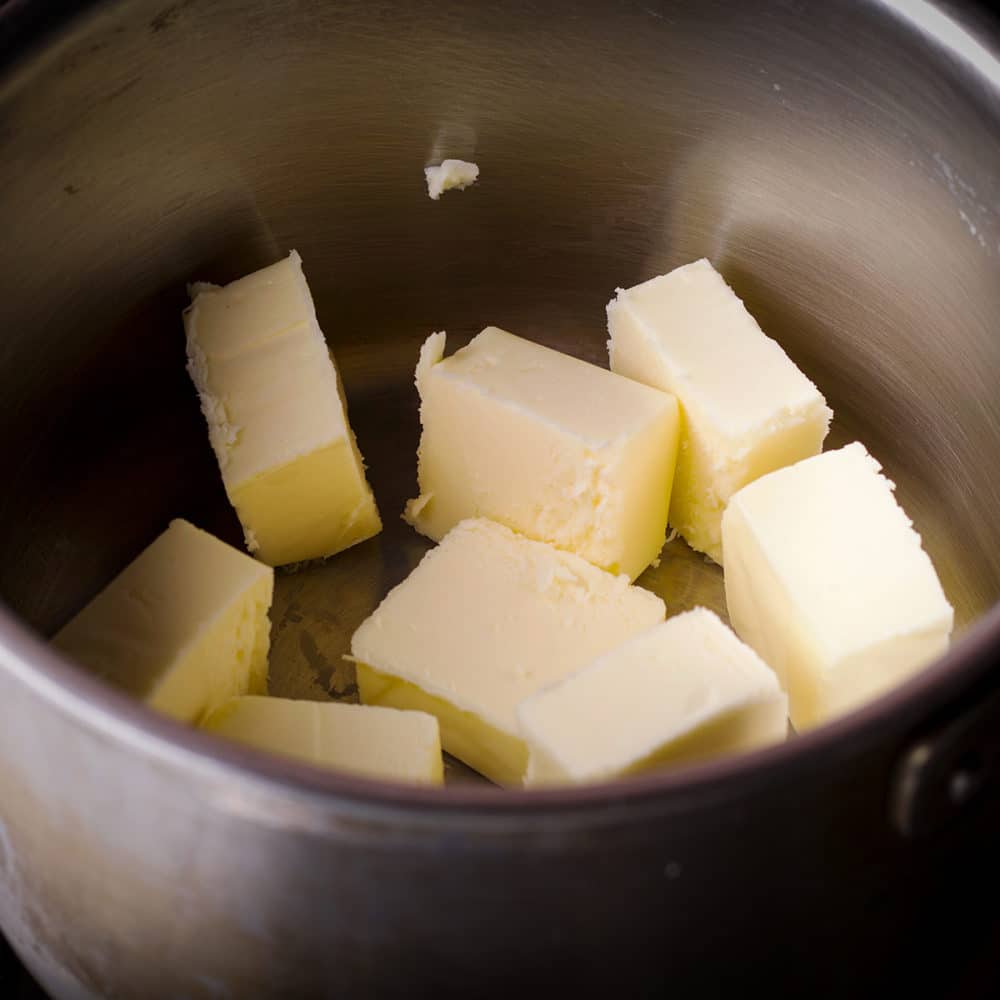
#1. Cut the butter into chunks and place it in a medium size light-colored saucepan. Using a light colored pan is important because dark pans make it difficult to see when the butter is browned.
#2. Set the pan over medium heat and cook until the butter is melted and begins to boil.
It's important to stir the butter constantly while it cooks to help it brown evenly and prevent any of the butter from burning. As the butter cooks, it will foam up, and then the foam will recede.
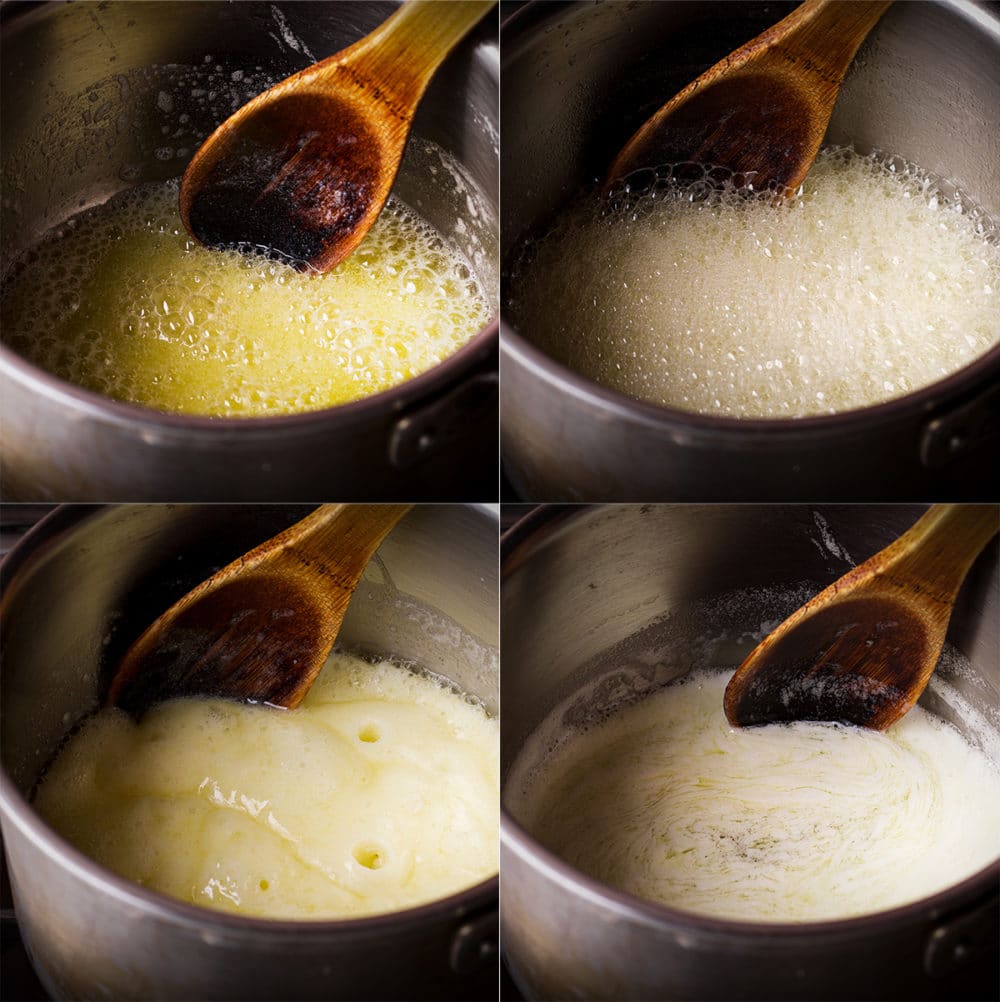
#3. Right before the butter begins to brown, it will foam up again, but the foam won't be as thick as before.
The foam will make it difficult to see when the butter is beginning to brown, so as you stir, pay attention to the color of the butter underneath the foam.
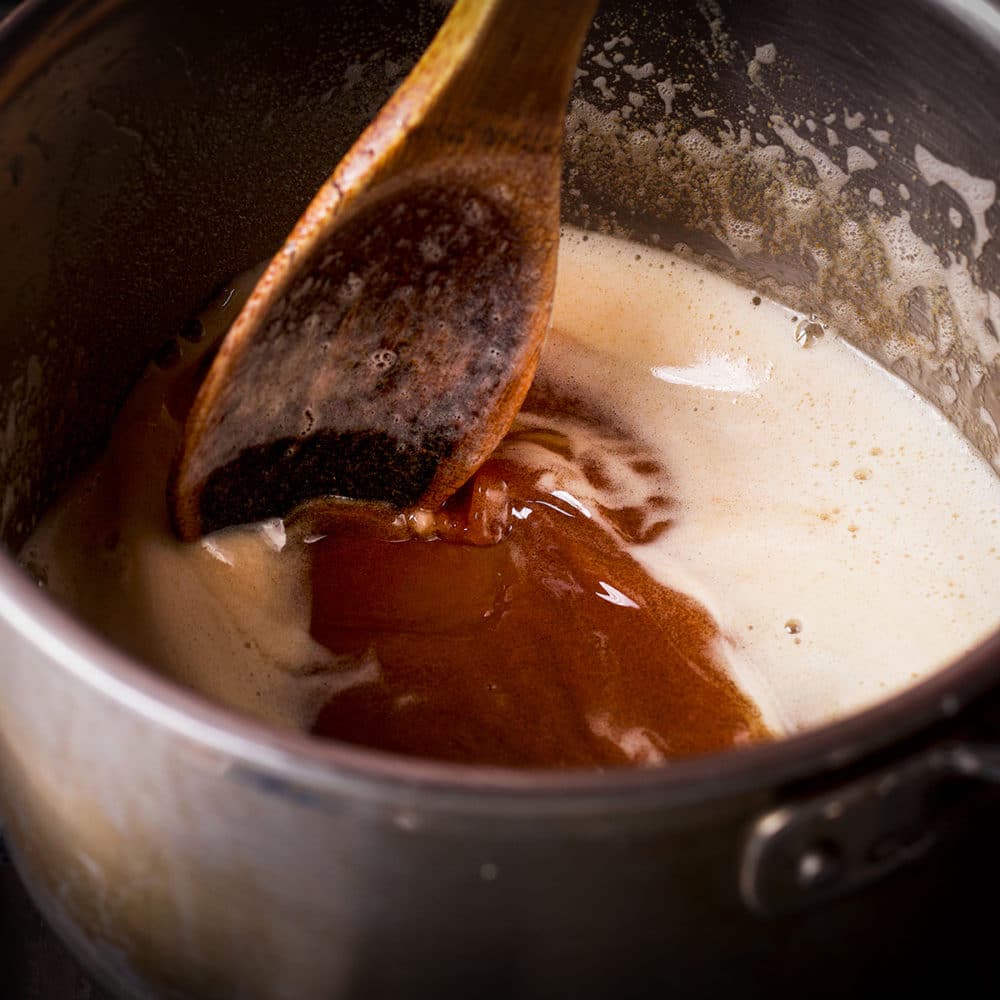
#4. Remove the pan from the heat when the butter is golden brown with dark brown specks on the bottom of the pan.
It will smell nutty and look a bit like a dark, foamy beer. The whole process only takes about 6-8 minutes.
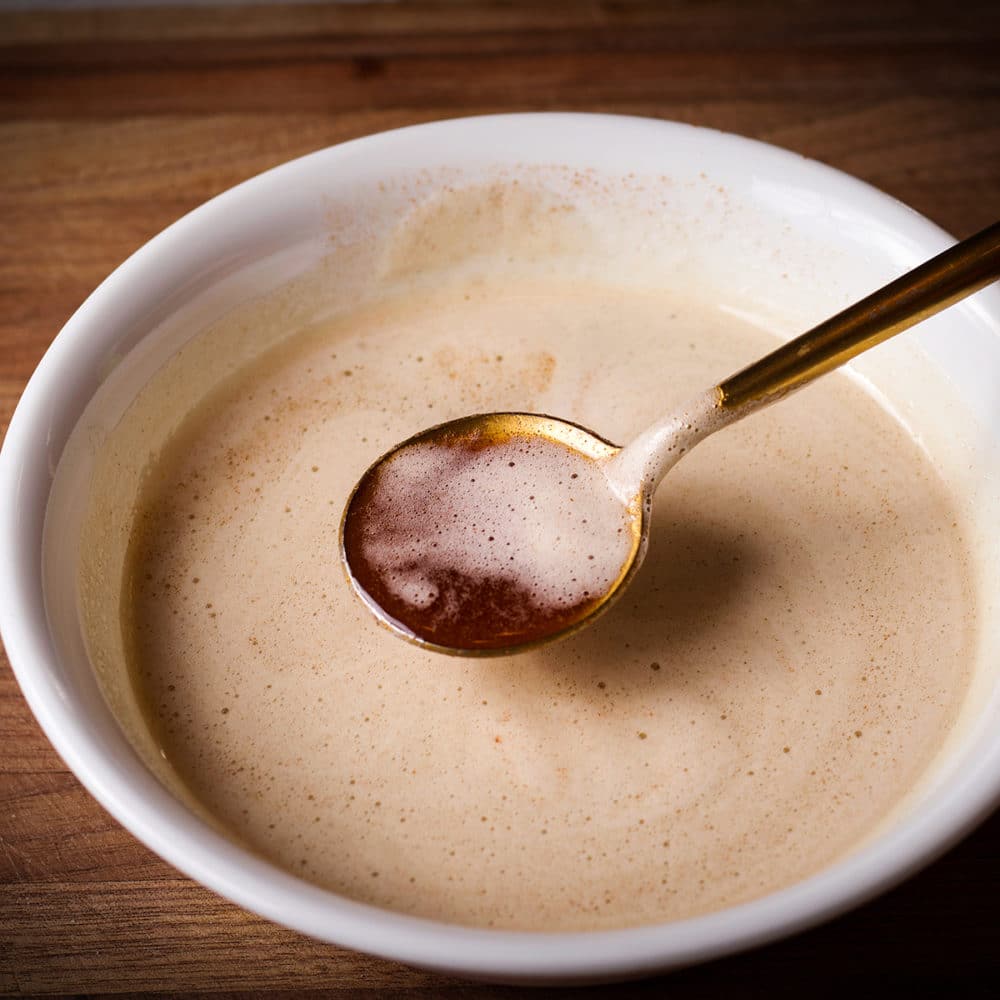
#5. Once browned, pour the butter into a small bowl and let cool until it's barely warm to the touch.
You can brown the butter in advance if you like. Brown butter will keep in the refrigerator for up to 2 weeks.
Because this recipe calls for melted butter, simply melt the browned butter gently on the stovetop or in the microwave before using it to make this cookie dough. When you add the butter to the cookie dough, it should be melted, but not hot.
Because one can never have too many brown butter cookie recipes, here are three more:


5 Secrets to Thick and Gooey Cookies
#1. Three words for softest, most delicious cookies: Melted brown butter.
Many cookie recipes (like this recipe for soft chocolate chip cookies) start by creaming room temperature butter and sugar. The creaming process incorporates air into the dough which gives cookies a light, firm texture.
But, to create cookies that are dense and chewy, with a gooey center, melted butter is where it's at.
To give these cookies even more flavor, I browned the butter first. More about that later but it raises the delicious factor by about 1000%.
#2. Brown Sugar adds flavor and chewiness.
Granulated sugar creates cookies that are thin and crisp. Brown sugar creates cookies that are thick and moist.
While creating this recipe, I tested several batches of cookies that used a mix of white and brown sugar. In the end, the cookies made with all brown sugar were the most thick and gooey.
Brown sugar also adds more flavor to the cookie dough, so it's a win-win.
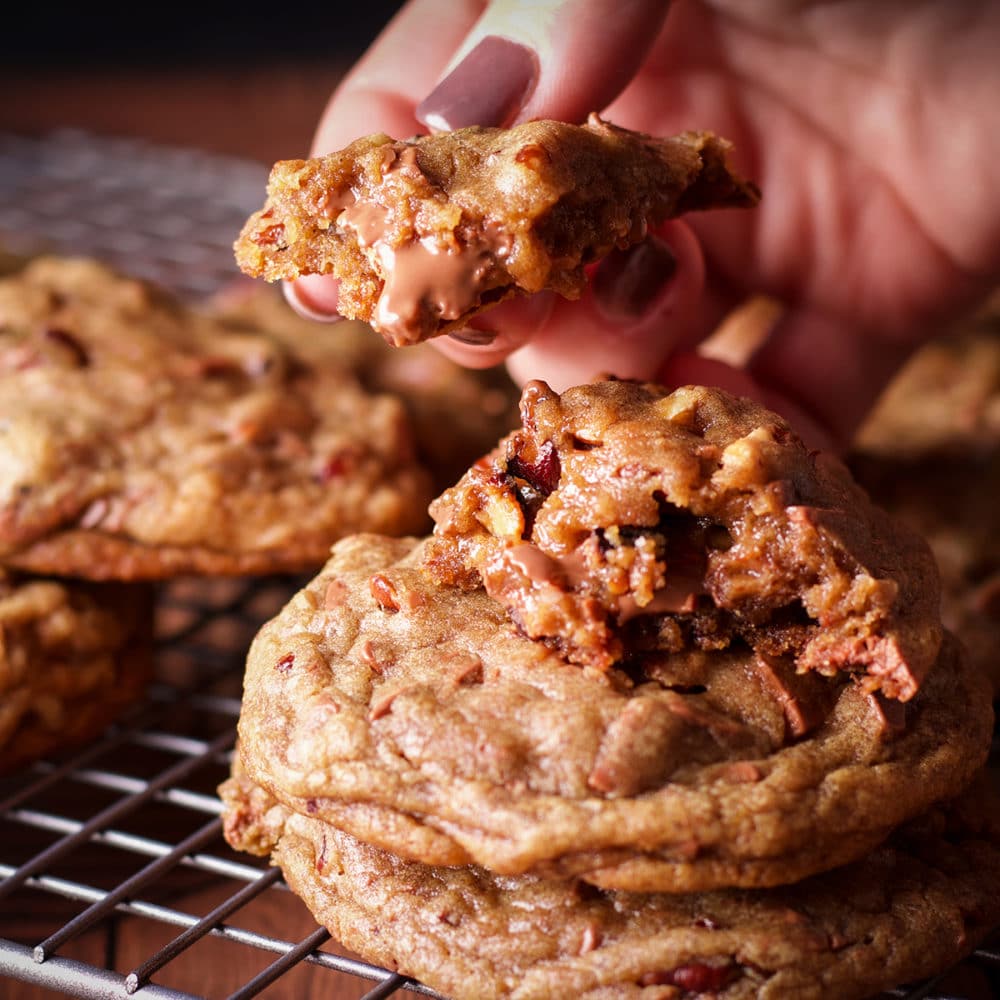
#3. Huge cookies = extra gooey centers.
Three ounces of dough per cookie makes really big cookies. You could make these cookies smaller... but you won't get the same super gooey center.

#4. Use lots and lots (and lots!) of chopped milk chocolate.
I tested these cookies with various amounts of milk chocolate chips and chopped milk chocolate bars.
In the end, I preferred chopped chocolate bars over chocolate chips because it gives you a variety of sizes of chocolate pieces to fold into the dough. This means you'll get some small pieces of chocolate all throughout the dough and still have some larger pieces in there for those delicious pockets of melted chocolate.
I also used a whopping 11 ounces of chocolate in these cookies, which might seem like too much when you're mixing up the dough, but trust me on this - it isn't.
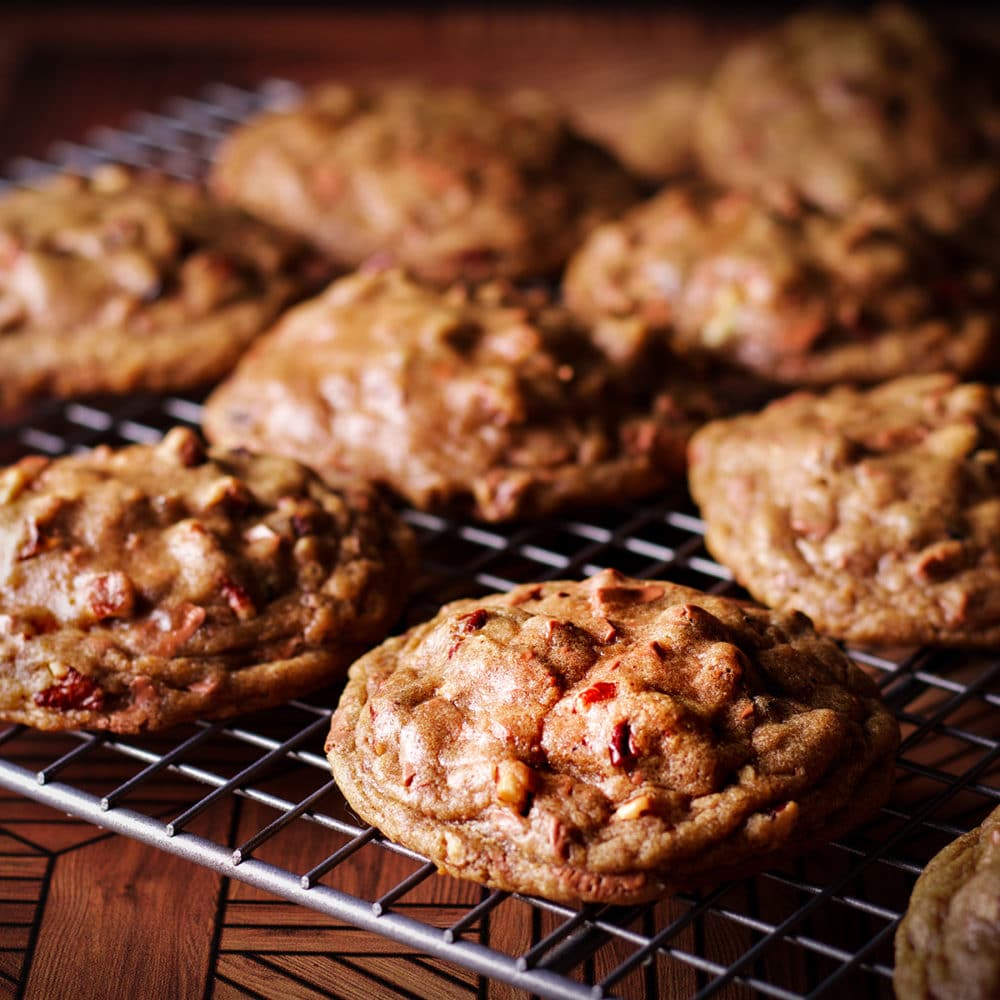
#5. Under-bake your cookies!
I over-baked batch after batch of these cookies, before realizing that just 12-13 minutes is the perfect amount of time to create cookies with a super soft, deliciously melty center.
You will think that it's a mistake to take them out of the oven after just 12 or 13 minutes. The cookies won't look done. Do it anyway.
They'll firm up a bit as they rest, but not so much that you'll lose that soft, gooey center.

Why It's Important to Let Cookie Dough Rest
Arrrggg. I know, I know that making cookie dough and then waiting for at least a day to bake them is super duper hard and I hate it.
Usually when I decide to make cookies it's because I want a cookie right now. But, let me tell you, allowing the cookie dough sit in the refrigerator for a while really, truly does make a better cookie.
Years ago, French Pastry Chef Jacques Torres revealed that allowing chocolate chip cookie dough to rest in the refrigerator for several hours was the secret to the best tasting cookies.
Since, then chocolate chip cookie recipes everywhere advocate for this technique for the simple reason that it works. Putting the cookie dough in the refrigerator for at least 12 hours actually does produce better tasting chocolate chip cookies.
Why does refrigerating the dough create more delicious cookies?
The super simplified answer is this: As the dough hangs out in your refrigerator, some of the proteins and starches begin to break down, creating enzymes that make for a more flavorful cookie.
Also, allowing the dough to rest hydrates the flour and redistributes the liquid in the dough. This helps the cookies bake and brown more evenly. It also gives the sugar time to absorb some of the moisture in the eggs. That absorption of moisture is part of what gives these cookies their deliciously dense, chewy center.
If you really can't wait (and who could blame you), do what I usually do and bake up a couple of cookies right after mixing up the dough, then put the rest in the refrigerator to bake in a day or two. It's the best of both worlds - immediate AND delayed gratification.
OR, a possibly even better suggestion is to whip up a quick batch of no bake hot chocolate mix cookies to snack on while you very patiently allow the chocolate chip pecan cookie dough to rest. 🙌
How to Store and Freeze these Cookies
If you store these cookies in an air-tight container at room temperature, the centers of the cookies will stay soft and delicious for at least 3 days after baking.
But, my favorite way to eat these cookies is warm from the oven. So, I like to keep 3-ounce balls of cookie dough in my freezer, ready to bake whenever the craving strikes. In fact, if you were to glance inside my freezer at basically any time you'd be likely to find raw chocolate chip pecan cookie dough balls, these gourmet cookie dough balls, and balls of anything cookies stuffed with whatever ingredients I happened to have on hand when I made the dough.
Simply shape 3 ounce balls of dough and pop them in an air tight container or freezer bag. The cookies can be baked straight from the freezer, no need to thaw the dough.
Bake frozen cookie dough in a preheated 350 degree oven for 20 minutes.
Recipe FAQs
Toasting the pecans before using them in this cookie dough concentrates their nutty flavor and gives them a crunchier texture. For both of these reasons, I feel the few minutes spent toasting chopped pecans in a skillet is 100% worth it.
I prefer to use chopped chocolate because chopping up a bar gives you a variety of sizes of chocolate pieces to fold into the dough. This means, you'll get some small pieces of chocolate all throughout the dough and still have some larger pieces to give you those delicious pockets of melted chocolate.
Having said that, using milk chocolate chips also creates really fabulous cookies, so if you'd rather go the chocolate chip route, your cookies will still be chocolatey and delicious.
I almost always prefer using semi-sweet or dark chocolate in my desserts. But, for these cookies, I tested both and preferred milk chocolate.
There's something about the combination of toasted pecans, brown butter and milk chocolate that just works for me. Also, milk chocolate gave these cookies the gooiest center, especially when they were eaten warm.
But, if you're skeptical, test both and see what kind of chocolate you prefer in your cookies.
Yes! If you don't have a milk chocolate bar but you do have chocolate chips, you could roughly chop them and add them in. However, chocolate chips are made so that they will hold their shape while baking. So, you won’t get as much chocolate spread with chips as you do from bars.
If you're going to use chocolate chips, I'd recommend just using them whole. These are also super delicious when made with chocolate chips. 🙂
If you want cookies with the ultimate soft, gooey center, large cookies are where it's at.
The easiest way to ensure large, uniform cookies is to use a kitchen scale. Plop enough dough on the scale to get you to 3 ounces, then shape it into a ball and place it on the cookie sheet.
Kitchen scales are inexpensive and quite useful, so if you don't have one, consider adding one to your kitchen.
More Popular Chocolate Chip Recipes
- Chocolate Chip Cake with Peanut Butter Fudge Icing
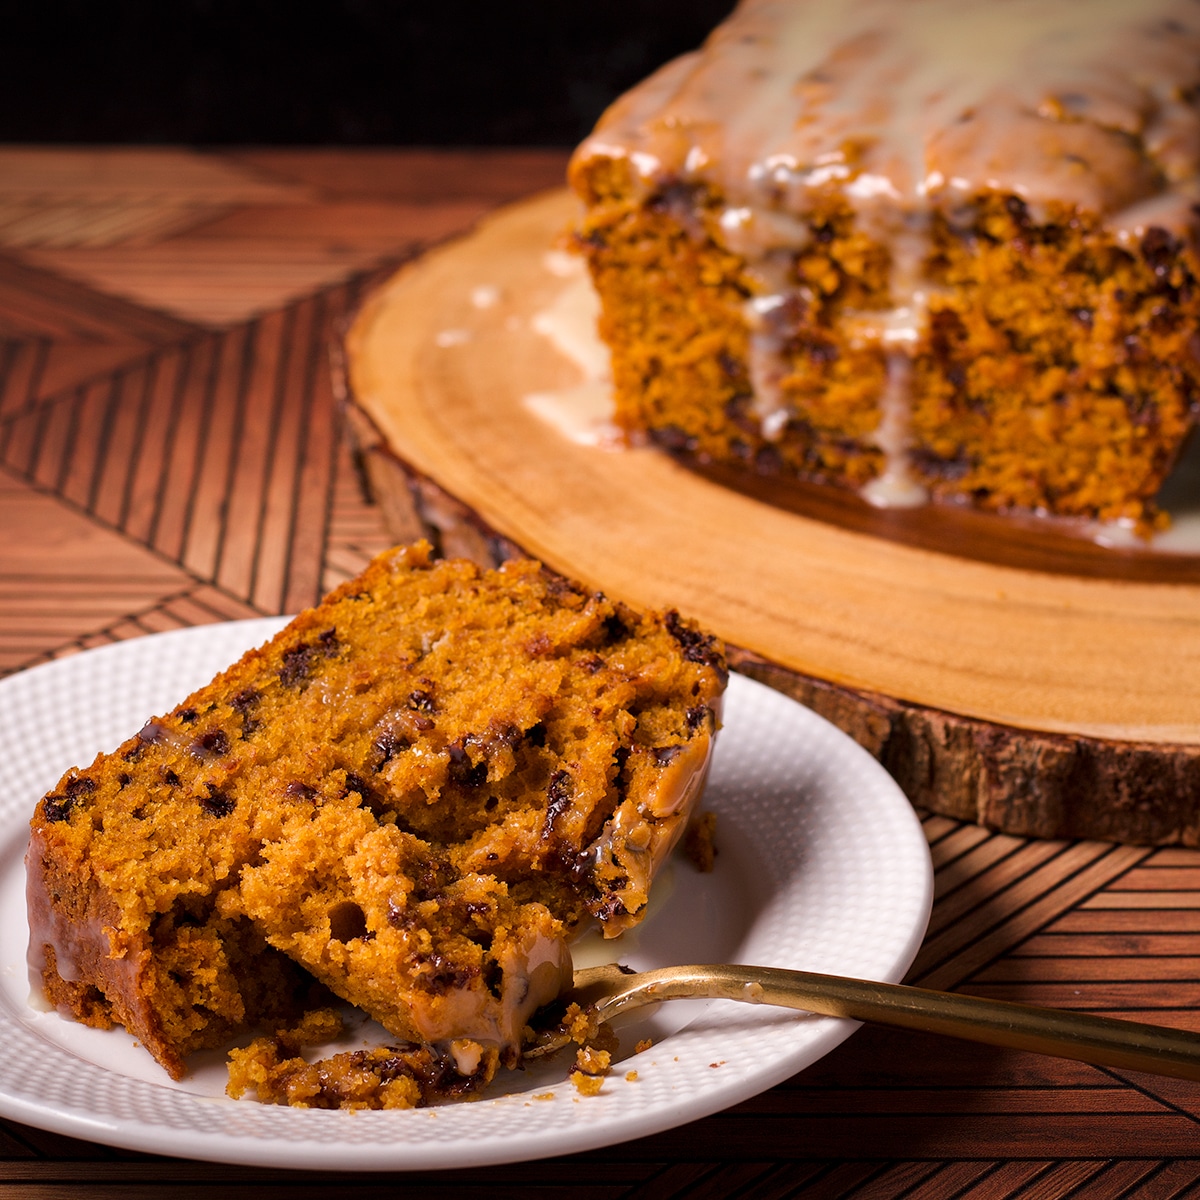
- Pumpkin Chocolate Chip Bread with White Chocolate Ganache
- Perfectly Soft Chocolate Chip Cookies
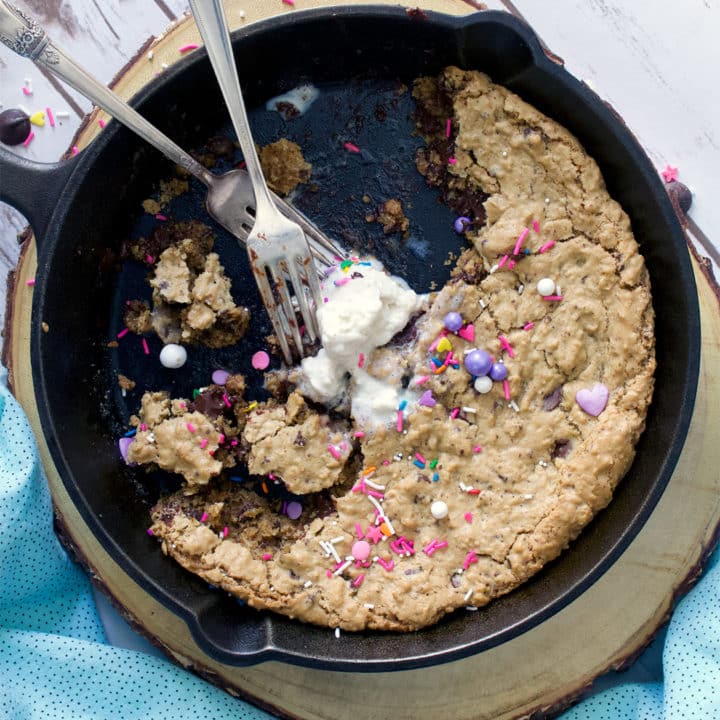
- Skillet Cookie with Chocolate Chips and Oatmeal
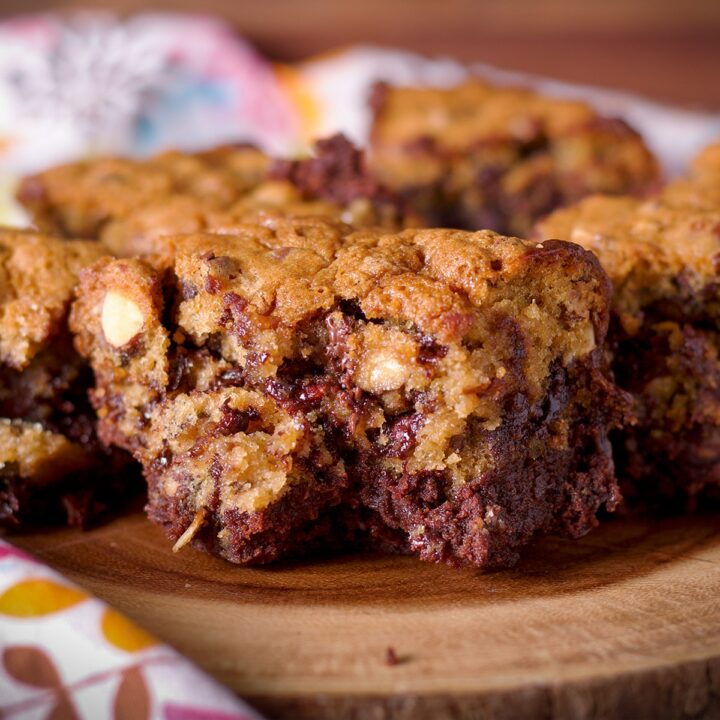
- Brookies ~ Chocolate Chip Cookie Brownie Bars
- Peanut Butter Oatmeal Chocolate Chip Cookies
- Gluten Free Chocolate Chip Ginger Cookies
- The BEST Chocolate Chip Cookie Recipe

+ Subscribe to my newsletter for new and exclusive recipes in your in-box every month! As a full time traveler, living, working, cooking, and baking from a 5th wheel RV, it's also where I share our experiences of life on the road.
📖 Recipe
Chocolate Chip Pecan Cookies
These chocolate chip pecan cookies are extra thick with a soft, gooey center loaded with milk chocolate chips and crunchy, toasted pecans.
Ingredients
- 8 ounces (226 grams; 16 tablespoons) unsalted butter
- 6 ounces (168 grams; about 1 ⅓ cups) chopped pecans
- 2 cups (240 grams) all-purpose flour
- ¾ teaspoon baking soda
- 2 teaspoons cornstarch
- 1 ¼ teaspoons kosher salt
- 1 ¼ cup (266 grams) packed light or dark brown sugar
- 2 large eggs
- 3 teaspoons pure vanilla extract
- 1 teaspoon almond extract (optional)
- 11 ounces (311 grams) of milk chocolate, chopped
Instructions
- (See photos above for reference) Cut the butter into chunks and put it in a medium size light-colored saucepan. (Dark pans make it difficult to tell when the butter is browned.)
- Set the pan over medium heat and, stirring constantly, cook until the butter is melted and begins to boil.
- As the butter cooks, it will foam up, then the foam will recede. Right before the butter begins to brown, it will foam up slightly again. As you stir, pay attention to the color of the butter underneath the foam. The butter will take approximately 6-8 minutes to brown.
- When it's done, the butter beneath the foam will be golden brown with dark brown specks on the bottom of the pan and will smell nutty. It will look a bit like a dark, foamy beer. Once browned, pour the butter into a small bowl and let cool until it's barely warm to the touch. (*See note below about how to brown the butter in advance.)
- Add the chopped pecans to a large, dry skillet and set the skillet over medium heat. Cook, stirring occasionally, until the pecans are golden brown and smell toasted, about 6-8 minutes. Set aside to cool. Place the bowl in the refrigerator if you want the pecans to cool quickly.
- Add the flour, baking soda, cornstarch, and salt to a bowl and stir with a wire whisk to combine.
- Using a hand-held mixer or stand mixer fitted with a paddle attachment, beat the brown butter, brown sugar, eggs, vanilla extract, and almond extract (if using), on medium high speed for 2-3 minutes to combine. It will lighten in color.
- Add the flour mixture and mix on low speed just until about 50% combined. Add the pieces of chopped chocolate and toasted pecan pieces and stir just until barely incorporated.
- Scoop the cookie dough into a bowl, cover, and refrigerate for at least 12 hours and up to 2 days. (The longer the better. See note below about why.)
- When ready to bake the cookies, heat the oven at 350 degrees F (176 degrees C). Cover a baking sheet or two with parchment paper.
- Form the dough into very large balls that weigh 3 ounces each. (*See note below) Set the balls of dough on the cookie sheet, being careful to space them at least 3 inches apart.
- Bake the cookies for 12 minutes. 20 min from frozen.
Brown the Butter:
Make the Cookies:
Notes
- Brown butter will keep well in the refrigerator for up to 2 weeks. If you want to make it in advance, simply pour it into an airtight container and store it in the refrigerator until you're ready to make the cookie dough. Before making the dough, melt the browned butter gently on the stovetop or in the microwave. When you add the butter to the cookie dough, it should be melted, but not hot.
- Refrigerating the dough for at least 12 hours and up to 2 days improves the flavor of these cookies significantly.
- Can you use milk chocolate chips instead of chopping a chocolate bar? Yes, absolutely!
- Can you use semi-sweet chocolate instead of milk chocolate in these cookies? Again, yes! Use any kind of chocolate you want in these cookies, even white chocolate.
- These chocolate chip pecan cookies are meant to be large. Baking them as large cookies ensures an ultra-gooey center. Use 3 ounces of dough per cookie. This amounts to a generous 4 tablespoons of dough. We're not messing around here, people.
- The centers of these cookies will stay soft and delicious for at least 3 days after baking. Store them in an airtight container at room temperature.
- My favorite way to eat these cookies is warm from the oven. So, I like to keep 3-ounce balls of cookie dough in my freezer, ready to bake whenever the craving strikes. Simply shape 3-ounce balls of dough and pop them in an airtight container or freezer bag. The cookies can be baked straight from the freezer, no need to thaw the dough.
- Bake frozen cookie dough in a preheated 350 degree F (176 degree C) oven for 20 minutes.
Recommended Products
As an Amazon Associate and member of other affiliate programs, I earn from qualifying purchases.


Nutrition Information:
Yield: 16 Serving Size: 1 cookieAmount Per Serving: Calories: 404Total Fat: 26gSaturated Fat: 12gTrans Fat: 0gUnsaturated Fat: 12gCholesterol: 58mgSodium: 188mgCarbohydrates: 39gFiber: 2gSugar: 24gProtein: 5g
M says
My dough was rock hard coming out of the fridge. I left it for around 30 mins but it was still hard. I used a knife to cut out chunks to meet the weight. I was able to mould it into balls with some effort. However the cookie barely flattened when I baked it and it took 20 mins to be done. Any tips?
Rebecca Blackwell says
Hi there! The dough does get very hard in the refrigerator because of all that butter in there. To make it easier to shape the balls next time, I'd suggest shaping the balls of cookie dough before putting the dough in the refrigerator to rest. Pile the balls of dough into a ziptop bag or a large bowl; they will stick together a bit, but you should be able to pull them apart and roll them between your palms to reshape them slightly before baking. As for the long bake time, next time try removing them from the oven earlier even if they don't appear to be done baking. It will seem that you're pulling them out too soon, but as they settle, they firm up a bit and you're left with thick, gooey cookies. I'd suggest baking just a couple of cookies for 12 to 15 minutes max, removing them from the oven, letting them cool to room temperature and then tasting them to see what you think. That should give you a good baseline for how long you prefer to allow the cookies to bake. I hope that helps! Please let me know if you have any other questions! How was the flavor of the cookies you already baked?
Janice says
I am absolutely obsessed with these chocolate chip pecan cookies! They are a true indulgence! With their massive size, thick and soft center, and irresistible combination of milk chocolate chips and toasted pecans, these are our favorite chocolate chip cookies!
Jane says
I love these cookies! They're so flavorful and delicious. I've made them a few times, and I always get rave reviews from my friends and family.
Jessica says
I love a hefty, chunky cookie and these really did it for me. The first time I made them with walnuts, since I was out of pecans. They were delicious, but I think the second batch with pecans was even better.
Liz says
Your first picture had my mouth watering! These cookies look so delicious and gooey! My kind of cookie!
Allyssa says
Thank you so much for sharing this amazing recipe! We are going to make these again and again! They were super easy to make and so delicious! Highly recommended!